Knowledge Base:  
Corrosion Protection for Industrial Coating Contractors - Article 02: Common Forms of Corrosion
Last Updated: 09/17/2026
Corrosion Protection for Industrial Coating Contractors Certificate Program

Corrosion Protection for Industrial Coating Contractors

Article 02: Common Forms of Corrosion

Recognizing How and Where Steel Is Being Attacked

Corrosion does not always appear as an even layer of rust. It can spread across an entire surface, concentrate inside a pit, develop beneath a coating, or attack one metal because it is connected to another.
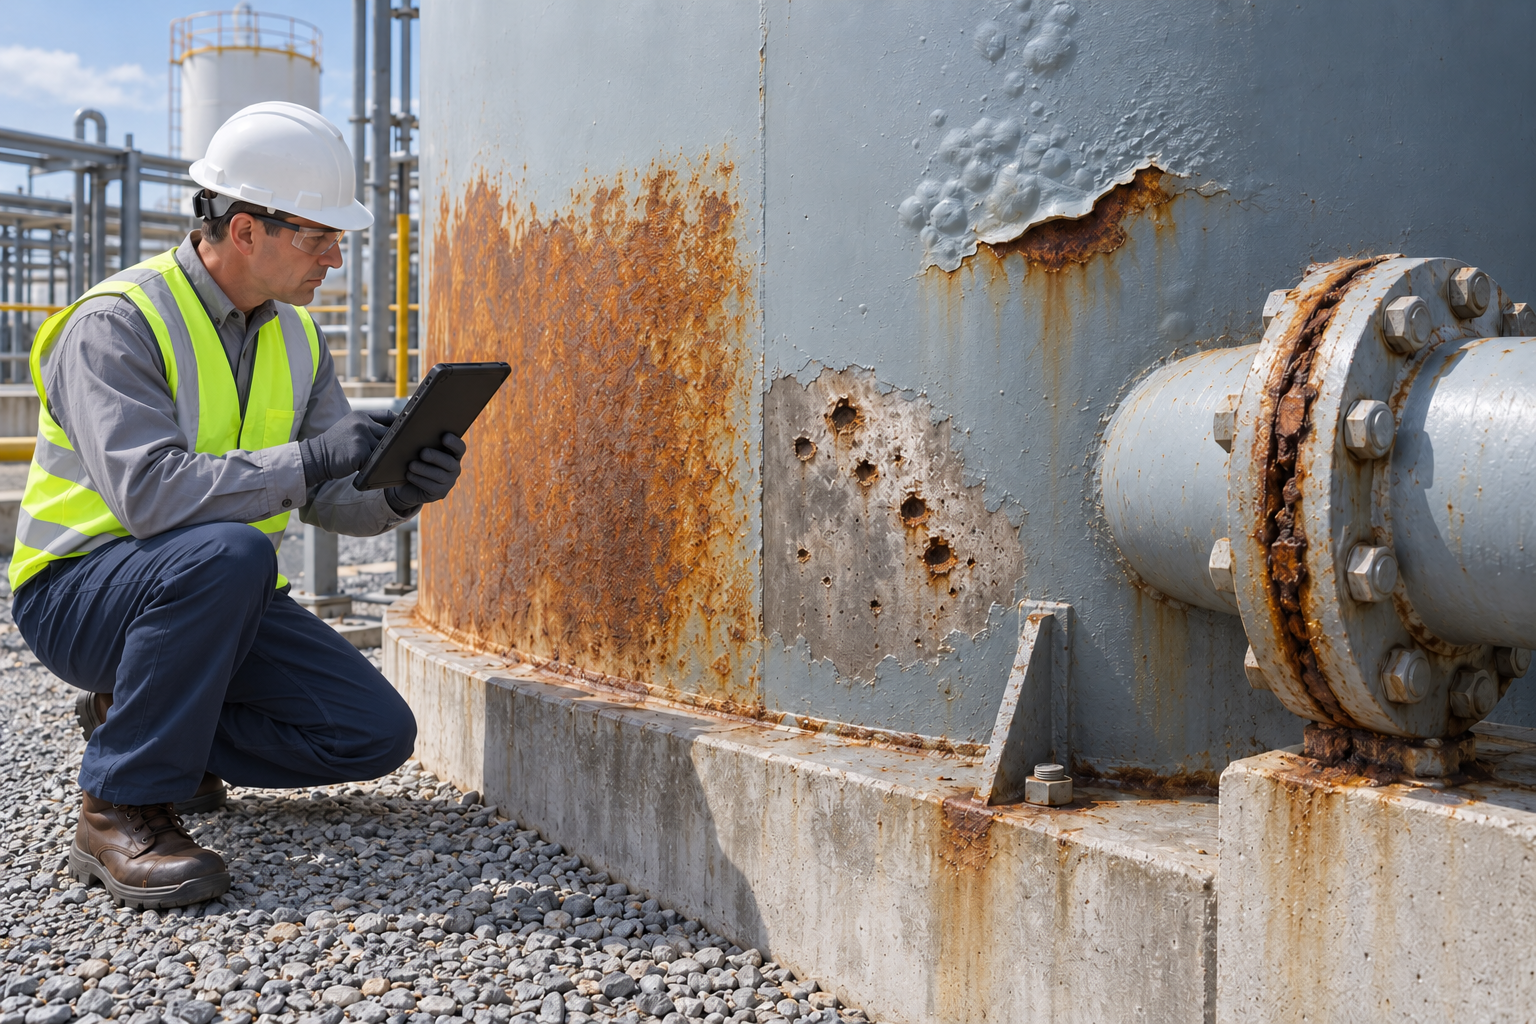
Big Idea: The appearance and location of corrosion provide clues about what caused it, how serious it may be, and what must be corrected before a new coating is applied.

Why the Type of Corrosion Matters

A coating contractor may be hired to abrasive blast and repaint a structure, but the visible rust is only part of the story. Before the surface is covered again, someone must determine why the corrosion developed and whether the cause has been corrected.

Uniform surface rust, deep isolated pits, corrosion beneath a disbonded coating, and attack between dissimilar metals do not represent the same condition. They can require different surface preparation, inspection, repair, and engineering decisions.

The contractor is not normally responsible for diagnosing structural integrity or redesigning the corrosion-control system. However, the contractor should recognize unusual conditions, document what is found, and report concerns before the evidence is removed by blasting or covered by a new coating.

Once the surface has been cleaned and coated, important clues may be lost. Photographs, measurements, inspection notes, and clear communication before surface preparation can protect both the asset owner and the contractor.


1. General or Uniform Corrosion

General corrosion is distributed relatively evenly across a large area of exposed metal. The surface may show widespread rusting, scaling, or general metal loss rather than a few isolated areas of deep attack.

This form of corrosion is often easier to see and evaluate than highly localized corrosion. Because the attack is spread across the surface, the remaining metal thickness may be more predictable than it is with deep pitting.

Where Contractors May Find It

  • Uncoated structural steel exposed to weather
  • Large areas where an old coating has worn away
  • Tank exteriors with widespread coating breakdown
  • Steel exposed to continuous condensation
  • Poorly maintained industrial structures

Contractor Concern

Widespread rust must be removed to the degree required by the specification. Remaining mill scale, rust scale, embedded contamination, and insufficient surface profile can prevent the new coating from developing proper adhesion.


2. Pitting Corrosion

Pitting is a localized form of corrosion that produces cavities or holes in the metal. A surface may appear acceptable over most of its area while a small number of pits penetrate deeply into the steel.

Pitting can be more dangerous than uniform corrosion because substantial penetration may occur with relatively little total metal loss. Corrosion products can also cover the opening and hide the true depth of the damage.

Where Contractors May Find It

  • Tank floors and lower shell areas
  • Structures exposed to chlorides or standing water
  • Steel beneath deposits or failed coatings
  • Marine and wastewater environments
  • Areas where moisture repeatedly collects

Contractor Concern

Abrasive blasting may reveal pits that were not visible during the initial inspection. Deep pits can retain spent abrasive, dust, salts, moisture, and corrosion products. These contaminants must be removed before coating.

Do not fill or bridge severe pits with coating simply to improve appearance. Significant pitting, perforation, or suspected section loss should be documented and referred to the responsible inspector, owner, or engineer.


3. Crevice Corrosion

Crevice corrosion develops in narrow, shielded spaces where moisture becomes trapped and oxygen movement is restricted. The chemistry inside the crevice can become different from the chemistry on the freely exposed surface.

This difference can create an electrochemical cell that concentrates corrosion inside or immediately adjacent to the crevice.

Common Crevice Locations

  • Lap joints
  • Bolted connections
  • Gaskets and flanges
  • Overlapping plates
  • Areas beneath deposits
  • Spaces beneath supports and attachments
  • Tight joints that cannot be properly cleaned or coated

Contractor Concern

Coating over the outside of a crevice does not guarantee that contamination and corrosion inside the crevice have been controlled. The specification may require sealing, stripe coating, caulking, welding, disassembly, or another treatment approved by the responsible authority.


4. Galvanic Corrosion

Galvanic corrosion can occur when two different metals are electrically connected while exposed to a conductive environment. One metal becomes more anodic and corrodes preferentially, while the more cathodic metal receives protection.

The severity of the attack depends on several factors, including the metals involved, the conductivity of the environment, the electrical connection, and the relative exposed surface areas.

The Area Effect

A small anodic area connected to a large cathodic area can experience severe, concentrated attack. This area relationship can make a small coating defect especially important when the surrounding cathodic surface is large.

Where Contractors May Find It

  • Steel connected to copper or copper-bearing materials
  • Carbon steel connected to stainless steel
  • Dissimilar fasteners and structural components
  • Metal transitions in piping systems
  • Marine structures containing several metal types

Contractor Concern

Do not assume that coating only one of two connected metals will solve the problem. The design of the isolation and coating system should be reviewed by the responsible corrosion professional. Improperly coating only the anodic metal can create a small exposed anode connected to a much larger cathodic surface.


5. Differential-Aeration Corrosion

Differential-aeration corrosion develops when different areas of the same metal receive different amounts of oxygen. The area with less oxygen can become anodic relative to the area with greater oxygen availability.

Where Contractors May Find It

  • Beneath dirt, scale, or biological deposits
  • At waterlines inside tanks
  • Inside narrow crevices
  • Under disbonded coatings
  • Where part of a surface remains wet longer than surrounding areas

Contractor Concern

Removing deposits may reveal concentrated attack beneath an area that appeared only dirty before cleaning. The revealed condition should be inspected before additional surface preparation or coating application continues.


6. Underfilm Corrosion

Underfilm corrosion develops when moisture, oxygen, salts, or chemicals reach the steel beneath a protective coating. Entry may occur through a holiday, crack, pinhole, damaged edge, porous film, loss of adhesion, or mechanical injury.

Once corrosion begins, it can spread laterally beneath the coating. Corrosion products may lift the coating, increase disbondment, and expose additional steel.

Common Warning Signs

  • Rust staining from coating defects
  • Blistering
  • Rust creepage from scratches or holidays
  • Cracking and flaking
  • Loss of adhesion around edges and welds
  • Raised areas that sound hollow when appropriately examined

Contractor Concern

Applying another coat over poorly adhered material will not stop corrosion beneath it. Unsound coating and underlying corrosion products must be removed to the extent required by the repair specification.


7. Filiform Corrosion

Filiform corrosion appears as narrow, thread-like tracks beneath a coating. It commonly begins at a coating defect, cut edge, fastener, scribe, or poorly protected opening and then travels beneath the film.

It is frequently associated with coated aluminum and thin metal components, although similar-looking underfilm patterns may be found on other substrates.

Contractor Concern

The affected coating must be removed far enough to expose sound, uncontaminated material. Simply sanding the visible thread and applying touch-up paint may leave active corrosion beneath the surrounding film.


8. Erosion-Corrosion

Erosion-corrosion combines chemical or electrochemical attack with the physical removal of protective films or corrosion products by moving liquid, gas, or suspended solids.

Where Contractors May Find It

  • Pipe elbows and directional changes
  • Pump components
  • Slurry-handling systems
  • High-velocity water service
  • Areas exposed to turbulence or impingement

Contractor Concern

A coating suitable for quiet immersion may not withstand abrasion, turbulence, or impact from suspended solids. The coating system must be selected for both the chemical exposure and the mechanical service conditions.


9. Microbiologically Influenced Corrosion

Microbiologically influenced corrosion, commonly called MIC, occurs when microorganisms create or contribute to conditions that accelerate corrosion.

The microorganisms do not necessarily consume the metal directly. Their activity can alter local chemistry, create deposits, produce corrosive byproducts, or establish low-oxygen conditions that support localized attack.

Where Contractors May Find It

  • Wastewater facilities
  • Pipelines and storage tanks
  • Cooling-water systems
  • Marine and freshwater structures
  • Low-flow or stagnant-water areas

Contractor Concern

Unusual deposits, odors, slime, concentrated pitting, or recurring corrosion should be reported. Specialized testing and treatment may be required before the surface is coated.


10. Stress-Corrosion Cracking

Stress-corrosion cracking can occur when a susceptible material is exposed to a particular corrosive environment while under tensile stress.

The surface may show fine cracks even though widespread rust or metal loss is not obvious. The stress may come from service loads, forming, welding, fabrication, or residual stress within the component.

Contractor Concern

A coating contractor should never assume that a crack is merely a coating defect. Cracks in the substrate, welds, or heat-affected areas must be documented and evaluated by qualified personnel before coating work continues.


11. Corrosion Beneath Insulation

Corrosion beneath insulation develops when water enters an insulated system and remains in contact with the metal surface. The insulation and outer jacket can hide the damage from normal view.

Moisture may enter through damaged jacketing, failed seals, penetrations, seams, supports, or areas where water collects. Temperature cycling can also draw moisture into the system.

Contractor Concern

Removing insulation may reveal severe corrosion that was not included in the original coating scope. The contractor should document the condition before cleaning removes the evidence and obtain direction concerning inspection, repair, and coating-system requirements.


12. Flash Rusting

Flash rusting is the rapid formation of rust on freshly prepared steel exposed to moisture. It may occur after waterjetting, wet abrasive blasting, washing, condensation, or unexpected weather exposure.

The amount and acceptability of flash rust depend on the project specification, coating manufacturer's requirements, and approved surface-preparation standard.

Contractor Concern

Do not coat over flash rust simply because the work must remain on schedule. The surface condition must meet the specification and coating manufacturer's requirements before application begins.

Field Rule: If corrosion appears different from what the specification or work scope anticipated, document it and obtain direction before hiding the evidence beneath a new coating.


How Coating Failures Can Reveal Corrosion Patterns

The location and shape of a coating failure often provide clues about the underlying corrosion process.

  • Failure at edges and welds: May indicate inadequate film build, poor stripe coating, or difficult surface geometry.
  • Rust beneath blisters: May indicate moisture or contamination beneath the coating.
  • Rust spreading from a scratch: May indicate underfilm corrosion and poor resistance to creepage.
  • Repeated failure at a waterline: May indicate changing oxygen conditions or repeated wetting and drying.
  • Attack around dissimilar-metal connections: May indicate galvanic corrosion.
  • Deep attack beneath deposits: May indicate crevice, differential-aeration, or microbiologically influenced corrosion.
  • Early rust across freshly prepared steel: May indicate flash rusting caused by moisture exposure.

These observations do not replace a formal failure analysis, but they help contractors recognize when additional investigation is necessary.


What the Contractor Should Document

Before removing corrosion products or failed coating, document:

  • The exact location of the condition
  • The apparent size and shape of the affected area
  • Whether the corrosion is general or localized
  • The presence of pits, holes, cracks, deposits, or blistering
  • The condition of nearby edges, welds, bolts, and connections
  • Whether dissimilar metals are present
  • Whether moisture, salts, chemicals, or biological deposits are present
  • The date, time, and environmental conditions
  • Clear overview and close-up photographs
  • Who was notified and what direction was received

A scale, ruler, pit gauge, or other appropriate reference in a photograph can help show the size of the condition. Structural measurements and acceptance decisions should be made by authorized and qualified personnel.


When the Contractor Should Stop and Ask

Stop work in the affected area and request direction when you discover:

  • Unexpected deep pitting
  • Perforation or suspected section loss
  • Cracks in the steel, welds, or heat-affected zones
  • Severe corrosion beneath insulation or deposits
  • Unexpected chemical or biological contamination
  • Evidence that the specified coating is unsuitable for the actual service environment
  • Damaged cathodic-protection components
  • A surface condition that cannot meet the specification using the approved preparation method

Stopping to obtain direction is not a sign of poor productivity. It is part of protecting the asset, the project, and the contractor.


Key Takeaways

  • Corrosion can be general, localized, hidden, mechanically accelerated, or influenced by microorganisms.
  • Pitting can cause serious penetration even when total metal loss appears small.
  • Crevices and deposits create conditions that can concentrate corrosion.
  • Dissimilar metals can produce galvanic corrosion when they are electrically connected in a conductive environment.
  • Underfilm corrosion can begin at a small coating defect and spread beyond the original damage.
  • Corrosion beneath insulation can remain hidden until severe damage has occurred.
  • Flash rust must be evaluated against the specification and coating manufacturer's requirements.
  • Unexpected corrosion conditions should be documented before surface preparation removes the evidence.
  • The contractor should report structural concerns rather than covering them with coating.

Bottom Line: Rust tells you corrosion has occurred. Its pattern, location, and severity may tell you why it occurred and what must be corrected before the structure is coated again.


Knowledge Check

  1. What is the difference between general corrosion and pitting corrosion?
  2. Why can corrosion inside a crevice be more severe than corrosion on the surrounding surface?
  3. What conditions are required for galvanic corrosion?
  4. How can a small coating holiday lead to widespread underfilm corrosion?
  5. Why should a contractor document corrosion before abrasive blasting?
  6. What should a contractor do after discovering unexpected deep pitting or cracks?
View Knowledge Check Answers

1. General corrosion is distributed relatively evenly across a broad surface. Pitting is concentrated in small areas and can penetrate deeply into the metal.

2. Restricted oxygen movement and trapped moisture can create a different local environment inside the crevice, causing the area to become anodic and experience concentrated attack.

3. Two different metals must be electrically connected and exposed to a conductive electrolyte.

4. Moisture and contaminants can enter through the holiday, initiate corrosion, and spread beneath the surrounding coating as corrosion products cause additional disbondment.

5. Abrasive blasting can remove corrosion products and coating patterns that provide evidence about the location, type, and severity of the original condition.

6. Stop work in the affected area, document the condition, notify the responsible party, and obtain direction before continuing.


Coming Next

Article 03: Evaluating the Structure and Service Environment

The next article explains what contractors should examine before surface preparation begins, including substrate condition, existing coatings, contamination, service exposure, accessibility, and conditions that may require clarification.



Was this article helpful?

Comments:
 

Related Articles
 > Academy Series | Five Professional Finishing Certificate Programs
 > The Language of Finishing: A Paint and Coatings Industry Glossary
 > The Language of Finishing: Paint and Coatings Glossary A–B
 > The Language of Finishing: Paint and Coatings Glossary C–D
 > The Language of Finishing: Paint and Coatings Glossary E–F
 > The Language of Finishing: Paint and Coatings Glossary G–H
 > The Language of Finishing: Paint and Coatings Glossary I–K
 > The Language of Finishing: Paint and Coatings Glossary L–M
 > The Language of Finishing: Paint and Coatings Glossary N–O
 > The Language of Finishing: Paint and Coatings Glossary P–Q
 > The Language of Finishing: Paint and Coatings Glossary R
 > The Language of Finishing: Paint and Coatings Glossary S
 > The Language of Finishing: Paint and Coatings Glossary T
 > The Language of Finishing: Paint and Coatings Glossary U–V
 > The Language of Finishing: Paint and Coatings Glossary W–Z
 > The Language of Finishing: Coatings Standards and Acronyms
 > Airless Spraying - From Pump to Pattern
 > Airless Spraying—From Pump to Pattern | Article 01 of 18 How Airless Spray Equipment Works
 > Airless Spraying—From Pump to Pattern | Article 02 of 18 How to Read an Airless Spray Tip Number
 > Airless Spraying—From Pump to Pattern | Article 03 of 18 How to Choose the Correct Airless Tip Size
 > Airless Spraying—From Pump to Pattern | Article 04 of 18 Understanding Airless Fan Width and Orifice Size
 > Airless Spraying—From Pump to Pattern | Article 05 of 18 The Right Way to Set Airless Spray Pressure
 > Airless Spraying—From Pump to Pattern | Article 06 of 18 The Perfect Airless Spray Pattern
 > Airless Spraying—From Pump to Pattern | Article 07 of 18 Why an Airless Spray Pattern Develops Tails
 > Airless Spraying—From Pump to Pattern | Article 08 of 18 How Tip Wear Wastes Paint and Changes the Pattern
 > Airless Spraying—From Pump to Pattern | Article 09 of 18 Matching the Tip to the Sprayer’s Capacity
 > Airless Spraying—From Pump to Pattern | Article 10 of 18 How Airless Hose Size and Length Affect Performance
 > Airless Spraying—From Pump to Pattern | Article 11 of 18 How to Prime and Start an Airless Sprayer
 > Airless Spraying—From Pump to Pattern | Article 12 of 18 Professional Airless Spray-Gun Technique
 > Airless Spraying—From Pump to Pattern | Article 13 of 18 How to Shut Down, Flush, and Store an Airless Sprayer
 > Airless Spraying—From Pump to Pattern | Article 14 of 18 Airless Troubleshooting: When the Pump Will Not Prime
 > Airless Spraying—From Pump to Pattern | Article 15 of 18 Airless Troubleshooting: Surging, Pulsing, and Pressure Loss
 > Airless Spraying—From Pump to Pattern | Article 16 of 18 Electric, Gas, or Pneumatic Airless Equipment
 > Airless Spraying—From Pump to Pattern | Article 17 of 18 Choosing the Right Airless Sprayer for the Work
 > Airless Spraying—From Pump to Pattern | Article 18 of 18 Airless Safety: Understanding Injection-Injury Hazards
 > Airless Spraying-From Pump to Pattern Certificate of Completion
 > Airless Spraying—From Pump to Pattern | Final Assessment
 > Powder Coating - From Particle To Performance
 > Powder Coating—From Particle to Performance | Article 01 of 32 | The History of Powder Coating
 > Powder Coating—From Particle to Performance | Article 02 of 32 | What Powder Coating Is—and What It Is Not
 > Powder Coating—From Particle to Performance | Article 03 of 32 | What Is Inside a Powder Coating?
 > Powder Coating—From Particle to Performance | Article 04 of 32 | How Powder Coating Is Manufactured
 > Powder Coating—From Particle to Performance | Article 05 of 32 | Thermoset Versus Thermoplastic Powder Coatings
 > Powder Coating—From Particle to Performance | Article 06 of 32 | Epoxy, Polyester, and Epoxy-Polyester Hybrid Powders
 > Powder Coating—From Particle to Performance | Article 07 of 32 | Polyurethane, Acrylic, Fluoropolymer, and Specialty Powders
 > Powder Coating—From Particle to Performance | Article 08 of 32 | Selecting the Right Powder for the Application
 > Powder Coating—From Particle to Performance | Article 09 of 32 | Why Surface Preparation Determines Coating Performance
 > Powder Coating—From Particle to Performance | Article 10 of 32 | Preparing Steel, Aluminum, and Galvanized Surfaces
 > Powder Coating—From Particle to Performance | Article 11 of 32 | Mechanical Surface Preparation for Powder Coating
 > Powder Coating—From Particle to Performance | Article 12 of 32 | Chemical Pretreatment, Rinsing, and Dry-Off
 > Powder Coating—From Particle to Performance | Article 13 of 32 | How Electrostatic Powder Coating Works
 > Powder Coating—From Particle to Performance | Article 14 of 32 | Corona-Charging Powder Guns
 > Powder Coating—From Particle to Performance | Article 15 of 32 | Tribostatic Powder Application
 > Powder Coating—From Particle to Performance | Article 16 of 32 | Fluidized-Bed Powder Coating
 > Powder Coating—From Particle to Performance | Article 17 of 32: Anatomy of a Manual Powder-Coating System
 > Powder Coating—From Particle to Performance | Article 18 of 32: Anatomy of an Automatic Powder-Coating System
 > Powder Coating—From Particle to Performance | Article 20 of 32: Powder Feed, Recovery, Reclaim, and Color Change
 > Powder Coating—From Particle to Performance | Article 21 of 32: Compressed-Air Quality for Powder-Coating Equipment
 > Powder Coating—From Particle to Performance | Article 22 of 32: How to Set Up and Start a Powder-Coating System
 > Powder Coating—From Particle to Performance | Article 23 of 32: Setting Powder Flow, Pattern Air, kV, and Current
 > Powder Coating—From Particle to Performance | Article 24 of 32: Professional Manual Powder-Gun Technique
 > Powder Coating—From Particle to Performance | Article 25 of 32: Setting Up Automatic Guns and Reciprocators
 > Powder Coating—From Particle to Performance | Article 26 of 32: Faraday-Cage Effect, Back Ionization, and Poor Coverage
 > Powder Coating—From Particle to Performance | Article 27 of 32: Curing Powder Coating—Time at Metal Temperature
 > Powder Coating—From Particle to Performance | Article 29 of 32: Measuring Powder-Coating Film Thickness
 > Powder Coating—From Particle to Performance | Article 30 of 32: Testing Adhesion, Cure, Gloss, Color, and Appearance
 > Powder Coating—From Particle to Performance | Article 31 of 32: Powder-Coating Defects and Corrective Action
 > Powder Coating—From Particle to Performance | Article 32 of 32: Powder-Coating Safety, Housekeeping, and Preventive Maintenance
 > Powder Coating—From Particle to Performance | Final Course Assessment
 > Powder Coating—From Particle to Performance | Certificate of Completion
 > Finishing Quality - From Spec to Sign-Off | AirSprayTech Academy
 > Finishing Quality—From Spec to Sign-Off | Article 01 of 28: Quality Begins with the Specification
 > Finishing Quality—From Spec to Sign-Off | Article 02 of 28: From Specification to Control Plan
 > Finishing Quality—From Spec to Sign-Off | Article 03 of 28: Document Control and Traceability
 > Finishing Quality—From Spec to Sign-Off | Article 04 of 28: Incoming Materials and Receiving Inspection
 > Finishing Quality—From Spec to Sign-Off | Article 05 of 28: Incoming Process Water Quality
 > Finishing Quality—From Spec to Sign-Off | Article 06 of 28: Process Water Treatment Systems
 > Finishing Quality—From Spec to Sign-Off | Article 07 of 28 Treating and Releasing Finishing Wastewater
 > Finishing Quality—From Spec to Sign-Off | Article 08 of 28: Surface Cleaning and Contamination Control
 > Finishing Quality—From Spec to Sign-Off | Article 09 of 28 Surface Pretreatment and Conversion Coating Control
 > Finishing Quality—From Spec to Sign-Off | Article 10 of 28 Coating Material Storage, Mixing, and Conditioning
 > Finishing Quality—From Spec to Sign-Off | Article 11 of 28 Compressed-Air Quality and System Control
 > Finishing Quality—From Spec to Sign-Off | Article 12 of 28 Temperature, Humidity, and Environmental Control
 > Finishing Quality—From Spec to Sign-Off | Article 13 of 28 Application Equipment Setup and Process Verification
 > Finishing Quality—From Spec to Sign-Off | Article 14 of 28 Wet-Film Thickness and Application Control
 > Finishing Quality—From Spec to Sign-Off | Article 15 of 28 Dry-Film Thickness Measurement and Control
 > Finishing Quality—From Spec to Sign-Off | Article 16 of 28 Cure Verification and Oven Performance
 > Finishing Quality—From Spec to Sign-Off | Article 17 of 28 Appearance, Color, Gloss, and Texture Inspection
 > Finishing Quality—From Spec to Sign-Off | Article 18 of 28 Coating Adhesion Testing and Interpretation
 > Finishing Quality—From Spec to Sign-Off | Article 19 of 28 Hardness, Impact, Flexibility, and Abrasion Testing
 > Finishing Quality—From Spec to Sign-Off | Article 20 of 28 Corrosion, Chemical, and Environmental Exposure Testing
 > Finishing Quality—From Spec to Sign-Off | Article 21 of 28 Holiday, Porosity, and Coating-Continuity Testing
 > Finishing Quality—From Spec to Sign-Off | Article 22 of 28 Building and Controlling the In-House Finishing Laboratory
 > Finishing Quality—From Spec to Sign-Off | Article 23 of 28 Sampling Plans and Inspection Frequency
 > Finishing Quality—From Spec to Sign-Off | Article 24 of 28 Building the Finishing Process Data Highway
 > Finishing Quality—From Spec to Sign-Off | Article 25 of 28 Nonconformance, Root Cause, and Corrective Action
 > Finishing Quality—From Spec to Sign-Off | Article 26 of 28 Final Product Audit, Acceptance, and Release
 > Finishing Quality—From Spec to Sign-Off | Article 27 of 28 Build a Quality Team That Includes the People Doing the Work
 > Finishing Quality—From Spec to Sign-Off | Article 28 of 28 Your Vendors Are Part of the Quality Team
 > Finishing Quality—From Spec to Sign-Off | Final Assessment
 > Finishing Quality—From Spec to Sign-Off | Certificate Request
 > Paint Shop Planning - From Floor Plan to First Spray
 > Paint Shop Planning—From Floor Plan to First Spray | Article 02 of 28 | Build a Project Team Before You Build the Shop
 > Paint Shop Planning—From Floor Plan to First Spray | Article 03 of 28 | Meet the Authority Having Jurisdiction Early
 > Paint Shop Planning—From Floor Plan to First Spray | Article 04 of 28 | Creating the Owner’s Project Requirements
 > Paint Shop Planning—From Floor Plan to First Spray | Article 05 of 28 | Understanding NFPA 33 and Spray-Application Fire Protection
 > Paint Shop Planning—From Floor Plan to First Spray | Article 06 of 28 | Understanding the NEC in a Paint Shop
 > Paint Shop Planning—From Floor Plan to First Spray | Article 07 of 28 | Flammable and Combustible Liquid Storage
 > Paint Shop Planning—From Floor Plan to First Spray | Article 08 of 28 | Building, Fire, and Mechanical Codes
 > Paint Shop Planning—From Floor Plan to First Spray | Article 09 of 28 | Environmental Permits and Emissions Planning
 > Paint Shop Planning—From Floor Plan to First Spray | Article 10 of 28 | Planning the Shop Layout and Product Flow
 > Paint Shop Planning—From Floor Plan to First Spray | Article 11 of 28 | Spray-Booth and Preparation-Station Selection
 > Paint Shop Planning—From Floor Plan to First Spray | Article 12 of 28 | Air-Makeup and Exhaust-System Planning
 > Paint Shop Planning—From Floor Plan to First Spray | Article 13 of 28 | Planning the Compressed-Air System
 > Paint Shop Planning—From Floor Plan to First Spray | Article 14 of 28 | Electrical Service, Controls, and Hazardous Locations
 > Paint Shop Planning—From Floor Plan to First Spray | Article 15 of 28 | Natural Gas, Heating, and Curing Requirements
 > Paint Shop Planning—From Floor Plan to First Spray | Article 16 of 28 | Fire Suppression, Detection, and Emergency Systems
 > Paint Shop Planning—From Floor Plan to First Spray | Article 17 of 28 | Writing an Equipment Specification Vendors Can Quote
 > Paint Shop Planning—From Floor Plan to First Spray | Article 18 of 28 | How to Compare Paint-Booth Proposals
 > Paint Shop Planning—From Floor Plan to First Spray | Article 19 of 28 | Who Is Responsible for What?
 > Paint Shop Planning—From Floor Plan to First Spray | Article 20 of 28 | Site Preparation and Construction Coordination
 > Paint Shop Planning—From Floor Plan to First Spray | Article 21 of 28 | Change Orders: Where Paint-Shop Budgets Go to Die
 > Paint Shop Planning—From Floor Plan to First Spray | Article 22 of 28 | Pre-Startup Inspection and Documentation
 > Paint Shop Planning—From Floor Plan to First Spray | Article 23 of 28 | Testing Booth Airflow and Pressure
 > Paint Shop Planning—From Floor Plan to First Spray | Article 24 of 28 | Testing Safety Interlocks and Emergency Controls
 > Paint Shop Planning—From Floor Plan to First Spray | Article 25 of 28 | Commissioning the Complete Paint Shop
 > Paint Shop Planning—From Floor Plan to First Spray | Article 26 of 28 | Training Operators and Maintenance Personnel
 > Paint Shop Planning—From Floor Plan to First Spray | Article 27 of 28 | Final Acceptance: Do Not Sign Off Until It Performs
 > Paint Shop Planning—From Floor Plan to First Spray | Article 28 of 28 | Planning for Maintenance, Expansion, and the Next Ten Years
 > Paint Shop Planning—From Floor Plan to First Spray | Article 01 of 28 | Before You Buy a Booth: Define the Finishing Process
 > Paint Shop Planning—From Floor Plan to First Spray | Final Assessment
 > Paint Shop Planning—From Floor Plan to First Spray | Certificate of Completion Request
 > Automotive Refinish - From Repair Plan to Road Ready
 > Automotive Refinish—From Repair Plan to Road Ready | Article 01 of 28 | Start Before the Sandpaper: Vehicle Intake and Refinish Planning
 > Automotive Refinish—From Repair Plan to Road Ready | Article 02 of 28 | PPE Is Part of the Process: Protecting the Automotive Painter
 > Automotive Refinish—From Repair Plan to Road Ready | Article 03 of 28 | Fire, Fumes, and Ignition Sources: Everyday Refinish-Shop Safety
 > Automotive Refinish—From Repair Plan to Road Ready | Article 04 of 28 | A Clean Shop Paints Cleaner Cars: Housekeeping and Contamination Control
 > Automotive Refinish—From Repair Plan to Road Ready | Article 05 of 28 | Know What You Are Painting: Automotive Substrate Identification
 > Automotive Refinish—From Repair Plan to Road Ready | Article 06 of 28 | Clean Before You Cut: Washing, Degreasing, and Contamination Removal
 > Automotive Refinish—From Repair Plan to Road Ready | Article 07 of 28 | Stop Corrosion Before It Starts: Bare Metal and Corrosion Protection
 > Automotive Refinish—From Repair Plan to Road Ready | Article 08 of 28 | Sand With a Purpose: Abrasives, Grit Selection, and Surface Profiles
 > Automotive Refinish—From Repair Plan to Road Ready | Article 09 of 28 | Build It Straight: Fillers, Glazes, Primers, and Sealers
 > Automotive Refinish—From Repair Plan to Road Ready | Article 10 of 28 | Mask the Repair, Not the Mistake: Paper, Plastic, Tape, and Technique
 > Automotive Refinish—From Repair Plan to Road Ready | Article 11 of 28 | Choose the Complete System: Modern Automotive-Refinish Materials
 > Automotive Refinish—From Repair Plan to Road Ready | Article 12 of 28 | Control the Mix: Paint Storage, Mixing Rooms, and Material Management
 > Automotive Refinish—From Repair Plan to Road Ready | Article 13 of 28 | Match It Before You Spray It: Color Tools, Spray-Outs, and Color Acceptance
 > Automotive Refinish—From Repair Plan to Road Ready | Article 14 of 28 | Choose the Right Spray Gun: Match the Equipment to the Finish
 > Automotive Refinish—From Repair Plan to Road Ready | Article 15 of 28 | Feed the Finish: Air-Compressor Operation and Maintenance
 > Automotive Refinish—From Repair Plan to Road Ready | Article 16 of 28 | Keep the Gun Honest: Spray Equipment Operation and Maintenance
 > Automotive Refinish—From Repair Plan to Road Ready | Article 17 of 28 | Paint With a Plan: Professional Basecoat and Clearcoat Application
 > Automotive Refinish—From Repair Plan to Road Ready | Article 18 of 28 | Control the Booth: Airflow, Filters, Lighting, and Maintenance
 > Automotive Refinish—From Repair Plan to Road Ready | Article 19 of 28 | Balance the Booth: Air-Makeup Unit Operation and Maintenance
 > Automotive Refinish—From Repair Plan to Road Ready | Article 20 of 28 | Cure It by the Numbers: Flash, Bake, and Return-to-Service
 > Automotive Refinish—From Repair Plan to Road Ready | Article 21 of 28 | Correct Without Creating: Denibbing, Sanding, and Polishing
 > Automotive Refinish—From Repair Plan to Road Ready | Article 22 of 28 | Put It Back Right: Reassembly Without Damaging the Finish
 > Automotive Refinish—From Repair Plan to Road Ready | Article 23 of 28 | Inspect It Before the Customer Does: Final Quality Control
 > Automotive Refinish—From Repair Plan to Road Ready | Article 24 of 28 | Deliver More Than Shine: Customer Handoff and Fresh-Paint Care
 > Automotive Refinish—From Repair Plan to Road Ready | Article 25 of 28 | Control the Waste Stream: Paint, Solvent, Filters, and Compliance
 > Automotive Refinish—From Repair Plan to Road Ready | Article 26 of 28 | Troubleshoot the Process: Find the Cause Before Repainting
 > Automotive Refinish—From Repair Plan to Road Ready | Article 27 of 28 | Make Quality Repeatable: Procedures, Training, and Team Accountability
 > Automotive Refinish—From Repair Plan to Road Ready | Article 28 of 28 | Road Ready Is Earned: Audit the Complete Refinish Process
 > Automotive Refinish—From Repair Plan to Road Ready | Final Assessment
 > Automotive Refinish—From Repair Plan to Road Ready | Certificate of Completion Request
 > Corrosion Protection for Industrial Coating Contractors - 00 Course Overview
 > Corrosion Protection for Industrial Coating Contractors - Article 01: Understanding Corrosion
 > Corrosion Protection for Industrial Coating Contractors - Article 03: Evaluating the Structure and Service Environment
 > Corrosion Protection for Industrial Coating Contractors - Article 04: Protective Coatings as the Primary Barrier
 > Corrosion Protection for Industrial Coating Contractors - Article 05: Selecting the Correct Coating System
 > Corrosion Protection for Industrial Coating Contractors - Article 06: Surface Cleanliness and Contaminant Testing
 > Corrosion Protection for Industrial Coating Contractors - Article 07: Abrasive Blasting and Surface-Preparation Standards
 > Corrosion Protection for Industrial Coating Contractors - Article 08: Surface Profile and Anchor Pattern
 > Corrosion Protection for Industrial Coating Contractors - Article 09: Environmental Conditions and Dew Point Control
 > Corrosion Protection for Industrial Coating Contractors - Article 10: Selecting Coating Systems for the Service Environment
 > Corrosion Protection for Industrial Coating Contractors - Article 11: Primers and Their Role in Corrosion Protection
 > Corrosion Protection for Industrial Coating Contractors - Article 12: Intermediate Coats, Finish Coats, and Stripe Coating
 > Corrosion Protection for Industrial Coating Contractors - Article 13: Coating Application Methods and Spray Technique
 > Corrosion Protection for Industrial Coating Contractors - Article 14: Coating Mixing, Thinning, Induction Time, and Pot Life
 > Corrosion Protection for Industrial Coating Contractors - Article 15: Wet Film and Dry Film Thickness Control
 > Corrosion Protection for Industrial Coating Contractors - Article 16: Holidays, Pinholes, and Discontinuity Testing
 > Corrosion Protection for Industrial Coating Contractors - Article 17: Coating Adhesion Testing and Failure Interpretation
 > Corrosion Protection for Industrial Coating Contractors - Article 18: Coating Defects and Failure Diagnosis
 > Corrosion Protection for Industrial Coating Contractors - Article 19: How Coatings and Cathodic Protection Work Together
 > Corrosion Protection for Industrial Coating Contractors - Article 20: Final Inspection, Repair Verification, and Project Documentation
 > Corrosion Protection for Industrial Coating Contractors - Final Assessment
 > Corrosion Protection for Industrial Coating Contractors - Final Certificate of Completion Request