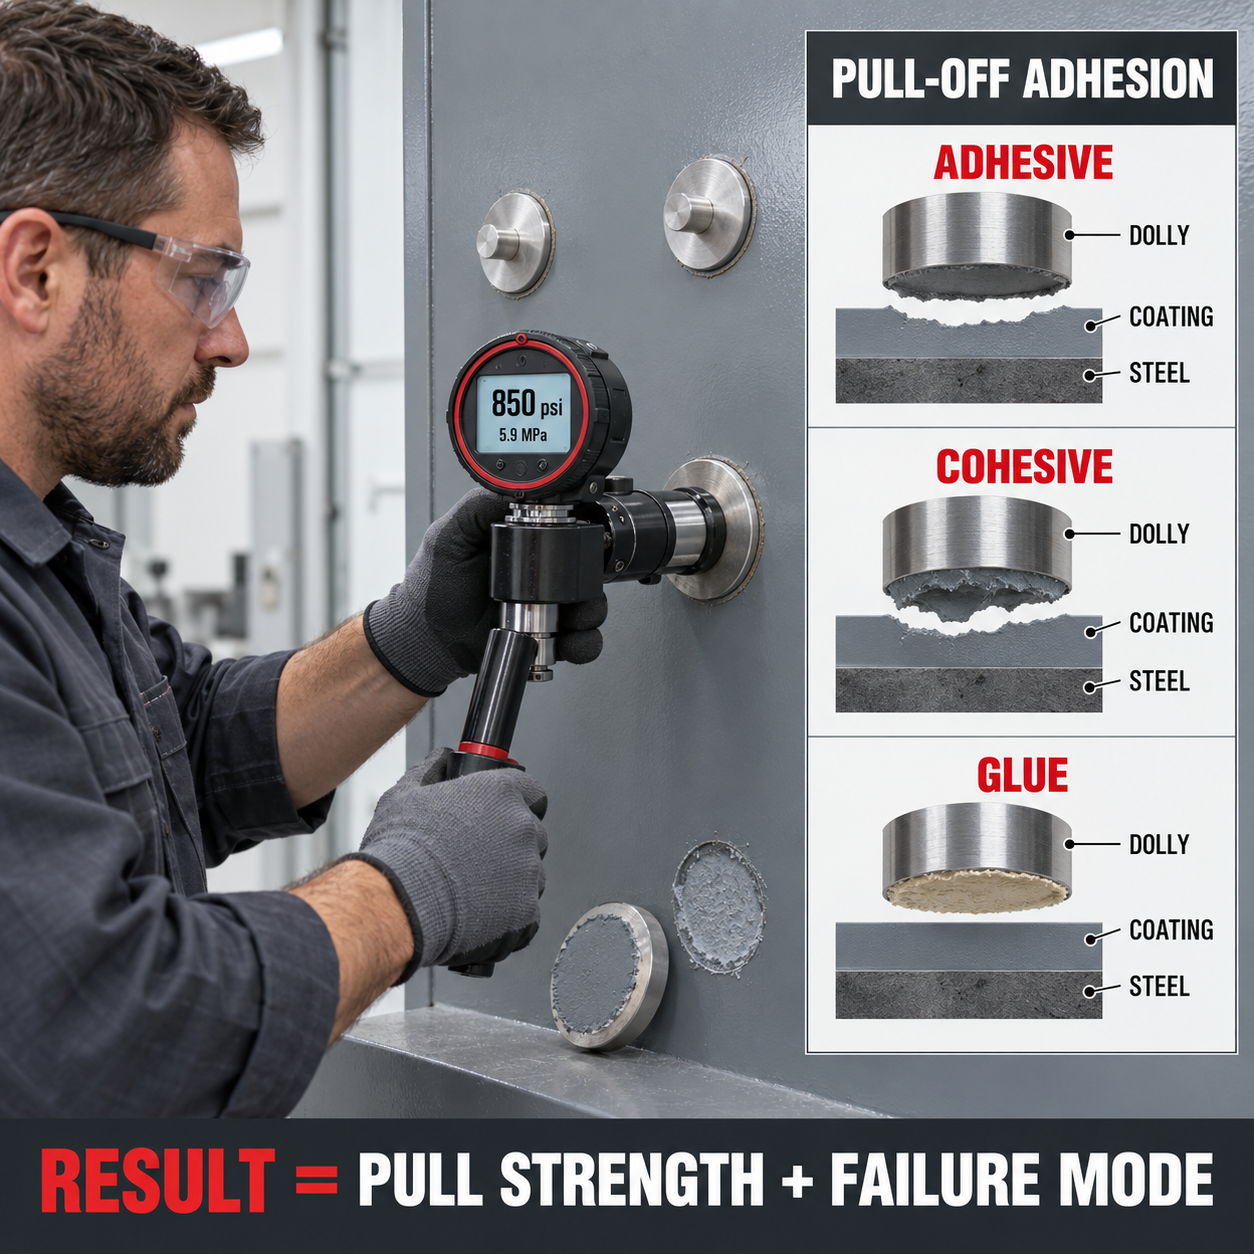
 When the Dolly Lets Go: Understanding Pull-Off Adhesion Results
A pull-off adhesion tester produces a number, but that number is only part of the result.
When the loading fixture—commonly called a dolly—separates from the coated surface, the location of the break may tell more about the coating system than the highest pressure displayed on the instrument.
Did the coating separate from the steel? Did one coating layer separate from another? Did the coating tear within itself? Did the concrete break? Or did the adhesive holding the dolly fail before the coating system was fully tested?
Understanding pull-off adhesion requires examining both:
- The pull-off value: The tensile stress reached during the test.
- The failure mode: The location and nature of the separation.
What Is a Pull-Off Adhesion Test?
A pull-off adhesion test evaluates the tensile force required to detach a defined area of coating from its substrate or to produce a break somewhere within the coating system.
A loading fixture is bonded to the coated surface using a suitable adhesive. After the adhesive cures, a portable tester applies a controlled force perpendicular to the surface.
The tester increases the load until:
- The dolly separates.
- The coating fails.
- The substrate fails.
- The adhesive fails.
- The equipment reaches a predetermined proof load.
- The instrument reaches its operating limit.
For coatings applied to metal, the primary referenced method is ASTM D4541—Pull-Off Strength of Coatings Using Portable Adhesion Testers.
For coatings applied to concrete, see ASTM D7234—Pull-Off Strength of Coatings on Concrete.
International testing may reference ISO 4624—Paints and Varnishes—Pull-Off Test for Adhesion.
What Does the Number Mean?
The displayed result represents tensile stress—the applied force divided by the test area.
Results are commonly reported in:
- psi: Pounds per square inch
- MPa: Megapascals
- N/mm²: Newtons per square millimeter
One MPa is equal to one N/mm² and approximately 145 psi.
For example:
- 500 psi is approximately 3.45 MPa.
- 1,000 psi is approximately 6.9 MPa.
- 2,000 psi is approximately 13.8 MPa.
The displayed value identifies the stress reached when the system separated—or when the test was intentionally stopped. It does not automatically identify the strength of the bond between the coating and substrate.
The Coating System Breaks at Its Weakest Plane
A pull-off test loads an entire system consisting of:
- The testing instrument
- The loading fixture
- The dolly adhesive
- The topcoat
- Intermediate coating layers
- The primer
- The coating-to-substrate interface
- The substrate itself
When the dolly separates, the failure normally occurs at the weakest plane reached under the test conditions.
The Four Basic Pull-Off Failure Modes
1. Adhesive Failure
Adhesive failure occurs at the interface between two different materials or layers.
Examples include separation:
- Between the coating and steel.
- Between the primer and substrate.
- Between the primer and intermediate coat.
- Between the intermediate coat and topcoat.
- Between the coating and concrete.
An adhesive failure may indicate that the bond at that interface is weaker than the cohesive strength of the adjoining materials.
Possible contributors include:
- Inadequate surface preparation.
- Oil, dust, moisture, salts, or other contamination.
- An exceeded recoat window.
- Incompatible coating layers.
- Insufficient surface profile.
- Condensation during application.
- Improper cure.
- Weathering or chemical exposure.
The failure location alone does not prove the cause. Additional investigation may be required.
2. Cohesive Failure
Cohesive failure occurs within one material rather than at an interface.
Examples include:
- A break within the primer.
- A break within the intermediate coat.
- A break within the topcoat.
- A split within a thick lining.
- A fracture within the concrete substrate.
If the same material is visible on both the dolly face and the remaining surface, the failure is generally cohesive within that material.
A cohesive coating failure indicates that the internal strength of the coating layer was lower than the strength of the adjoining interfaces under the test conditions.
3. Substrate Failure
Substrate failure occurs when the substrate breaks before the coating or coating-to-substrate bond separates.
This is particularly common when testing coatings on concrete, masonry, wood, or another substrate with limited tensile strength.
If concrete remains attached to the dolly and a corresponding cavity is visible in the floor or wall, the test may have demonstrated that the coating bond exceeded the tensile strength of the concrete at that location.
The recorded value is then limited by the substrate failure. It does not establish the maximum possible strength of the coating-to-concrete bond.
4. Glue or Dolly-Adhesive Failure
Glue failure occurs within the adhesive used to attach the dolly or at the interface between:
- The dolly and adhesive.
- The adhesive and coating.
- Two portions of the adhesive layer.
A glue failure may result from:
- Incorrect mixing of the adhesive.
- Insufficient adhesive cure.
- Contamination on the dolly.
- Contamination on the coating.
- An adhesive unsuited to the coating or expected load.
- Excessive adhesive thickness.
- Air voids in the adhesive.
- Temperature outside the adhesive’s cure range.
If the glue fails before the required acceptance value is reached, the test normally does not establish whether the coating system could have passed. Another test may be necessary.
Understanding Mixed Failures
Pull-off fractures are not always clean. Part of the dolly may show failure within one layer while another portion shows separation at an interface.
For example:
- 60% cohesive failure within the primer.
- 30% adhesive failure between the primer and substrate.
- 10% glue failure.
The fracture surfaces should be visually divided into approximate percentages. The reported percentages should account for the entire test area.
Mixed failure information can reveal variation within a very small area and may help identify more than one weak plane in the coating system.
How to Read the Dolly and Test Surface
After the pull, place the dolly beside the test location and compare the two fracture surfaces.
Same Material on Both Surfaces
If the same coating material appears on the dolly and the remaining surface, the break likely occurred cohesively within that layer.
Different Materials on Opposite Surfaces
If the dolly shows one coating layer while the test surface shows another, the separation likely occurred adhesively at the interface between those layers.
Bare Substrate on the Surface
If the dolly carries the complete coating system and the test location exposes clean substrate, the break likely occurred between the coating system and substrate.
Concrete Attached to the Dolly
If concrete is present on the dolly, examine the test cavity. The failure may be cohesive within the concrete rather than adhesive at the coating interface.
Little or No Coating on the Dolly
If the coating remains largely intact while adhesive is visible on the dolly or coating surface, the glue system may have failed.
A visual guide to fracture analysis is included in the DeFelsko PosiTest AT Pull-Off Adhesion Tester Guide.
Which Is More Important: The Number or the Failure Mode?
Both are important, but they answer different questions.
| Result Component | What It Tells You |
|---|---|
| Pull-off value | The tensile stress reached when separation occurred or the test stopped. |
| Failure location | The weakest plane reached within the test assembly. |
| Failure percentage | How much of the test area failed at each plane. |
| Test conditions | The circumstances under which the result was obtained. |
A high number with glue failure may provide less information about the coating system than a lower number with a clearly identified coating failure.
Conversely, a coating that exceeds the specified proof load without separating may have demonstrated compliance if the approved procedure allows a proof test.
Is a Higher Pull-Off Value Always Better?
Not necessarily.
A higher pull-off value generally indicates that greater tensile stress was required to produce separation. However, the number must be interpreted in relation to:
- The coating system.
- The substrate.
- The required acceptance value.
- The failure mode.
- The test equipment.
- The dolly size.
- Whether the coating was cut around the dolly.
- The loading rate.
- The coating’s cure and temperature.
A flexible coating, elastomeric membrane, thin-film coating, high-build epoxy, and concrete floor system should not automatically be expected to produce similar values.
There Is No Universal Passing Value
No single pull-off value applies to every coating and substrate.
An 800-psi result might exceed the requirement for one system and fail the requirement for another. A 300-psi result with cohesive concrete failure could be meaningful on a weak concrete substrate, while the same number might be unacceptable for a high-performance coating on prepared steel.
Acceptance criteria must come from:
- The project specification.
- The coating manufacturer’s written requirements.
- The contract documents.
- An approved test procedure.
- A qualified engineer or coating specialist.
- Preconstruction testing or an approved reference area.
A Test Method Is Not an Acceptance Specification
ASTM D4541 and ASTM D7234 explain how pull-off testing is performed and reported. They do not establish one minimum adhesion value for every coating.
The test method supplies the procedure. The project documents supply the acceptance criteria.
If no minimum value or acceptable failure mode was established before testing, the results may still be useful for comparison or failure analysis—but a pass/fail declaration may require additional technical judgment.
Why Tester Type Matters
Portable adhesion testers do not all apply load in exactly the same way. Instruments may differ in:
- Actuator design.
- Reaction support.
- Manual or automatic pressure control.
- Load alignment.
- Loading rate control.
- Dolly size.
- Maximum pressure.
- Measurement accuracy.
Results obtained with different tester designs may not be directly interchangeable. When comparing areas, coating systems, contractors, or projects, use the same test method and preferably the same instrument type, dolly size, preparation, adhesive, and loading procedure.
Why Dolly Size Matters
Dollies are available in different diameters. The selected size may depend on:
- The expected adhesion strength.
- The tester’s operating range.
- The coating thickness.
- The strength of the substrate.
- Available test area.
- Surface curvature.
A tester may achieve a higher stress with a smaller dolly because the same force is concentrated over a smaller area. Larger dollies are often useful for lower-strength materials such as concrete, but the specified procedure and equipment limitations should control the selection.
The correct dolly diameter must be entered into or used with the instrument. Using the wrong area calculation will produce an incorrect reported stress.
To Cut or Not to Cut Around the Dolly
The coating may be isolated around the dolly by cutting or drilling through the film before the pull. This is sometimes called scoring.
Cutting can:
- Define the exact test area.
- Reduce the influence of surrounding coating.
- Prevent a larger area from being unintentionally removed.
- Be useful for thick or laterally reinforced coatings.
However, cutting can also:
- Introduce cracks or edge damage.
- Disturb a brittle coating.
- Damage the substrate.
- Change the resulting pull-off value.
The decision to cut around the dolly must follow the governing standard, specification, or agreed procedure. Results from cut and uncut tests should not be compared without identifying the difference.
Adhesive Selection Can Limit the Test
The dolly adhesive must develop greater strength than the coating property being evaluated. It must also be compatible with the coating.
An unsuitable adhesive may:
- Fail before the coating.
- Soften or attack the coating.
- Fail to cure in the available temperature.
- Produce excessive voids.
- Bond poorly to the dolly.
- Require surface abrasion that alters the coating.
Confirm the adhesive’s mixing ratio, working time, cure time, temperature range, and expected tensile strength.
If a cleaner, solvent, or abrasive is used to prepare the coating surface, verify that it does not weaken, swell, dissolve, or otherwise alter the coating.
Coating Cure and Temperature Affect Results
A coating that is dry to the touch may not have developed its final adhesion or cohesive strength.
Before testing, record:
- Application date and time.
- Coating cure time.
- Ambient temperature.
- Surface temperature.
- Relative humidity.
- Any force-curing or heating conditions.
- Exposure conditions before testing.
Testing a coating too early can produce a lower result that reflects incomplete cure rather than its expected in-service properties.
Temperature can also change coating stiffness, adhesive cure, instrument performance, and substrate behavior.
How to Evaluate a Group of Results
A pull-off test represents a small area. Several tests are normally required to understand the condition of a larger surface.
When reviewing multiple results:
- Record every valid result.
- Identify the failure mode for every dolly.
- Look for repeated failures at the same interface.
- Compare affected and apparently sound areas.
- Consider location, exposure, coating thickness, and substrate condition.
- Investigate unusually high or low results.
- Do not average invalid glue failures into otherwise valid coating results.
- Do not use an average to conceal a confirmed localized failure.
A group of similar results with the same failure mode is generally easier to interpret than scattered values with several different fracture locations.
Examples of Pull-Off Result Interpretation
Example 1: Coating-to-Steel Failure
Three tests produce values near 900 psi. The complete coating system remains attached to each dolly, leaving bare steel at the test locations.
Interpretation: Separation occurred adhesively between the coating system and steel. The numerical results should be compared with the specified minimum, but repeated failure at the same interface may also justify investigation of surface preparation or contamination.
Example 2: Cohesive Primer Failure
The dolly and test surface both show primer. The result is 1,200 psi.
Interpretation: The failure occurred within the primer. The coating-to-substrate bond and intercoat bond resisted at least the stress reached before the primer separated internally.
Example 3: Concrete Failure
The dolly removes coating and a layer of concrete at 350 psi.
Interpretation: The test was limited by cohesive failure in the concrete. The coating bond exceeded the concrete tensile strength at that location, but the maximum strength of the coating bond was not determined.
Example 4: Glue Failure Below the Requirement
The adhesive separates from the dolly at 500 psi, but the specification requires at least 750 psi.
Interpretation: The coating system was not loaded to the required value. The result does not demonstrate compliance. The adhesive, preparation, and cure procedure should be reviewed before retesting.
Example 5: Proof Test Without Separation
The specification requires the coating to withstand 1,000 psi. The test is stopped at 1,000 psi without separation.
Interpretation: If the approved procedure permits a proof test, the result may be reported as having withstood the specified load. It should not be reported as an exact ultimate pull-off strength because the coating was not pulled to failure.
Example 6: Mixed Failure
A test reaches 1,100 psi. Examination shows 50% cohesive failure within the primer, 30% separation between the primer and steel, and 20% glue failure.
Interpretation: Several failure planes contributed. All percentages and the numerical result should be reported. The project criteria must determine whether the mixed failure is acceptable.
Common Interpretation Mistakes
Reporting Only the Highest Number
The highest result may not represent the overall coating system or the weakest tested area.
Ignoring Glue Failure
A glue failure can limit the test and prevent evaluation of the coating system.
Calling Every Break an Adhesion Failure
A cohesive break within a coating or substrate is different from adhesive separation at an interface.
Assuming Concrete Failure Means the Coating Failed
If the concrete fractured, the coating bond may have been stronger than the substrate.
Comparing Different Tester Types Without Qualification
Instrument design, reaction support, dolly size, cutting, and loading rate can affect results.
Averaging Invalid Tests
An invalid or limited glue failure should not automatically be averaged with valid coating failures.
Testing Before Full Cure
A low result may reflect incomplete cure rather than final coating performance.
Deciding the Passing Value After Testing
The acceptance value and acceptable failure modes should be established before dollies are attached.
What Should Be Included in the Test Report?
A useful pull-off adhesion report may include:
- Project and test location
- Date and time
- Inspector or technician
- Coating manufacturer and product
- Batch or lot number
- Coating system and individual layers
- Dry-film thickness
- Substrate
- Surface-preparation method
- Coating age and cure conditions
- Test method and edition
- Tester manufacturer, model, and serial number
- Calibration or verification status
- Dolly diameter
- Dolly adhesive
- Adhesive cure time
- Coating and dolly preparation
- Whether the coating was cut around the dolly
- Loading rate
- Individual pull-off values
- Failure modes and percentages
- Photographs of the dolly and test surface
- Acceptance criteria
- Pass, fail, proof load, or invalid-test status
- Repair and retest information
Repairing the Test Locations
Pull-off adhesion testing is destructive. Each test location may expose the substrate or damage one or more coating layers.
After testing:
- Remove loose coating and remaining adhesive.
- Feather or prepare the coating edges as required.
- Restore the specified substrate preparation.
- Remove dust and contamination.
- Apply the approved repair coating system.
- Observe the required recoat and cure times.
- Inspect the completed repair.
The repair procedure should be approved before pull-off testing begins.
Primary Referenced Standards
- ASTM D4541—Pull-Off Strength of Coatings Using Portable Adhesion Testers
- ASTM D7234—Pull-Off Strength of Coatings on Concrete
- ISO 4624—Paints and Varnishes—Pull-Off Test for Adhesion
The Bottom Line
The pull-off number tells you how much tensile stress was reached. The fracture surfaces tell you what actually separated.
A valid interpretation requires both.
Record the value, examine both sides of the break, identify each failure plane, estimate the percentage of each failure mode, and compare the complete result with acceptance criteria established before testing.
Technical Notice: This article provides general educational information and does not reproduce or replace the complete ASTM, ISO, coating-manufacturer, instrument-manufacturer, adhesive-manufacturer, contract, safety, or project requirements. Standards are revised periodically. Always obtain and follow the current edition of the specified test method. Pull-off adhesion testing should be authorized, performed by appropriately trained personnel, documented, and repaired using an approved procedure.
Copyright © 2026 Azimuth Spray Systems, LLC. All rights reserved. AirSprayTech.com—The Finishing Authority®. No portion of this article may be reproduced, distributed, republished, or transmitted without prior written permission.