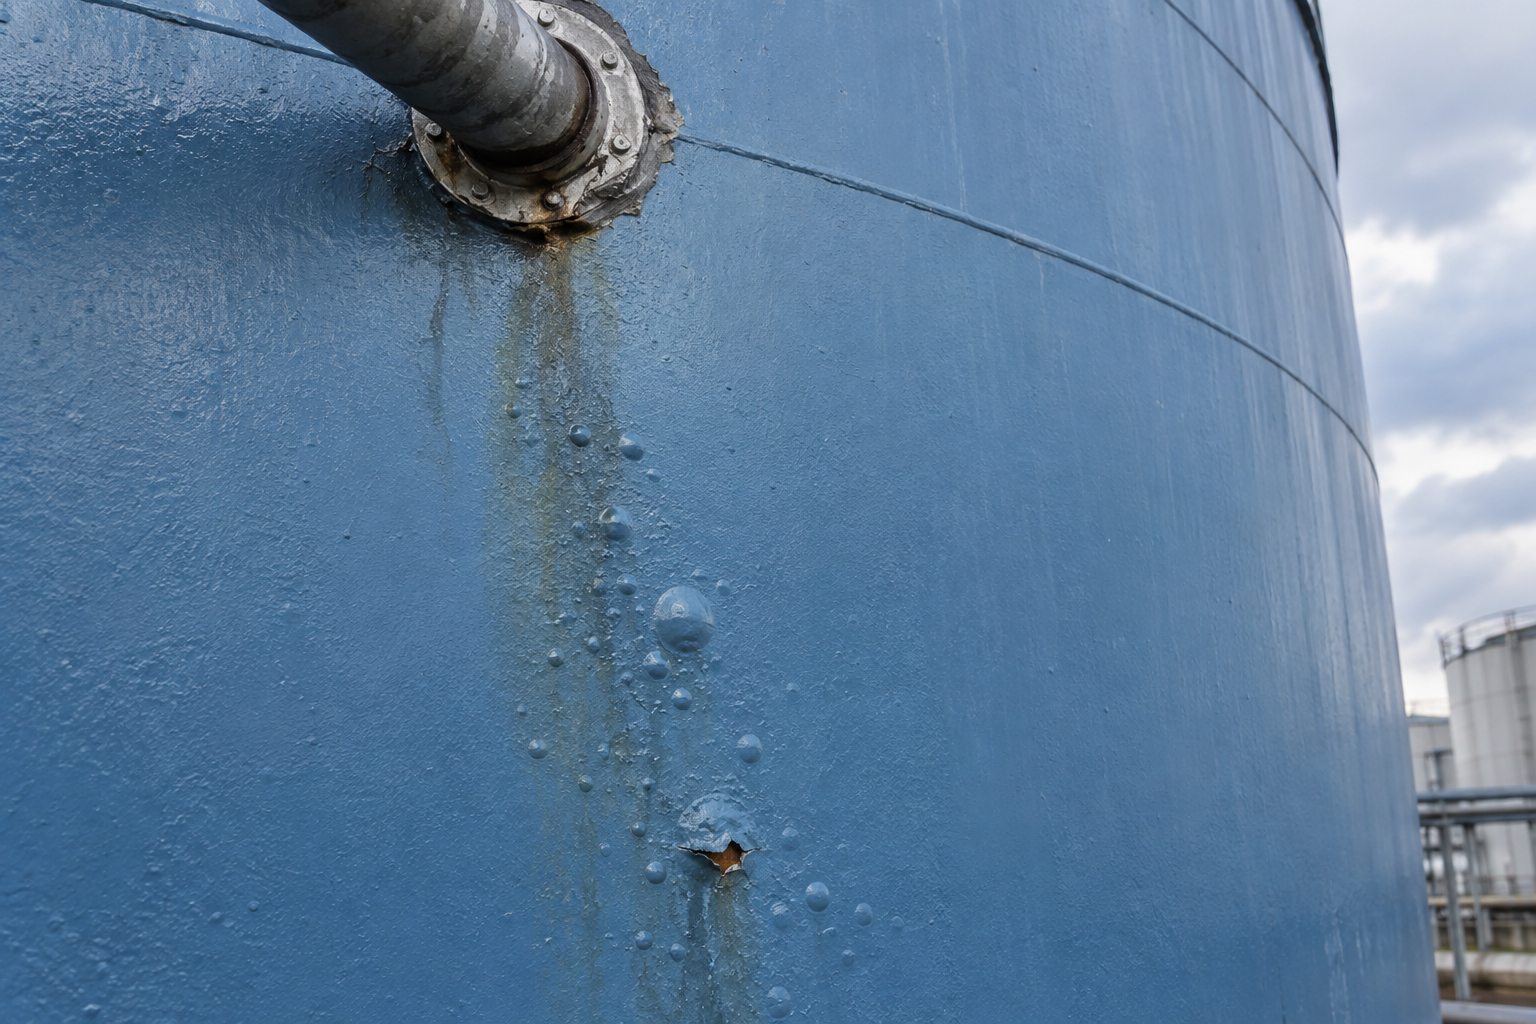
 The Bubble Is a Clue: Common Causes of Paint Blistering
A paint blister is easy to see. The cause hiding underneath it may be much harder to identify.
Moisture, soluble salts, trapped solvent, heat, poor adhesion, concrete vapor transmission, surface contamination, and application errors can all produce blisters that appear similar from the outside.
That is why a blister should be treated as evidence—not as a diagnosis.
Puncturing one blister and finding water does not automatically prove where the water came from. Finding rust underneath does not establish whether corrosion caused the blister or developed after the coating lifted.
A sound investigation considers the blister’s size, frequency, location, contents, failure plane, coating history, substrate, environment, and service exposure.
What Is Paint Blistering?
A paint blister is a raised area where the coating has separated or expanded away from an underlying surface or coating layer.
A blister may contain:
- Liquid
- Water
- Solvent
- Gas or vapor
- Corrosion products
- Nothing obvious when opened
Blisters may occur:
- Between the coating and substrate.
- Between coating layers.
- Within one coating layer.
- Across a large area.
- Only around pits, welds, edges, or repairs.
- Only after immersion, heating, rain, or chemical exposure.
Blistering Versus Bubbling
The terms blistering and bubbling are often used interchangeably, but the timing can be useful.
- Bubbling during application may be associated with entrained air, outgassing, solvent release, foaming, or application technique.
- Blistering after drying or service may involve moisture, osmosis, solvent entrapment, corrosion, heat, or loss of adhesion.
A bubble that forms in wet paint can become a pinhole, crater, or permanent blister if it does not release and level before film formation.
How Is Blistering Rated?
Coating professionals may use photographic reference standards to describe blister size and frequency.
The primary ASTM method is
ASTM D714—Standard Test Method for Evaluating Degree of Blistering of Paints
.
An international method is
ISO 4628-2—Assessment of Degree of Blistering
.
These standards provide a consistent way to describe blistering. They do not determine the cause and do not independently establish whether a particular blister rating is acceptable.
Acceptance criteria must come from the project specification, coating manufacturer, contract documents, or another governing requirement.
1. Moisture Beneath the Coating
Moisture is one of the most common contributors to paint blistering.
It may be present:
- On the surface during application.
- Inside concrete, masonry, or wood.
- Behind a wall or roof coating.
- Under an existing coating system.
- As condensation on metal.
- From leaks, groundwater, cleaning, weather, or process exposure.
When moisture moves toward the coated surface and cannot pass through the film as rapidly as it arrives, pressure may develop beneath the coating. If that pressure exceeds the coating’s adhesion or cohesive strength, a blister can form.
Common Moisture Sources
- Rain before application.
- Condensation caused by a surface near the dew point.
- Water trapped in seams, pits, or welds.
- Leaks behind walls or ceilings.
- Ground moisture beneath concrete slabs.
- Moisture moving through masonry.
- Wet or insufficiently seasoned wood.
- Pressure washing without adequate drying time.
- Water entering through unsealed joints.
2. Osmotic Blistering
Osmotic blistering occurs when water moves through a coating film toward water-soluble material beneath or within the coating system.
The coating acts as a partially permeable membrane. Water moves toward the area containing the higher concentration of dissolved material. As liquid accumulates, pressure can develop and lift the coating.
Potential osmotic materials include:
- Soluble salts on steel.
- Contaminants left after cleaning.
- Residue from chemical treatment.
- Water-soluble material in a filler or coating layer.
- Contamination in pits or under old paint.
- Curing compounds or cleaning residue on concrete.
Osmotic blisters are frequently liquid-filled. Laboratory analysis of the blister liquid may help identify dissolved ions or other contamination.
AMPP provides additional discussion of the relationship between residual soluble salts and coating failure in
Assessing the Risk of Coating Failure From Residual Soluble Salts
.
3. Soluble Salts on Steel
Chlorides, sulfates, nitrates, and other soluble salts can remain on steel after visible rust and old coating have been removed.
These contaminants may be:
- Invisible to the unaided eye.
- Concentrated inside corrosion pits.
- Deposited by marine exposure.
- Left by process chemicals.
- Introduced by contaminated abrasive or water.
- Present beneath an older coating system.
Abrasive blasting can produce a visually clean surface without removing all soluble contamination. If the steel will be exposed to immersion, condensation, or severe humidity, residual salts can contribute to osmotic blistering and underfilm corrosion.
4. Solvent Entrapment
Solvent entrapment occurs when the coating surface forms a skin before volatile material escapes from the lower portion of the film.
Trapped solvent or vapor can create pressure, softness, bubbles, pinholes, wrinkling, or blisters.
Conditions That Promote Solvent Entrapment
- Excessive wet-film thickness.
- Applying several heavy passes too quickly.
- Using an incorrect or excessively fast thinner.
- High surface temperature.
- Insufficient flash time between coats.
- Poor ventilation.
- Recoating too soon.
- Rapid surface drying.
- Applying a less permeable coating over a solvent-rich layer.
Solvent blisters may appear during curing, shortly after application, after heating, or when the coating is placed into service.
5. Excessive Film Thickness
More coating is not automatically better.
When the applied film is substantially thicker than recommended:
- The surface may cure faster than the material underneath.
- Solvent escape may be restricted.
- Internal stresses may increase.
- Heat generated by cure may become concentrated.
- Lower layers may remain soft.
- The coating may wrinkle, crack, or blister.
Measure wet-film thickness during application and dry-film thickness after curing. Do not assume that a coating is within range because it looks acceptable.
6. Painting a Hot Surface
A surface heated by sunlight, process conditions, or nearby equipment can accelerate solvent evaporation at the top of the coating.
The surface may skin over while solvent or air remains below. Continued heating may expand trapped vapor and produce blisters.
Hot-surface blistering may be most severe:
- On dark-colored surfaces.
- On roofs and exterior walls.
- On tanks exposed to direct sunlight.
- Near process heat.
- Where coating is applied during rapidly rising temperatures.
Measure the actual surface temperature. Air temperature alone does not describe the application condition.
7. Painting Over Moisture or Condensation
A metal surface can appear dry while remaining close enough to the dew point for a microscopic moisture film to form.
Coating over condensation can reduce adhesion and trap moisture at the interface. Later temperature changes or water exposure may produce blistering.
Record:
- Air temperature.
- Surface temperature.
- Relative humidity.
- Dew-point temperature.
- The difference between surface temperature and dew point.
Environmental conditions can change quickly, especially outdoors, inside tanks, and near sunrise or sunset.
8. Moisture Vapor From Concrete
Concrete contains moisture and can transmit vapor from the ground, the slab, cleaning, curing, or the surrounding environment.
A low-permeability coating may restrict this movement. Pressure or osmotic activity can then develop beneath the coating, producing blisters or delamination.
Potential contributors include:
- A missing or damaged vapor retarder.
- Groundwater beneath the slab.
- Young concrete.
- Wet cleaning methods.
- Leaks or drainage problems.
- Moisture-sensitive coating systems.
- Testing only the surface instead of slab conditions.
A commonly used qualitative indication method is
ASTM D4263—Indicating Moisture in Concrete by the Plastic Sheet Method
.
The plastic-sheet method provides an indication at the test location. It does not quantify internal relative humidity or moisture-vapor emission and should not be treated as a universal approval test for every floor-coating system.
The coating manufacturer and project specification should identify the required concrete moisture tests and acceptance limits.
9. Moisture Behind Exterior Paint
On buildings, moisture may enter from the back side of a painted surface and move outward.
Potential sources include:
- Roof leaks.
- Plumbing leaks.
- Missing or damaged flashing.
- Unsealed joints.
- Interior humidity.
- Poor ventilation.
- Wet insulation.
- Ground moisture.
- Water entering behind siding.
Repainting the visible blisters without correcting the moisture source usually leads to repeated failure.
10. Outgassing From Concrete and Porous Surfaces
Concrete, masonry, wood, and other porous materials contain air within their pores.
When the substrate warms, the air expands and moves outward. If a coating is applied while the substrate temperature is rising, escaping air can create bubbles, pinholes, or blisters in the wet film.
Outgassing is frequently observed when:
- Morning sunlight warms a slab or wall.
- Interior temperature rises after coating application.
- Porous concrete is coated without suitable sealing.
- Thick, fast-setting materials trap escaping air.
Applying during a stable or falling substrate temperature may reduce outgassing for some systems, but the coating manufacturer’s instructions should control the procedure.
11. Contamination and Poor Surface Preparation
Oil, grease, dust, wax, silicone, release agents, cleaning residue, and other contaminants can interfere with adhesion and film formation.
The coating may bridge over the contaminated area rather than bonding to it. Moisture, heat, stress, or service exposure can later produce localized blisters.
Contamination may remain:
- Inside pits.
- Along welds.
- On previously painted surfaces.
- Inside porous concrete.
- Under sanding dust.
- Where compressed air contains oil or water.
12. Poor Intercoat Adhesion
Blisters may form between coating layers rather than at the substrate.
Possible causes include:
- Exceeding the maximum recoat window.
- Recoating a contaminated surface.
- Applying over amine blush.
- Applying an incompatible topcoat.
- Recoating before the previous layer is ready.
- Failing to provide required abrasion.
- Applying over chalk, overspray, or moisture.
Opening the blister and determining which layer is exposed on each surface can help identify the failed interface.
13. Water Immersion Before Full Cure
A coating may be dry enough to touch but not ready for immersion.
Placing a lining into service too early can allow water or chemicals to enter a coating that has not developed full resistance. The film may soften, swell, discolor, lose adhesion, or blister.
Always distinguish between:
- Dry-to-touch time.
- Recoat time.
- Handling time.
- Full cure.
- Immersion-service cure.
- Full chemical-resistance cure.
14. Cathodic Protection and Cathodic Disbondment
On buried or immersed structures, cathodic-protection systems can influence coating behavior.
Excessive cathodic polarization, coating holidays, water, electrolyte, and coating limitations can contribute to loss of adhesion around an exposed area. Blistering or disbondment may develop near the defect.
This is a specialized corrosion-control issue that may require evaluation by a coatings professional and cathodic-protection specialist.
15. Chemical Exposure
A chemical may pass into, soften, swell, or react with a coating. If the coating is not resistant to the chemical, concentration, temperature, or exposure duration, blisters may form.
Chemical blistering may be affected by:
- Chemical concentration.
- Temperature.
- Continuous versus intermittent exposure.
- Mixtures of chemicals.
- Incomplete coating cure.
- Film thickness.
- Existing holidays or damage.
Chemical resistance charts should be treated as product-specific guidance, not universal promises.
16. Coating Incompatibility
A new coating may soften, swell, or lift an existing layer. Strong solvents in the new coat may attack the old coating, creating wrinkles or blisters.
Problems are more likely when:
- The existing coating is unknown.
- The existing film is poorly adhered.
- A strong-solvent coating is applied over a sensitive layer.
- A two-component coating is applied over a weak conventional paint.
- A test patch was not performed.
17. Entrained Air and Foaming
Air can be introduced during mixing, pumping, rolling, or spray application.
Potential causes include:
- Mixing at excessive speed.
- Using the wrong mixer or blade position.
- Air leaks on the pump’s suction side.
- Excessive return-line agitation.
- Rolling too aggressively.
- Using an unsuitable roller cover.
- Excessive atomization.
- Applying thick material over a porous surface.
Entrained air may form visible bubbles during application or remain trapped and appear later.
18. Applying Over Rust or an Unstable Existing Coating
Rust, mill scale, chalk, loose paint, or a poorly bonded existing coating can create a weak layer beneath the new system.
The new coating may initially look sound, but moisture or stress can produce lifting and blistering at the weak interface.
What Can the Blister Pattern Tell You?
| Observed Pattern |
Conditions to Investigate |
| Blisters over the entire surface |
Moisture, immersion, widespread contamination, cure, or coating incompatibility |
| Blisters concentrated in pits |
Soluble salts, corrosion residue, trapped contamination, or incomplete cleaning |
| Blisters near welds |
Weld contamination, salts, porosity, rough geometry, or insufficient film build |
| Blisters on sun-facing areas |
Heat, vapor expansion, trapped solvent, or moisture behind the coating |
| Blisters on concrete floors |
Moisture vapor, osmosis, outgassing, contamination, or weak surface concrete |
| Blisters between coats |
Recoat window, contamination, blush, incompatibility, or trapped solvent |
| Blisters after immersion |
Osmosis, soluble salts, incomplete cure, chemical attack, or unsuitable coating selection |
These patterns provide investigative direction. They do not establish cause without supporting evidence.
How to Investigate Paint Blistering
1. Do Not Open Every Blister
Preserve representative blisters for examination and sampling. Randomly puncturing all blisters can destroy useful evidence.
2. Map the Failure
Record where blistering appears and where it does not. Note relationships to:
- Sun exposure.
- Water sources.
- Welds and pits.
- Repairs.
- Different application shifts.
- Coating batches.
- Immersion levels.
- Concrete joints and cracks.
- Edges and drainage paths.
3. Rate the Blistering
Use the specified ASTM or ISO method to describe blister size and frequency consistently.
4. Photograph the Condition
Take overview, intermediate, and close-up photographs. Include a scale and identify the location.
5. Examine Blister Contents
Determine whether representative blisters contain liquid, vapor, corrosion products, or no obvious material.
Blister liquid may be examined for:
- pH.
- Conductivity.
- Chloride, sulfate, nitrate, or other ions.
- Solvent or chemical contamination.
Collecting and interpreting samples may require a qualified laboratory.
6. Determine the Failure Plane
When a blister is carefully opened, identify what remains on the substrate and on the underside of the lifted film.
The failure may be:
- Between coating and substrate.
- Between coats.
- Within a coating layer.
- Within the substrate.
7. Measure Coating Thickness
Compare DFT in blistered and unblistered areas. Look for excessive thickness, thin areas, and differences between application locations.
8. Review Application Records
Review:
- Surface preparation.
- Soluble-salt testing.
- Environmental conditions.
- Wet- and dry-film thickness.
- Mixing ratio and pot life.
- Thinner type and amount.
- Recoat intervals.
- Cure time before service.
- Coating batches.
- Application equipment and technique.
9. Investigate Moisture Sources
Inspect drainage, flashing, joints, roof conditions, plumbing, groundwater, concrete moisture, condensation, cleaning procedures, and process exposure.
10. Consult the Coating Manufacturer
Provide photographs, test results, product information, batch numbers, application records, exposure history, and representative samples.
Why Puncturing One Blister Can Mislead You
A water-filled blister does not prove that water was present during application. Water may have entered later through the coating or from behind the substrate.
A dry blister does not rule out moisture. The liquid may have evaporated after the blister formed.
Rust beneath a blister does not automatically prove corrosion initiated the blister. Corrosion may have begun after the coating separated and exposed the steel.
The blister contents must be evaluated together with the failure plane, location, exposure, and coating history.
Can Blistered Paint Be Repaired?
Yes—but only after the cause has been identified and corrected.
A repair may require:
- Correcting the moisture, heat, contamination, or application problem.
- Removing blistered and poorly adhered coating.
- Extending removal to sound, well-bonded material.
- Cleaning or decontaminating the substrate.
- Restoring the specified surface profile.
- Confirming acceptable environmental conditions.
- Applying the approved coating system.
- Controlling WFT and DFT.
- Allowing the required cure.
- Inspecting and testing the repair.
Simply cutting off the blister and painting over the spot may leave the original cause in place.
How to Help Prevent Paint Blistering
- Select a coating suitable for the substrate and service.
- Inspect and repair welds, edges, pits, and irregularities.
- Remove oil, grease, dust, salts, moisture, and contamination.
- Confirm surface cleanliness and profile.
- Evaluate concrete and wood moisture.
- Monitor air temperature, surface temperature, humidity, and dew point.
- Use the correct mixing ratio.
- Observe induction time and pot life.
- Use only approved thinner within permitted limits.
- Control WFT and DFT.
- Provide suitable ventilation.
- Observe minimum and maximum recoat times.
- Allow full cure before immersion or chemical service.
- Use test patches when coating compatibility is uncertain.
- Protect completed coatings from handling damage.
What Should Be Documented?
A blistering investigation may include:
- Project and failure location
- Date first observed
- Coating manufacturer and product
- Batch or lot numbers
- Coating system and individual layers
- Substrate and surface preparation
- Application dates
- Environmental conditions
- Wet- and dry-film thickness
- Mixing and thinning records
- Recoat intervals
- Cure time before service
- Type and duration of exposure
- Blister size and frequency rating
- Blister distribution and pattern
- Blister contents
- Failure plane
- Corrosion beneath the film
- Laboratory findings
- Probable cause and supporting evidence
- Corrective action and repair results
Primary Referenced Standards
The Bottom Line
Paint blistering is not one defect with one cause. Similar-looking blisters can result from moisture, osmosis, soluble salts, trapped solvent, excessive film build, heat, outgassing, contamination, poor intercoat adhesion, incomplete cure, or chemical exposure.
The blister is the visible symptom. The pattern, contents, failure plane, coating history, and service environment provide the clues.
Do not repair the bubble and ignore the pressure that created it. If the cause remains, the blister usually returns.
Technical Notice: This article provides general educational information and does not reproduce or replace complete ASTM, ISO, coating-manufacturer, laboratory, contract, safety, or project requirements. Blistering can have multiple contributing causes, and accurate failure analysis may require qualified inspection, sampling, and laboratory evaluation. Always follow the current product data sheet and specified test methods.
Copyright © 2026 Azimuth Spray Systems, LLC. All rights reserved. AirSprayTech.com—The Finishing Authority®. No portion of this article may be reproduced, distributed, republished, or transmitted without prior written permission.