|
|
|
When Paint Starts Coming Apart: Cracking, Checking, Flaking, and Erosion Explained Last Updated: 09/15/2026 |
|||||||||||||||
|
 When Paint Starts Coming Apart: Cracking, Checking, Flaking, and Erosion Explained
| Defect | Typical Appearance | What Is Happening |
|---|---|---|
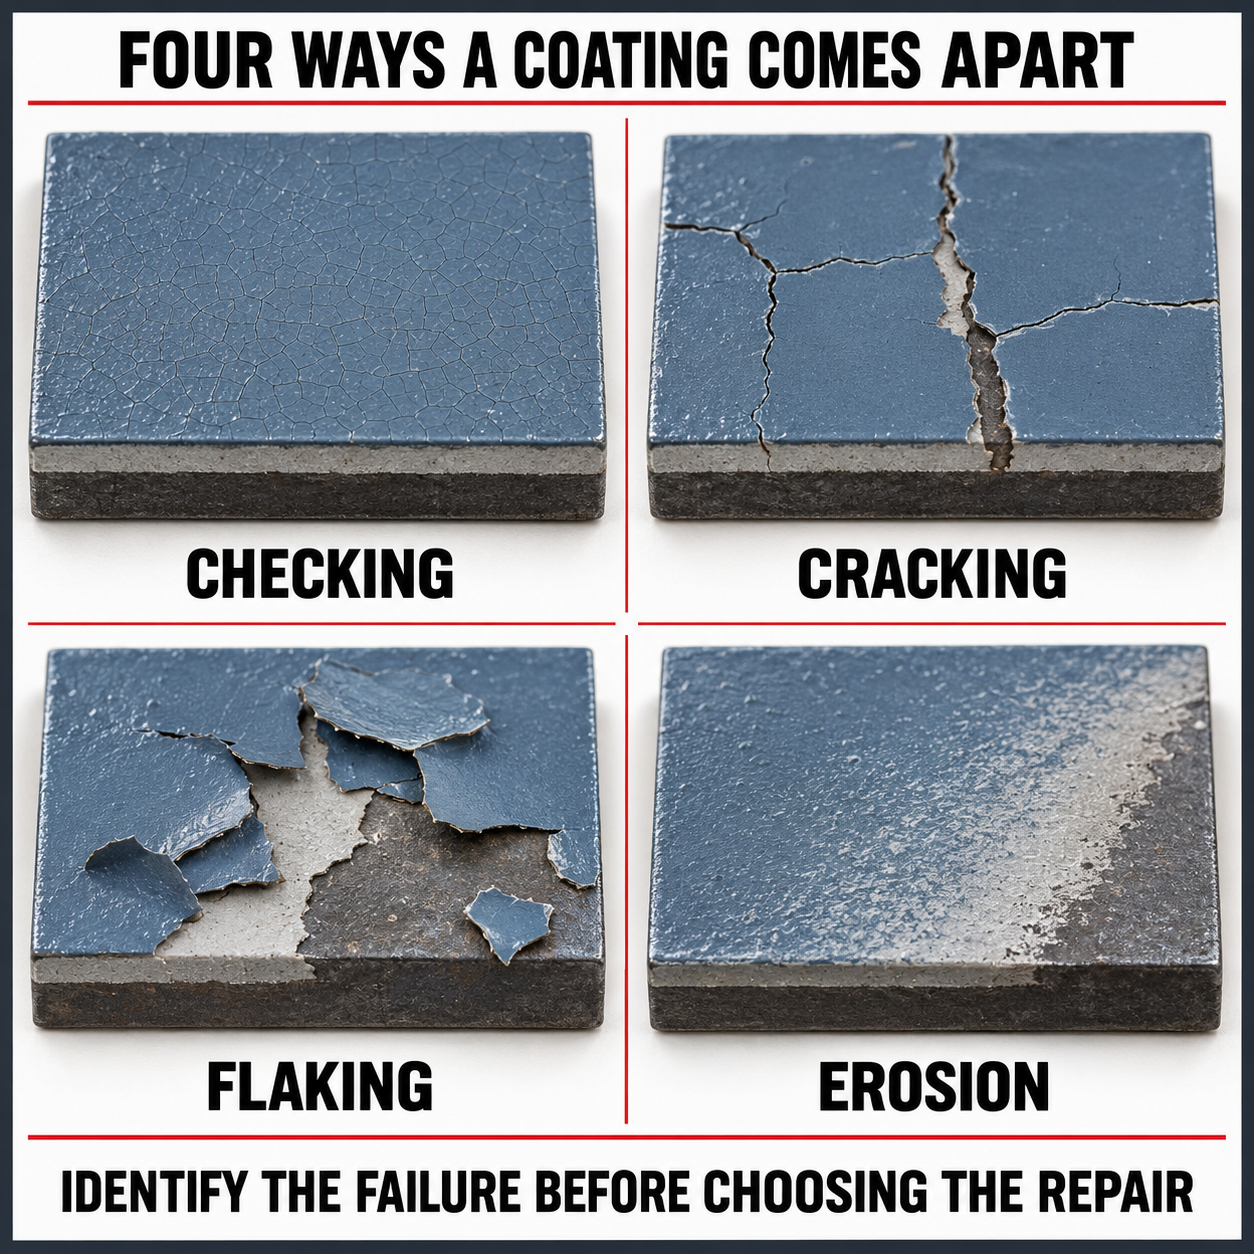
| Checking | Fine, shallow surface lines | The upper portion of the coating is beginning to split |
| Cracking | Deeper and wider breaks in the film | The split may extend through one or more coating layers |
| Flaking | Loose scales, chips, or flakes | Sections of coating have lost adhesion and are detaching |
| Erosion | Gradual thinning, wearing, or loss of paint | The coating is progressively wearing away from the surface |
1. Checking: The Early Warning
Checking consists of fine, shallow breaks that generally affect the surface of the coating. The lines may be difficult to see without close examination and typically do not initially penetrate through the complete coating system.
A checked surface may resemble:
- A network of very fine lines
- Dry or weathered skin
- Small irregular polygons
- Fine lines that become more visible when viewed at an angle
Checking is often an early indication that a coating is losing flexibility. If exposure continues, the fine checks may widen, deepen, and develop into cracking.
Common Causes of Checking
- Long-term ultraviolet and weather exposure
- Natural aging and embrittlement of the binder
- Repeated thermal expansion and contraction
- A rigid coating applied over a flexible substrate
- Excessive coating thickness
- Improperly formulated or improperly mixed material
- Application over an unstable or poorly cured undercoat
- Loss of plasticizer or other flexible components
ASTM D660 provides an illustrated comparative method for evaluating the degree of checking in exterior paint films.
2. Cracking: When the Film Can No Longer Move
Cracking is a more advanced break in the coating film. Unlike shallow checking, a crack may penetrate through the topcoat, through several coats, or through the entire coating system to the substrate.
Cracks can appear in several patterns:
- Hairline cracking: Fine but clearly visible breaks
- Alligator cracking: A pattern resembling reptile skin
- Parallel cracking: Lines running in a similar direction
- Cross-grain cracking: Cracks running across the grain of wood
- Mud cracking: Wide, irregular cracks usually associated with excessive film thickness or rapid surface drying
- Substrate-related cracking: Cracks that follow joints, seams, welds, or structural movement
Common Causes of Cracking
- Applying the coating too thickly
- Applying additional coats before the previous coat has cured
- Using incompatible coating materials
- Applying a hard, brittle topcoat over a softer coating
- Coating application at an improper temperature
- Incorrect mixing ratio or insufficient mixing
- Excessive thinner or use of the wrong thinner
- Rapid solvent evaporation or surface drying
- Movement, vibration, or flexing of the substrate
- Thermal cycling
- Natural aging and embrittlement
- Chemical or ultraviolet degradation
ISO 4628-4 establishes a method for assessing the quantity and size of coating cracks. For laboratory evaluation of coating flexibility, ASTM D522/D522M covers mandrel-bend testing of attached organic coatings.
3. Flaking: When Adhesion Is Lost
Flaking, sometimes called scaling, occurs when sections of coating detach from the layer beneath them. The loose material may separate as small chips, thin flakes, large scales, or sheets.
The location of the separation is an important clue. Failure may occur:
- Between the topcoat and an intermediate coat
- Between an intermediate coat and the primer
- Between the primer and the substrate
- Within a weak or deteriorated coating layer
- Within a weak substrate, such as weathered wood or deteriorated concrete
If the underside of a flake is examined, its color and condition may help identify the plane of failure. For example, clean metal on the underside may indicate failure at the primer-to-substrate interface. Primer remaining on the substrate may indicate intercoat adhesion failure.
Common Causes of Flaking
- Poor surface preparation
- Dust, oil, grease, salts, moisture, or other contamination
- Applying paint over loose rust, mill scale, chalk, or deteriorated coating
- Exceeding the manufacturer’s recoat window
- Incompatible coating layers
- Condensation during application or curing
- Moisture moving through a porous substrate
- Poor penetration into weathered wood or masonry
- Insufficient surface profile
- Low application temperature or incomplete cure
- Stress produced by thick or highly cross-linked coating films
ASTM D772 addresses the comparative evaluation of flaking or scaling in exterior paints. ISO 4628-5 provides an international method for assessing the quantity and size of flaking.
4. Erosion: The Coating Is Wearing Away
Erosion is the gradual wearing away of a coating film. Instead of splitting or detaching in pieces, the coating progressively loses material and thickness.
Early erosion may appear as a loss of gloss, color, or surface smoothness. Advanced erosion may expose an underlying coat, primer, or substrate. On exterior surfaces, the most severe erosion is often found where sunlight, rain, wind, airborne particles, or water runoff are concentrated.
Common Causes of Erosion
- Long-term ultraviolet exposure
- Rain, wind, and normal weathering
- Abrasive dust or airborne particles
- Repeated washing or scrubbing
- Process chemicals or cleaning agents
- Water flow or splash zones
- Insufficient original dry-film thickness
- Incorrect coating selection for the service environment
- Weak binder or poor resistance to abrasion
- Excessive pigment exposure as the binder deteriorates
ASTM D662 provides a comparative method for evaluating the degree of erosion of exterior paints. Where scrubbing or repeated cleaning is part of the service environment, ASTM D2486 may be useful for evaluating scrub resistance under controlled conditions.
Is It Checking or Cracking?
The practical distinction is generally depth and severity.
- Checking usually begins as fine, shallow breaks in the surface.
- Cracking consists of more pronounced breaks that may extend through one or more coating layers.
Do not rely on appearance alone. Carefully examine the defect with magnification. Where permitted, inspect a cross-section at the edge of a naturally failed area. Avoid cutting into a sound coating unless the inspection plan authorizes destructive testing.
Is It Flaking or Erosion?
Flaking involves the loss of identifiable pieces of coating. Erosion involves gradual film wear.
- If chips or scales can be lifted from the surface, the defect is likely flaking.
- If the coating is becoming progressively thinner without producing distinct flakes, the condition is more consistent with erosion.
- If a heavily eroded coating exposes the primer, this does not automatically mean the coating has flaked.
- A surface may exhibit both defects at the same time.
How One Defect Can Lead to Another
These defects are not always isolated. A coating may move through a sequence of deterioration:
- The surface loses flexibility and develops fine checking.
- The checks become wider and deeper, producing cracking.
- Water and contaminants enter through the cracks.
- Corrosion, moisture, or intercoat stress reduces adhesion.
- The cracked sections begin to flake away.
Erosion may occur independently, or it may thin the coating until the remaining film can no longer tolerate environmental or mechanical stress.
A Practical Jobsite Inspection Procedure
Step 1: Review the Coating History
Gather the product data sheets, application records, coating specification, repair history, and available inspection reports. Determine the coating type, number of coats, specified thickness, application dates, and exposure conditions.
Step 2: Examine the Entire Area
Do not begin with a close-up inspection. First observe the overall distribution of the defect. Note whether it occurs:
- On sun-facing or weather-facing elevations
- Around welds, joints, fasteners, and sharp edges
- Near heat sources or cold surfaces
- In splash zones or areas of water runoff
- Only on one substrate or one previously repaired area
- In a pattern corresponding to application passes
Step 3: Inspect Under Good Lighting
Use daylight when possible, supplemented by directional lighting. Raking light directed across the surface can make checking and shallow cracking easier to see. A hand magnifier or portable microscope may help distinguish superficial checking from deeper cracks.
Step 4: Determine the Depth of Failure
At a naturally damaged edge, determine which layers are involved. Look for exposed topcoat, intermediate coat, primer, substrate, rust, or deteriorated substrate material.
Step 5: Measure the Film Thickness
Dry-film thickness readings can reveal whether cracking is associated with excessive coating buildup or whether erosion has reduced the film below the required protective thickness. The measurement procedure should be appropriate for the substrate and coating system.
Useful references include ASTM D7091 for nondestructive dry-film thickness measurement and ISO 19840 for measuring dry-film thickness on rough steel surfaces.
Step 6: Evaluate Adhesion When Appropriate
An adhesion test can help determine whether apparently sound coating surrounding the defect is suitable for overcoating. Possible methods include:
- ASTM D3359 for tape adhesion testing
- ASTM D4541 for pull-off strength of coatings using portable adhesion testers
- ISO 4624 for pull-off adhesion testing
Testing a visibly failed area only proves that the failed coating is weak. When making an overcoating decision, testing should also include representative areas that appear intact.
Step 7: Look for Contributing Conditions
Check for moisture, soluble salts, corrosion, substrate movement, elevated temperature, chemical exposure, poor drainage, and coating incompatibility. A defect name describes what happened to the coating; it does not automatically identify why it happened.
Step 8: Document the Findings
A useful inspection record should include:
- Location and size of the affected area
- Defect type and apparent severity
- Pattern and distribution
- Layers involved in the failure
- Dry-film thickness readings
- Adhesion results, when performed
- Environmental and service conditions
- Overview and close-up photographs
- Comparison with an applicable reference standard
- Recommended additional investigation or repair
Repair or Remove?
The proper corrective action depends on how deeply the defect extends and whether the remaining coating is sound.
Localized Repair May Be Possible When:
- The defect is confined to a small area
- The surrounding coating remains well adhered
- The cause has been identified and corrected
- The substrate remains sound
- The repair coating is compatible with the existing system
Complete Removal May Be Necessary When:
- Cracking extends through the complete coating system
- Flaking is widespread
- Adhesion is poor throughout the area
- Multiple incompatible coating layers are present
- Moisture or corrosion is active beneath the coating
- The existing coating is too brittle or too thick to support another coat
- Erosion has reduced the system below the thickness needed for protection
Applying another coat over an unstable film may improve appearance temporarily, but the new coating cannot restore the adhesion, flexibility, or integrity of the failed layers beneath it.
Prevention Begins Before Application
Many cracking and adhesion-related failures can be reduced by following several basic practices:
- Select a coating system suited to the substrate and service environment.
- Prepare the surface to the specified cleanliness and profile.
- Remove dust, salts, oil, grease, chalk, and other contaminants.
- Verify substrate and ambient conditions before application.
- Apply each coat within the manufacturer’s recommended thickness range.
- Observe minimum and maximum recoat intervals.
- Use the specified thinner and do not exceed the permitted amount.
- Mix plural-component coatings at the correct ratio.
- Allow sufficient curing before placing the coating into service.
- Inspect and repair coating damage before deterioration spreads.
Referenced Standards and Additional Resources
- ASTM D660 — Evaluating Degree of Checking of Exterior Paints
- ASTM D662 — Evaluating Degree of Erosion of Exterior Paints
- ASTM D772 — Evaluating Degree of Flaking of Exterior Paints
- ISO 4628-4 — Assessment of Degree of Cracking
- ISO 4628-5 — Assessment of Degree of Flaking
- ASTM D7091 — Nondestructive Measurement of Dry-Film Thickness
- ASTM D3359 — Rating Adhesion by Tape Test
- ASTM D4541 — Pull-Off Strength of Coatings
- ASTM D522/D522M — Mandrel-Bend Test of Attached Organic Coatings
- AMPP CoatingsPro — Checking and Cracking: Failure Before Service
The Bottom Line
Checking is usually an early, shallow break in the coating surface. Cracking is a deeper rupture that may extend through multiple layers. Flaking occurs when coating sections lose adhesion and detach. Erosion is the progressive wearing away of the film.
The visible defect is only the beginning of the investigation. A professional assessment considers defect depth, distribution, film thickness, adhesion, environment, application history, and the condition of the substrate. The coating is telling you what happened. The inspector’s job is to understand why.
Technical Notice: This article provides general educational information. Project specifications, coating-manufacturer instructions, contract requirements, and the current edition of the applicable test standard should govern inspection and acceptance decisions. Formal testing should be performed by qualified personnel using properly verified or calibrated equipment.
Copyright © 2026 Azimuth Spray Systems, LLC. All rights reserved. AirSprayTech.com—The Finishing Authority®. No portion of this article may be reproduced, distributed, or republished without prior written permission.