AirSprayTech.com Academy
Water Spotting & Chemical Staining: Causes, Diagnosis, Correction & Prevention
Finish Defect Diagnostic Center
A ring, splash, drip trail, or discolored patch may be a removable deposit—or evidence that a liquid has etched, softened, swollen, or permanently changed the coating. The appearance alone does not establish the depth of the damage. A reliable diagnosis identifies what contacted the finish, how long it remained, whether the coating was fully cured, and what changed after the residue was safely removed.
What Water Spotting Looks Like
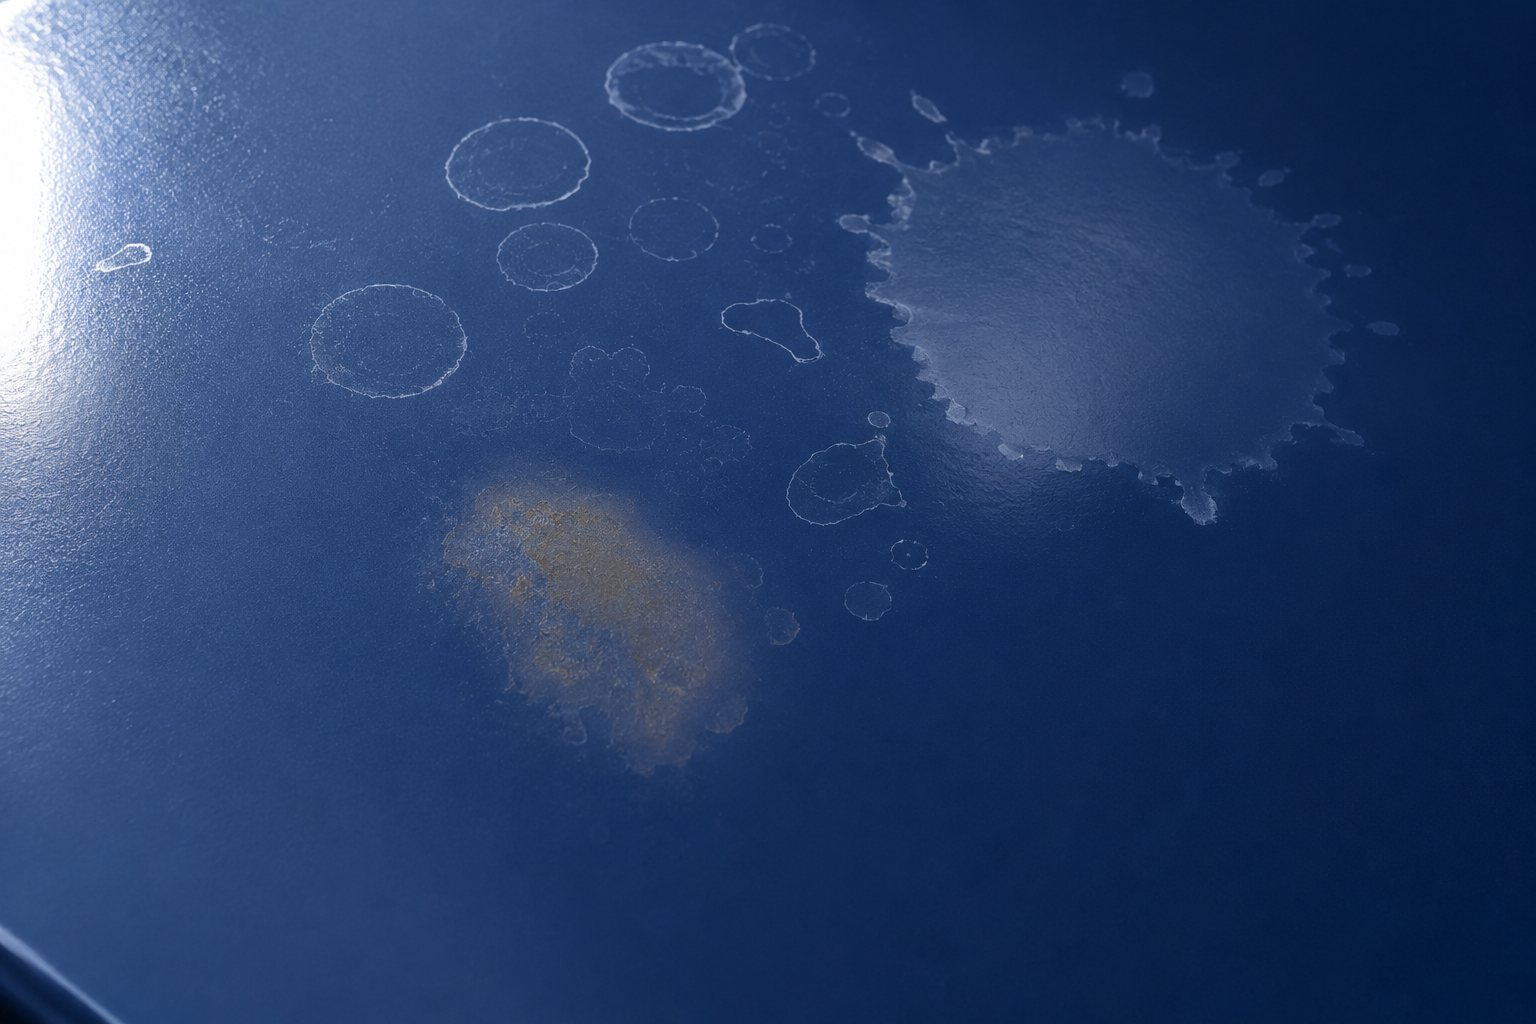
Water spotting commonly appears as pale rings, irregular droplet outlines, cloudy patches, streaks below seams, or deposits concentrated at the edge of a dried puddle. Evaporation carries dissolved minerals and contaminants toward the perimeter of a droplet, producing a recognizable ring. Hard water, rinse water, rain, sprinkler spray, cooling-tower drift, wash solutions, and process water can all leave deposits.
Not every water spot is merely mineral residue. Water can carry salts, acids, alkalis, detergents, metal ions, or airborne contamination. Prolonged contact can reduce gloss, etch a surface, create osmotic blistering, promote corrosion at a defect, or discolor a coating. Fresh or incompletely cured films are often more vulnerable than fully cured films.
What Chemical Staining Looks Like
Chemical staining may follow the exact boundary of a splash, puddle, drip, wipe mark, cup ring, or cleaning path. The affected area may darken, yellow, bleach, turn cloudy, lose gloss, become sticky, wrinkle, swell, blister, or lift. A stain can be caused by transferred color or residue on the surface, but it can also reflect a chemical reaction, plasticizer migration, pigment change, binder degradation, or penetration into the coating.
The liquid name is not enough to predict the result. Concentration, temperature, dwell time, coating thickness, cure state, surface condition, and repeated exposure all matter. A cleaner tolerated during a brief wipe may damage the same finish when left beneath a wet rag for hours.
Usually Surface Deposit
Distinct residue, mineral ring, or film that transfers to a clean cloth and disappears without changing the underlying gloss, color, hardness, or texture.
Likely Coating Damage
A mark remains after approved cleaning, or the film shows etching, dullness, discoloration, tack, softening, swelling, cracking, blistering, or loss of adhesion.
Pattern-Based Diagnostic Clues
| Observation | Likely Direction | What to Verify |
|---|---|---|
| White or pale rings matching dried droplets | Dissolved minerals or dried wash residue | Water source, hardness, rinse quality, evaporation rate, and whether gentle approved cleaning removes the ring. |
| Dull or etched droplet outlines after residue is removed | Waterborne contamination or prolonged wet contact attacked the film | pH, contaminants, dwell time, coating age, temperature, and depth of gloss loss. |
| Sharp splash, drip, or puddle boundary | Localized chemical exposure | Chemical identity, concentration, safety data sheet, temperature, contact time, and cleanup history. |
| Soft, tacky, swollen, or wrinkled film | Solvent or chemical absorption | Whether damage extends through the topcoat and whether adhesion or hardness recovers after controlled conditioning. |
| Rust-colored streak below a fastener, seam, or holiday | Corrosion product carried by water | Source of corrosion, coating discontinuity, trapped moisture, and underfilm rust creep. |
| Repeated spotting only beneath a leak or spray zone | Ongoing source rather than isolated application defect | Drainage, condensation, sprinklers, wash procedure, process leaks, and drying practices. |
Common Causes
- Mineral-laden water: Calcium, magnesium, silica, salts, or other dissolved solids remain after evaporation.
- Contaminated rinse water: Reused or poorly controlled water can redeposit detergent, soil, metal ions, or process chemicals.
- Slow drying and pooling: Horizontal surfaces, seams, poor drainage, high humidity, and repeated wetting increase dwell time.
- Premature service: Exposure before the specified cure has developed can leave a coating unusually sensitive to water or chemicals.
- Wrong cleaner or concentration: Aggressive solvents, high- or low-pH cleaners, disinfectants, degreasers, and long wet dwell times can attack the binder.
- Unexpected service exposure: Acids, alkalis, fuels, oils, hydraulic fluids, food products, fertilizers, salts, and process liquids may exceed the coating’s resistance.
- Heat and sunlight: Hot panels accelerate evaporation and can concentrate dissolved material at the droplet edge; heat may also accelerate chemical attack.
- Coating selection or application: Insufficient resistance, incorrect mix ratio, undercure, excessive or insufficient film thickness, or incompatible repair layers can reduce durability.
Do Not Confuse It With
- Blushing or blooming: A more general milky haze caused by moisture, cure chemistry, or surface exudation rather than individual dried droplets.
- Bleeding: Color migrates upward from a substrate or underlying coat; chemical staining originates with an external exposure.
- Fisheyes and craters: Depressions formed during application. Water spots generally appear after exposure and follow droplet or runoff patterns.
- Chalking: Widespread powdering from binder weathering rather than isolated rings or splash boundaries.
- Corrosion staining: Rust or metal salts travel from an active corrosion source. Cleaning the stain alone does not correct the source.
- Dirt: Loose contamination may wash away without leaving a persistent change in gloss, color, hardness, or surface profile.
A Safe Investigation Procedure
- Document before cleaning. Photograph overall location and close details with scale. Record ring direction, splash boundaries, runoff paths, nearby seams, and unaffected reference areas.
- Identify the exposure. Review wash logs, process records, leaks, weather, sprinkler use, chemical inventories, maintenance work, and the time between coating application and first exposure.
- Treat unknown residues cautiously. Isolate the area when appropriate. Consult the safety data sheet and site procedures. Do not touch, smell, taste, heat, or mix unknown materials. Use qualified personnel and suitable personal protective equipment.
- Confirm coating history. Record product, batch, substrate, preparation, mix ratio, induction, application date, film thickness, cure schedule, and service conditions.
- Start with the least aggressive approved method. On a small inconspicuous area, use the coating manufacturer’s recommended water or neutral-cleaning procedure. Do not escalate to acids, alkalis, abrasives, or solvents without compatibility guidance.
- Inspect after residue removal and drying. Compare color, gloss, texture, hardness, tack, swelling, blisters, and adhesion with an unaffected area. A clean-looking wet surface can reveal permanent dullness after it dries.
- Measure when the decision matters. Instrumental color and gloss readings can quantify changes, but use consistent locations, geometry, calibration, and surface condition.
- Reproduce carefully. If needed, expose a properly prepared test panel—not the finished asset—to the suspected liquid at controlled concentration, temperature, and dwell time.
- Determine depth and extent. Establish whether damage is residue-only, confined to the topcoat, present between coats, or accompanied by substrate corrosion or adhesion failure.
Useful Test Methods—and Their Limits
ASTM D1308 evaluates the effect of household chemicals on clear and pigmented organic finishes and can document changes such as discoloration, gloss loss, blistering, softening, swelling, and adhesion loss. ASTM D870 addresses water resistance by immersion. ASTM D2244 provides calculations for instrumental color differences, while ASTM D523 covers specular-gloss measurement.
These methods create controlled comparisons; they do not automatically prove suitability for every field exposure. Service liquids may be hotter, more concentrated, contaminated, repeatedly applied, or retained longer than a laboratory test. Acceptance criteria should come from the coating specification, manufacturer, owner, or governing agreement.
Correction
For removable deposits: Correct the water or contamination source, then clean with the mildest manufacturer-approved procedure. Rinse thoroughly when required and dry without allowing another mineral deposit to form. Avoid aggressive polishing until a test area confirms that it will not alter gloss or expose an edge.
For light surface etching: Cleaning will not replace lost film. If the manufacturer permits it and adequate coating thickness remains, controlled polishing may restore appearance on some finishes. Verify color and gloss from multiple viewing angles before treating a large area.
For chemical damage: Softened, swollen, blistered, cracked, discolored, or adhesion-damaged coating generally requires removal to sound material. Neutralization, decontamination, surface preparation, and recoating must follow the chemical and coating manufacturers’ instructions. If the substrate has corroded, remove corrosion and restore the full protective system—not only the visible topcoat.
Spot repairs can create a visible difference in color, metallic orientation, texture, or gloss. Define repair boundaries carefully and confirm that the remaining coating is sound before feathering or recoating.
Prevention
- Select a coating system verified for the actual chemical, concentration, temperature, exposure frequency, and cleaning regime.
- Allow the complete specified cure before washing, disinfecting, immersion, chemical service, or outdoor exposure.
- Control rinse-water quality; use deionized or otherwise treated final rinse water where the process and manufacturer recommend it.
- Prevent pooling through drainage, slope, seam design, prompt drying, and correction of leaks or condensation.
- Train cleaning personnel on approved products, dilution, dwell time, temperature, agitation, rinse, and drying.
- Validate new cleaners and disinfectants on representative coated test panels before broad use.
- Respond quickly to spills using a written procedure appropriate to the chemical and coating system.
- Inspect holidays, damaged edges, fasteners, and seams where water can reach the substrate and carry corrosion products outward.
Application-Specific Notes
Automotive and transportation finishes: Hard-water rinses, sprinklers, acid-containing fallout, wash chemicals, fuels, and service fluids can leave similar-looking marks. Confirm whether the clearcoat is merely contaminated or has been etched before polishing.
Industrial, OEM, and powder coatings: Parts may be exposed to cutting fluids, alkaline cleaners, coolants, lubricants, packaging moisture, or final-rinse residue. Review cure and pretreatment records as well as chemical resistance.
Floors and hygienic facilities: Concentrated cleaner beneath equipment or a wet mat can create longer exposure than an open-floor wash. Disinfectant rotation and incorrect dilution can also change the chemical challenge.
Protective linings, tanks, marine, and roofing: Ponding, immersion, condensation, salts, and concentrated process liquids can produce staining alongside blistering, corrosion, or loss of adhesion. Appearance correction must not substitute for integrity assessment.