AirSprayTech.com Academy — Finish Defect Diagnostic Center
Orange Peel in Coatings: Causes, Diagnosis, Correction & Prevention
When a Smooth Finish Turns Rough
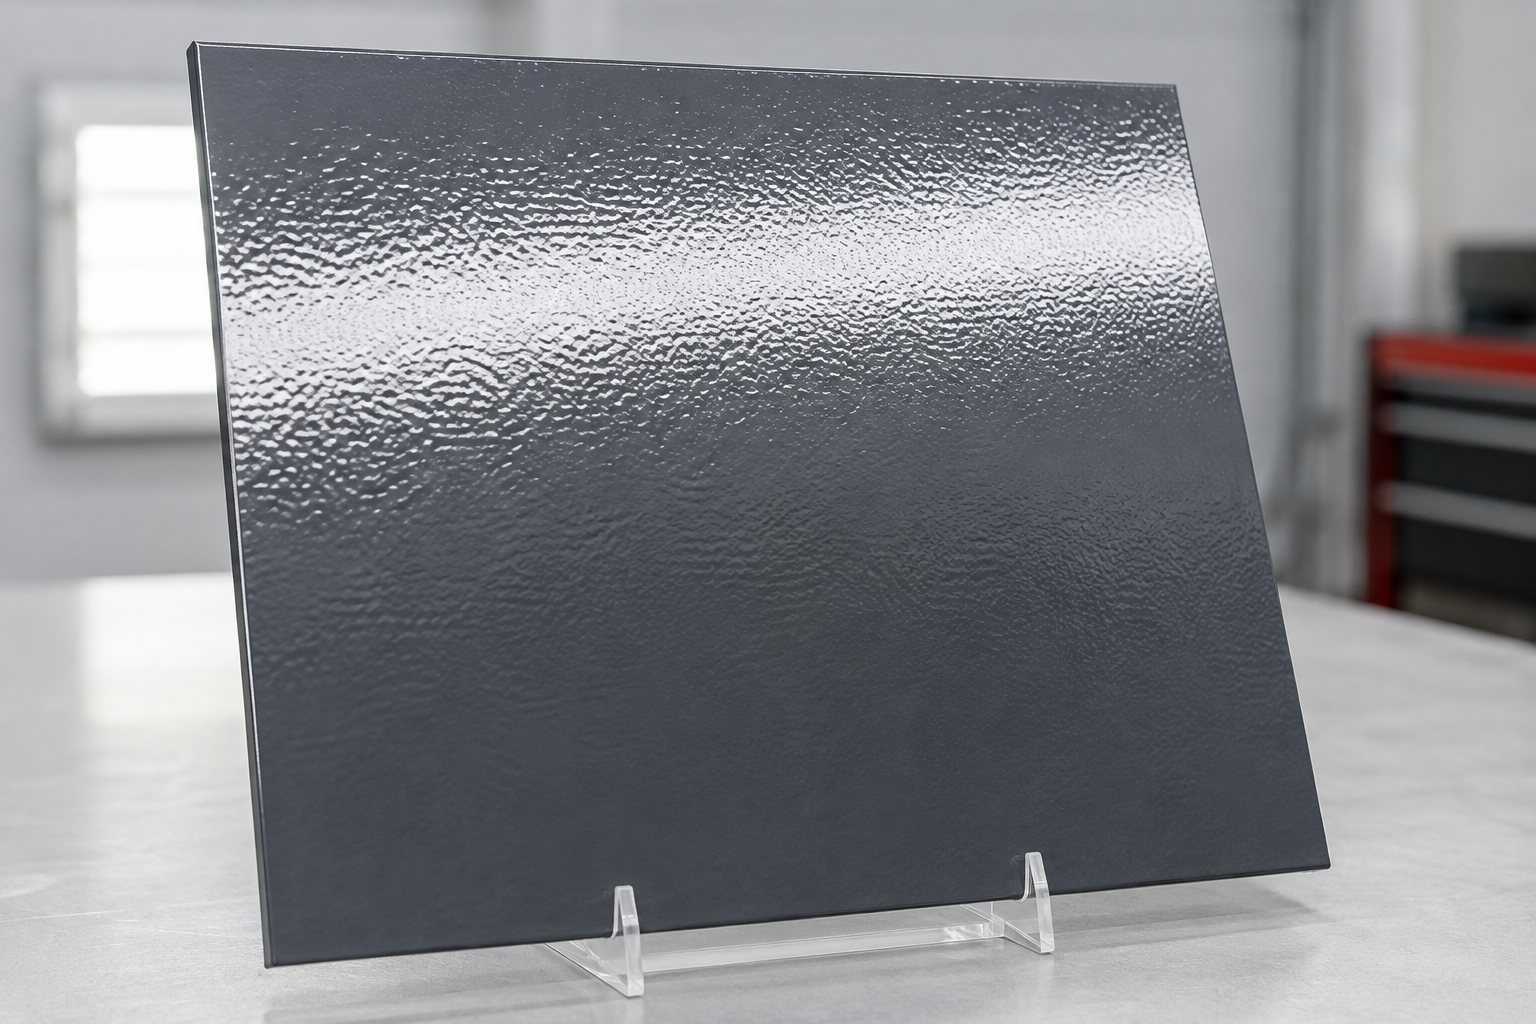
Orange peel is a pebbled or dimpled texture in a cured coating that resembles the surface of an orange. It develops when the applied film does not flow and level into the intended smooth surface before it sets. The defect may be barely noticeable under ordinary light or severe enough to distort reflected images and make an otherwise sound finish unacceptable.
Quick Diagnosis
What you see: A continuous pattern of rounded highs and lows across the finish.
What happened: Atomized droplets reached the surface but did not merge and level sufficiently before the coating lost mobility.
First things to check: Product data sheet, material viscosity and temperature, reducer or activator selection, spray-gun setup, atomizing energy, gun distance, film build, flash time, booth temperature, and airflow.
How to Recognize Orange Peel
Examine the surface under bright, directional light. Move your viewing angle so a straight light source or window is reflected across the coating. On a smooth film, the reflected edge appears relatively straight and sharp. Orange peel breaks that reflection into a wavy or rippled pattern.
- The texture is distributed across an area rather than centered around isolated holes.
- The surface has rounded hills and valleys but normally remains continuous.
- There is no central contaminant or exposed spot, as may occur with fisheyes or craters.
- There are no elongated downward trails typical of runs and sags.
- The texture often appears worse in reflected light than when viewed straight on.
Some texture is normal in many factory finishes, protective coatings, high-build materials, and powder coatings. The important question is not simply whether orange peel exists, but whether the observed texture exceeds the approved sample, specification, customer expectation, or functional requirement.
Why Orange Peel Forms
A sprayed coating arrives as thousands of droplets. Those droplets must wet the surface, join together, and flow before solvent loss, chemical reaction, cooling, or melt-solidification removes their ability to move. Orange peel develops when that leveling window is too short or when the droplets are too large, too dry, too viscous, or too unevenly deposited.
Material and Mixing
- Viscosity is too high for the product and application method.
- The mix ratio is incorrect or components were not thoroughly mixed.
- The reducer, thinner, activator, or hardener is too fast for the temperature and job size.
- The coating or compressed air is colder than the recommended application range.
- Material has advanced too far into its pot life.
Atomization and Equipment
- Atomizing pressure or energy is insufficient for the material.
- The fluid nozzle, air cap, airless tip, or other atomizing component is mismatched, worn, damaged, or partially obstructed.
- Fluid delivery is too high for the available atomizing energy.
- The spray pattern is poorly balanced or improperly adjusted.
- Compressed-air volume falls below the spray gun's requirement while triggering.
Application Technique
- The gun is held too far from the work, allowing droplets to become too dry.
- Travel speed, overlap, or gun angle produces an uneven wet film.
- The applicator attempts to cover too large an area without maintaining a wet edge.
- Coats are applied too light and dry to flow together—or so heavy that the surface cures differently from the material below.
- Flash intervals do not match the coating manufacturer's instructions.
Environment and Airflow
- High booth, material, or substrate temperature accelerates solvent loss or reaction.
- Excessive airflow pulls solvent from the wet film too quickly.
- Cold material resists atomization and flow.
- A large temperature difference exists between the coating and substrate.
- The selected reducer or cure schedule does not fit actual shop conditions.
A Disciplined Diagnostic Sequence
Do not begin by turning every adjustment on the spray gun. Change one controlled variable at a time and document the result.
| Check | What to Verify | Why It Matters |
|---|---|---|
| Product requirements | Mix ratio, induction time, pot life, recommended viscosity, reducer or activator, temperature range, flash time, and target film build. | The coating manufacturer's current instructions establish the correct operating window. |
| Material condition | Actual coating temperature, viscosity, age after mixing, filtration, and evidence of skinning or gel formation. | A material can be mixed correctly and still spray poorly if it is cold, too old, or outside its viscosity range. |
| Air and fluid supply | Dynamic air pressure at the gun, available air volume, fluid pressure, hose restrictions, filter condition, and pulsation. | Static gauge pressure does not prove that adequate air or fluid reaches the gun during spraying. |
| Atomizing components | Correct air cap, nozzle, needle, airless tip, electrode settings when applicable, cleanliness, wear, and damage. | The wrong or worn components change droplet size, spray-pattern balance, and transfer. |
| Technique | Gun distance, perpendicular angle, travel speed, overlap, triggering, wet edge, and coat sequence. | Even a correctly adjusted system cannot compensate for inconsistent deposition. |
| Environment | Air, material, and substrate temperatures; relative humidity; airflow; and changes during the application period. | Flow and leveling depend on how quickly the coating loses solvent, reacts, cools, or melts. |
| Film thickness | Wet-film thickness during application and dry-film thickness after cure. | Film build outside the recommended range can alter flow, solvent release, gloss, cure, and final texture. |
Liquid Coatings Versus Powder Coatings
In liquid spray finishing, orange peel usually points toward atomization, viscosity, solvent balance, temperature, film build, or technique. In powder coating, the deposited particles must melt, coalesce, flow, and cure. Texture may increase when the powder does not receive the specified time at metal temperature, when film thickness is inappropriate, when the powder has poor flow characteristics, when incompatible materials are mixed, or when the substrate and oven conditions are inconsistent.
Some powder products are intentionally formulated to produce texture. Compare the part with the coating supplier's approved panel before declaring that appearance defective. Never assume that increasing oven temperature or dwell time is the answer; verify the powder supplier's cure schedule and measure the actual part temperature.
Correcting Orange Peel
When the Coating Is Still Wet
Follow the product data sheet. Depending on the coating, stage of cure, and severity, the safest action may be to allow the film to cure and then evaluate it. Adding more material to a film that has already begun to set may trap solvent, cause sagging, change color or gloss, or create an even heavier texture. Do not add reducer directly to an applied surface unless the coating manufacturer specifically permits that procedure.
After the Coating Has Cured
Minor orange peel in a polishable decorative finish may sometimes be reduced by controlled sanding, compounding, and polishing—provided sufficient film thickness remains and the coating system permits it. Severe texture may require sanding or removal followed by refinishing. High-performance protective coatings, linings, powder coatings, and thin finishes may not be suitable for polishing. Confirm the repair procedure with the coating manufacturer and project specification before disturbing the film.
Do Not Repair Appearance at the Expense of Protection
Sanding and polishing remove coating. Measure remaining dry-film thickness and consider the required barrier, corrosion, chemical, ultraviolet, and service properties. A surface can look smoother while becoming less capable of doing its job.
How to Prevent Orange Peel
- Use the coating manufacturer's specified mix ratio, reducer or activator, induction time, pot life, viscosity, flash interval, and cure schedule.
- Condition the coating, substrate, and application area within the recommended temperature range.
- Select the correct spray gun, air cap, fluid nozzle, airless tip, or powder setup for the coating and required production rate.
- Set air and fluid pressures while the equipment is operating, not merely while static.
- Maintain the recommended gun distance, perpendicular angle, overlap, travel speed, and wet edge.
- Measure wet-film thickness during liquid application and verify dry-film thickness after cure.
- Use test panels when changing coating batches, reducers, spray equipment, booth conditions, or application personnel.
- For powder coating, confirm actual metal temperature and time at temperature rather than relying only on oven-air settings.
- Establish an approved appearance standard under consistent inspection lighting.
Evaluating the Finished Appearance
Visual comparison under controlled lighting is often the fastest practical method, especially when an approved reference panel is available. For more formal evaluation, gloss and reflected-image clarity can be measured, but they describe different appearance properties. ASTM D523 addresses specular gloss. ASTM D5767 addresses instrumental measurement of distinctness-of-image gloss on coated surfaces. Neither standard automatically establishes how much orange peel is acceptable for a particular part; acceptance criteria must come from the contract, specification, coating manufacturer, customer standard, or approved sample.
Technical References
- PPG: Orange Peel—Causes, Prevention, and Correction
- Axalta: Paint Defects Manual
- ASTM D523: Standard Test Method for Specular Gloss
- ASTM D5767: Instrumental Measurement of Distinctness-of-Image Gloss of Coated Surfaces
Standards and product instructions may be revised. Confirm the required edition and obtain the current complete document from its publisher or coating manufacturer before performing acceptance testing.
Return to the Finish Defect Diagnostic Center
Technical notice: This article provides general educational guidance and does not replace the project specification, coating manufacturer's current product data and safety data, applicable regulations, or qualified inspection and engineering judgment.
© 2026 Azimuth Spray Systems, LLC. AirSprayTech.com — The Finishing Authority®. All rights reserved.