AirSprayTech.com Academy
Pressure from Within: Diagnosing Solvent Popping
Finish Defect Diagnostic Center
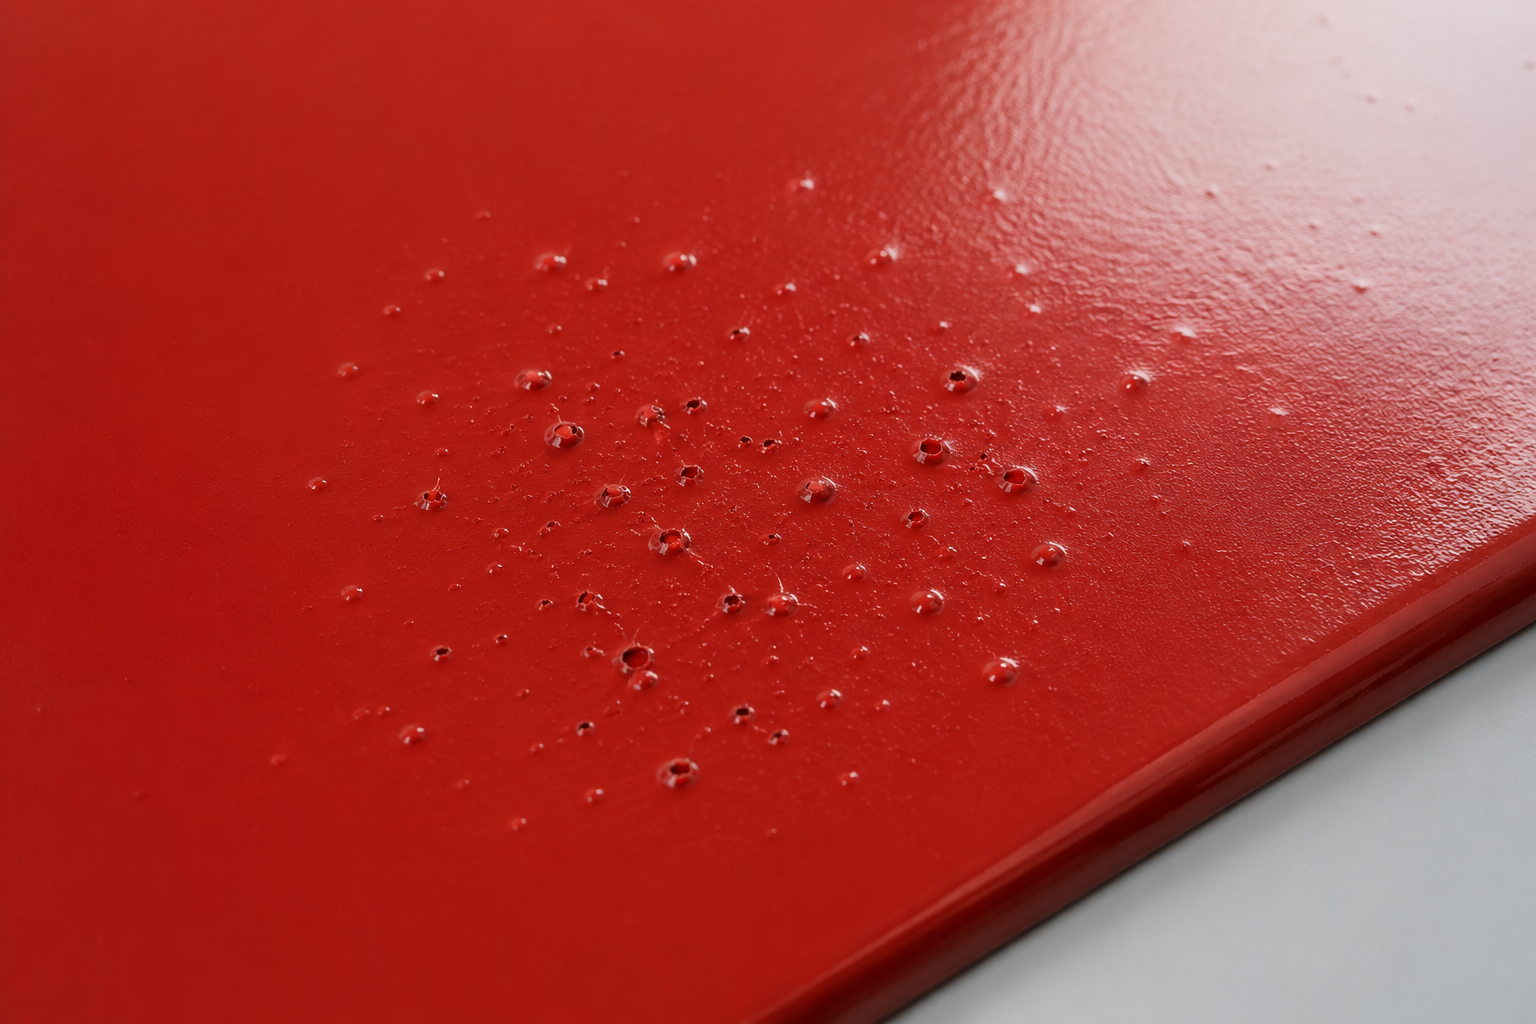
Solvent popping occurs when volatile material trapped inside a coating tries to escape after the surface has begun to form a skin. The pressure creates raised bumps, small ruptures, or open-topped, volcano-like holes in the newest paint film. It is more than a cosmetic nuisance: open pores can reduce film continuity and expose the coating system to moisture, chemicals, corrosion, or premature failure.
What Solvent Popping Looks Like
- Small raised bumps or blisters in the most recently applied coat.
- Round openings with raised rims that resemble tiny volcanoes.
- Clusters in heavy-film areas, overlaps, recesses, horizontal surfaces, or slow-draining locations.
- A defect that becomes more obvious after heat is introduced.
- Open passages that may extend beneath the visible surface.
Do not identify every small hole as a solvent pop. Pinholes, craters, fisheyes, substrate outgassing, entrained air, and contamination can produce similar-looking marks. A reliable diagnosis combines close visual examination with application records and controlled testing.
Why the Defect Forms
Material and Solvent Selection
- Reducer or thinner evaporates too quickly for the temperature, airflow, coating, or part size.
- Unapproved thinner, incorrect blend, or inaccurate mix ratio.
- Material is too viscous, too cold, or otherwise outside the product data sheet limits.
Application Conditions
- Excessive wet-film thickness or heavy passes.
- Insufficient flash time between coats.
- Coats applied wet-on-wet faster than solvent can leave.
- Low atomizing pressure or poor atomization producing large, wet droplets.
Air and Environment
- Excessive air movement skins the surface before deeper solvent escapes.
- High booth or part temperature accelerates surface drying.
- Temperature, humidity, or ventilation falls outside the coating manufacturer's recommendations.
Force Drying and Baking
- Heat is applied before the required ambient flash.
- The temperature rises too rapidly.
- The heat source is too close or oven temperature is excessive.
- An underlying coat still contains volatile material when it is topcoated.
Do Not Confuse It with Another Defect
| Condition | Typical Distinction |
|---|---|
| Solvent popping | Raised bumps or ruptured, open-topped holes that develop as trapped volatile material escapes during flash or cure. |
| Pinholing | Very small, clean openings; causes can include air release, porosity, application, or substrate effects, not only solvent entrapment. |
| Fisheyes | Coating pulls away from a contaminated spot, usually leaving a smooth-edged circular depression, sometimes with a visible center. |
| Cratering | Bowl-shaped depressions formed by localized flow disturbance; the defect may not have a ruptured raised rim. |
| Blistering | Domed lifting associated with moisture, osmotic pressure, heat, or loss of adhesion; it may involve layers below the newest coat. |
| Substrate outgassing | Gas comes from porous castings, concrete, wood, welds, or another substrate rather than primarily from retained coating solvent. |
| Dirt or nibs | Solid particles protrude from the film and usually do not contain an open escape passage. |
A Practical Jobsite or Finishing-Line Investigation
- Preserve the evidence. Photograph the defect in normal and low-angle light before sanding or cleaning. Mark affected panels and retain samples when practical.
- Establish when it appeared. Record whether bumps arose during application, flash, force dry, oven bake, cooldown, or later service. Solvent popping is strongly tied to flash and cure history.
- Map the pattern. Compare heavy and light areas, overlaps, horizontal and vertical faces, recesses, operators, guns, booths, shifts, batches, and oven zones.
- Inspect the opening. Use magnification and, for important failures, a cross-section. Determine whether the pore begins in the topcoat, passes through multiple layers, or originates at the substrate.
- Verify the material. Record product and batch numbers, pot life, induction time, mix ratio, viscosity, material temperature, reducer type, and reducer amount. Compare them with the current technical data sheet.
- Check film build. Review wet-film readings and measure cured dry-film thickness where the substrate and specification permit. Compare affected and sound areas.
- Review application settings. Document tip/nozzle, cap, atomizing pressure at the gun, fluid pressure, fan pattern, gun distance, travel speed, overlap, and number of passes.
- Reconstruct flash and cure. Record actual time between coats and before heat. Profile part temperature—not merely oven-air temperature—through the cure cycle.
- Run controlled panels. Reproduce the process, changing one suspected variable at a time. Uniform panels make comparisons much more meaningful.
What the Evidence May Be Telling You
| Observed Pattern | Investigate First |
|---|---|
| Defect is worse in overlaps and heavy areas | Wet-film thickness, pass count, gun speed, and intercoat flash. |
| Defect appears or worsens after force drying | Pre-bake flash, heat-source distance, ramp rate, and actual part temperature. |
| Problem began with a reducer or weather change | Reducer speed and suitability for current temperature, humidity, airflow, and object size. |
| Only one gun, operator, or shift is affected | Atomization, fluid delivery, technique, mixing, and recorded process settings. |
| Only porous castings or absorbent substrates are affected | Substrate outgassing, moisture, porosity, preheating, and sealing procedures. |
| Multiple parts fail in one oven zone | Localized heat, airflow imbalance, and temperature-control accuracy. |
Useful Tests—and Their Limits
There is no single universal field test that proves a defect is solvent popping. Diagnosis usually relies on defect morphology, film-thickness data, process records, temperature profiling, and a controlled reproduction. Microscopy or a polished cross-section can show where the passage originates and whether it penetrates one or several coats.
ASTM D823 describes methods for producing uniform paint films on test panels. It can support controlled comparisons, but it is not a direct solvent-popping rating method. When specified for a chemically curing coating, ASTM D5402 may help assess solvent resistance by solvent rubs. It does not, by itself, identify the cause of popping or prove complete cure.
Correcting an Affected Finish
- Stop and correct the process condition before recoating more parts.
- Determine the depth and extent of the openings. Do not merely sand the raised tops flat; hidden passages may remain below the surface.
- Sand or remove the affected coating back to a sound, clean layer using the coating manufacturer's repair instructions.
- Clean and prepare the surface without introducing silicone, oil, water, dust, or incompatible solvent.
- Reapply at the specified film build, flash interval, reducer selection, and cure schedule.
- Where coating continuity is critical, conduct the specified post-repair inspection after cure.
Preventing Solvent Popping
- Select only the manufacturer-approved reducer appropriate for actual temperature, humidity, airflow, part geometry, and job size.
- Condition and mix material accurately; observe induction time, viscosity, pot life, and filtration requirements.
- Apply the recommended wet-film thickness and build heavier systems through properly flashed coats.
- Maintain correct atomization, gun distance, travel speed, overlap, and fluid delivery.
- Provide the specified flash before recoating or introducing heat.
- Use a controlled cure ramp and verify the coated part's temperature with calibrated equipment.
- Maintain balanced booth airflow and do not aim unapproved fans or heaters directly at fresh coating.
- Record a proven process window so operators can recognize and respond to changing conditions.
Notes for Different Coating Operations
Automotive refinish and OEM: heavy clearcoat application, short flash, fast reducer, or premature bake are frequent lines of inquiry. Follow the complete product system and its temperature-dependent reducer chart.
Industrial, protective, floor, and lining systems: thick films and multilayer work increase the importance of wet-film control, recoat windows, substrate temperature, ventilation, and staged cure. Entrapped solvent may also affect continuity in immersion or corrosion service.
Waterborne coatings: water and co-solvents still require a controlled release path. Humidity, airflow, temperature, coat thickness, and flash procedure must match the manufacturer's instructions.
Powder coating: conventional powder is generally solvent-free, so “solvent popping” is usually not the correct diagnosis. Similar openings may result from substrate outgassing, moisture, trapped air, contamination, or cure by-products and should be investigated as a powder-coating defect.
What to Record in the Inspection Report
Include photographs and locations; date, time, part, and batch identity; substrate and preparation; full coating system; product and batch numbers; mixing and thinning; material, air, surface, dew-point, and oven conditions; equipment settings; wet- and dry-film readings; flash and cure history; observed defect size and density; tests performed; affected quantity; suspected cause; corrective action; and verification results. Separate observations from conclusions.
Technical References
- PPG Automotive Refinish: Solvent Popping
- Sherwin-Williams: Liquid Coatings Troubleshooting Guide
- Axalta: Paint Defects Manual
- ASTM D823: Producing Films of Uniform Thickness on Test Panels
- ASTM D5402: Assessing Solvent Resistance of Organic Coatings Using Solvent Rubs
Technical notice: This article is general educational guidance. Always follow the coating manufacturer's current product data sheet, safety data sheet, written repair procedure, project specification, and applicable safety and environmental requirements.
Return to the Finish Defect Diagnostic Center
© 2026 Azimuth Spray Systems, LLC. AirSprayTech.com — The Finishing Authority®. All rights reserved.