AirSprayTech.com Academy — Finish Defect Diagnostic Center
When the Finish Lets Go: Diagnosing Peeling and Delamination
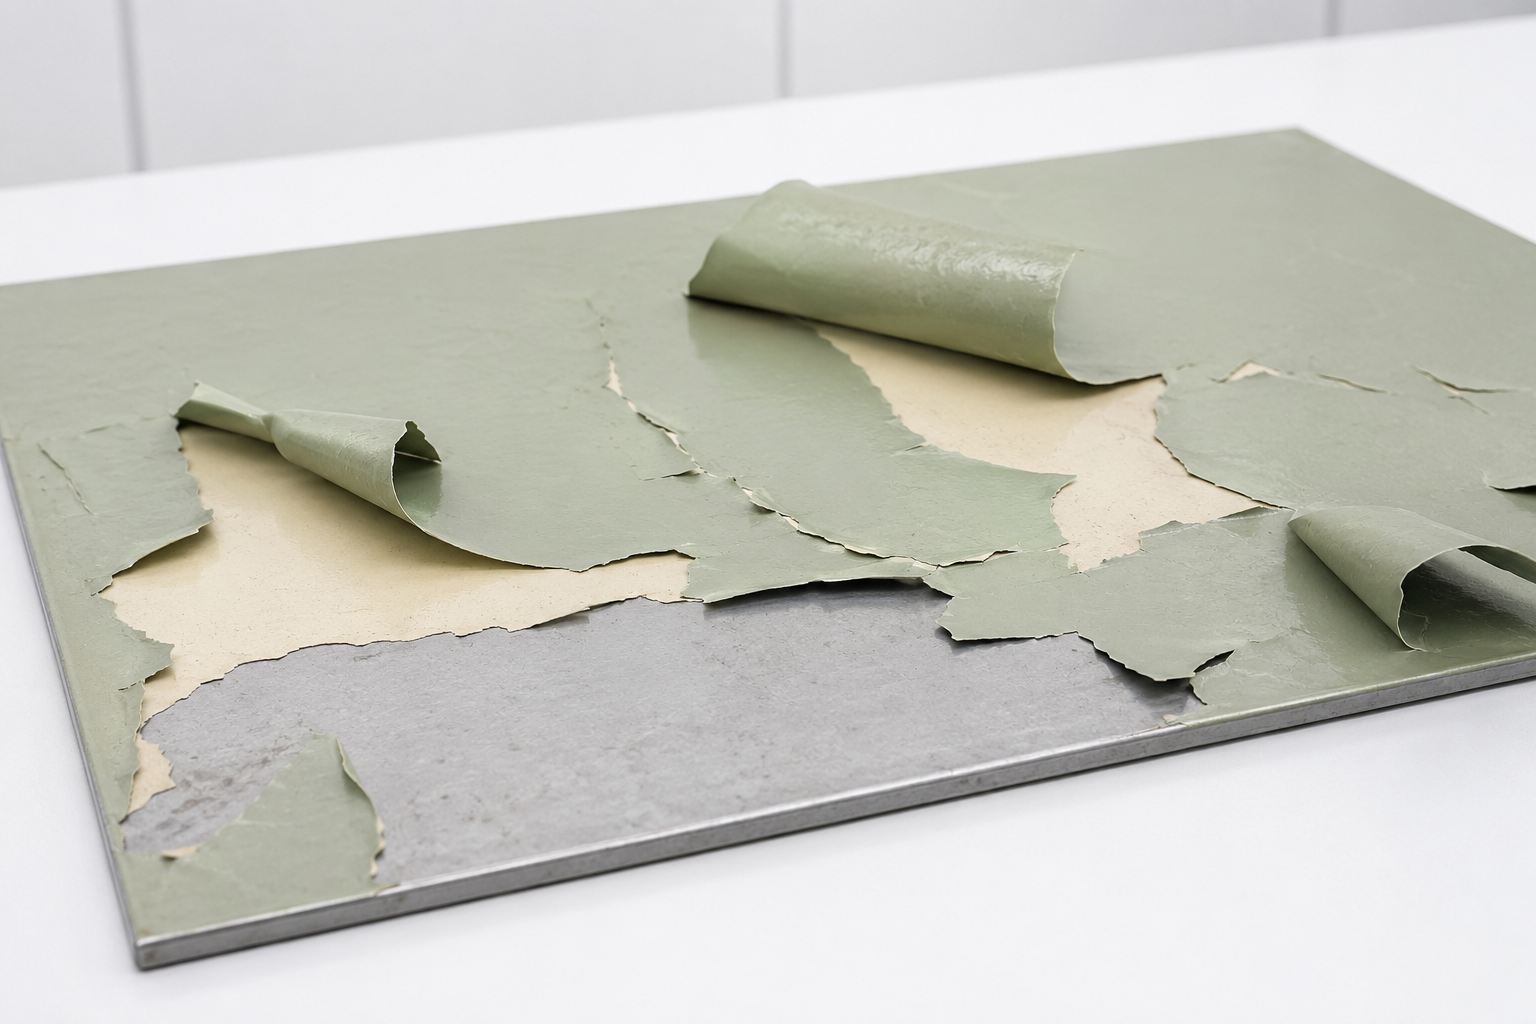
Peeling is easy to see. The hard part is determining exactly where the coating system separated and why. The exposed surface and the back of the detached film hold the clues.
What Peeling and Delamination Look Like
Failure may begin at an edge, scratch, seam, fastener, impact site, blister, crack, holiday, or poorly prepared area. The film can lift in flexible ribbons, stiff chips, broad sheets, or thin flakes. Sometimes only the topcoat separates. In other cases, primer and topcoat come off together and expose bare steel, aluminum, galvanized metal, concrete, wood, plastic, or a previous finish.
The words are often used together, but they are not identical. Peeling describes the visible form of failure. Delamination identifies separation at an interface. Adhesive failure occurs at an interface; cohesive failure occurs within a coating, adhesive, or substrate. Correct diagnosis requires naming the actual plane of failure.
Common Causes
Surface Contamination
- Oil, grease, silicone, wax, release agent, soap, dust, salts, moisture, or fingerprints remain on the surface.
- Cleaning residue is not rinsed or neutralized.
- Flash rust, oxidation, mill scale, corrosion products, chalk, or weak old coating remain beneath the system.
Inadequate Surface Preparation
- The substrate lacks the cleanliness or anchor profile required by the coating.
- A glossy previous coat is not abraded.
- Concrete laitance, curing compounds, weak surface paste, or moisture is not addressed.
- Plastic, galvanized metal, aluminum, or other difficult substrate receives the wrong pretreatment or primer.
Intercoat and Material Problems
- The recoat window is exceeded or the preceding coat is too hard, contaminated, undercured, or overcured.
- Products, reducers, primers, sealers, or existing finishes are incompatible.
- Mix ratio, induction time, agitation, pot life, film build, flash, or cure is incorrect.
- A brittle topcoat is applied over a soft or moving layer.
Service and Design Stresses
- Moisture, osmotic pressure, chemicals, heat, freeze-thaw cycling, UV, abrasion, impact, or thermal expansion attacks the system.
- Sharp edges, flexing panels, joints, welds, water traps, and dissimilar materials concentrate stress.
- Corrosion grows beneath the film and forces it away.
- Cathodic protection or immersion conditions exceed the coating system's capability.
The Failure Plane Tells the Story
| What Remains Exposed | Failure Plane | Investigate First |
|---|---|---|
| Clean bare substrate | Substrate-to-primer or substrate-to-coating adhesion | Cleanliness, soluble salts, moisture, profile, pretreatment, oxidation, primer selection, and delay before coating |
| Primer remains; topcoat is gone | Primer-to-topcoat intercoat adhesion | Recoat window, contamination, primer cure, sanding, compatibility, flash, and topcoat solvent strength |
| Top of an intermediate coat remains | Separation within the multilayer system | Identify every layer, batch, application date, cure condition, surface treatment, and repair coat |
| Coating residue remains on both sides | Cohesive fracture inside a coating layer | Mixing, cure, film thickness, embrittlement, plasticization, chemical attack, or internal stress |
| Substrate material is attached to the coating | Cohesive failure of weak substrate | Concrete surface strength, degraded wood, friable masonry, corrosion, laminate, filler, or weak old finish |
| Rust, salts, liquid, or deposits lie underneath | Environment-assisted loss of adhesion | Moisture path, contamination, holidays, corrosion, immersion service, drainage, and exposure history |
Do Not Confuse It With These Defects
- Blistering: pressure forms raised domes before the film ruptures; ruptured blisters may later peel.
- Flaking: small pieces detach, often after cracking or weathering. It is a form of coating loss but may not show broad sheet separation.
- Cracking or checking: the film splits but may remain attached until the damage advances.
- Crawling: wet coating pulls away during application and exposes the surface before cure.
- Chalking or erosion: binder degradation removes material gradually from the surface rather than separating an intact layer.
- Impact damage: a local chip at a strike point does not automatically prove a general adhesion problem.
How to Investigate the Failure
- Preserve the evidence. Photograph wide and close views before pulling more film away. Record scale, orientation, weather, service exposure, part number, location, and coating history.
- Map the pattern. Note whether failure follows edges, welds, water paths, sun exposure, repairs, batches, spray zones, racks, seams, concrete joints, or particular elevations.
- Examine both sides. Use clean tools and magnification to compare the exposed surface with the back of the detached film. Save representative chips in clean, labeled containers.
- Identify every layer. Document color, thickness, texture, hardness, and apparent fracture plane. A microscope or cross-section may reveal layers that are difficult to distinguish in the field.
- Review preparation records. Check cleaning, abrasive, profile, dust, salt, moisture, pretreatment, primer timing, environmental readings, and hold-point inspections.
- Review application and cure. Verify product codes, batches, shelf life, mix ratio, induction, reduction, wet and dry film thickness, flash, recoat interval, cure time, and cure temperature.
- Review service conditions. Look for water, condensation, chemicals, heat, UV, flexing, impact, pressure washing, immersion, cathodic protection, and conditions beyond the specification.
- Test deliberately. Select test type, locations, sample count, acceptance criteria, and repair plan before destructive testing. Compare failed areas with sound controls.
Useful Adhesion Test Methods
No adhesion test can recreate the entire service history or independently prove root cause. The governing specification should state the method, preparation, conditions, frequency, and acceptance criteria.
- ASTM D3359 — Standard Test Methods for Rating Adhesion by Tape Test. Its applicability is limited by coating thickness, substrate, and method requirements; it is not a universal quantitative bond-strength test.
- ASTM D4541 — Standard Test Method for Pull-Off Strength of Coatings Using Portable Adhesion Testers. Report the instrument method, protocol, preparation, scoring, adhesive, result, and fracture location.
- ASTM D6677 — Standard Test Method for Evaluating Adhesion by Knife. This qualitative field method requires judgment and is used within its stated scope.
A high numerical pull-off value does not erase visible delamination elsewhere, and a low result may reflect glue failure, substrate failure, poor dolly preparation, cutting damage, geometry, or a different weak plane. Always record where the fracture occurred, not merely the number or rating. Adhesion methods are destructive or damaging and require approved spot repair.
Correcting Peeling and Delamination
Painting over loose coating does not restore adhesion. Remove all detached and unsound material to a firmly bonded boundary. The necessary extent may be much larger than the visibly peeled area, especially when moisture, salts, corrosion, weak concrete, incompatible layers, or widespread preparation problems are involved.
Correct the underlying cause: stop moisture; remove contaminants and salts; repair corrosion, leaks, weak substrate, and design traps; establish the required profile; and resolve compatibility, cure, or recoat-window issues. Feather sound edges only when permitted. Rebuild the specified primer, intermediate, and finish coats under acceptable environmental conditions and verify wet film, dry film, cure, and adhesion as required.
For critical linings, containment, aerospace, rail, marine, roof, floor, pipeline, structural, or OEM systems, obtain a written repair procedure from the responsible coating manufacturer, owner, or specifier. A spot repair is inappropriate if the remaining system cannot be shown to be sound.
Preventing Adhesion Failure
- Specify surface cleanliness, profile, moisture, soluble-salt, dust, and pretreatment requirements appropriate to the substrate and service.
- Protect prepared surfaces from flash rust, oxidation, condensation, dust, and handling contamination.
- Confirm surface temperature, air temperature, humidity, dew point, ventilation, and weather before and during coating.
- Use compatible products as a complete system; do not assume any topcoat will bond to any primer or old finish.
- Follow mix ratio, induction, reduction, pot life, film-build, flash, recoat, and curing instructions.
- Abrade, clean, or reactivate aged coats exactly as the manufacturer directs when a recoat window is exceeded.
- Stripe-coat and protect edges, welds, seams, bolts, and difficult geometry when the specification requires it.
- Control moisture migration in concrete, masonry, roofs, walls, floors, and wood before coating.
- Use representative qualification panels or test patches when substrate history, compatibility, or preparation is uncertain.
- Document each layer so a later investigator can identify products, batches, dates, conditions, film thickness, and cure.
Application-Specific Clues
Architectural coatings: Moisture, chalk, glossy old paint, dirt, incompatible coatings, and weak plaster or wood commonly influence peeling. Correct water entry and remove unsound material before repainting.
Concrete floors and linings: Determine whether the coating released cleanly, pulled away weak concrete paste, or separated between layers. Moisture vapor, laitance, curing compounds, contamination, surface strength, profile, and service chemicals all matter.
Powder, electrocoat, automotive, aerospace, rail, and OEM finishes: Pretreatment control, rinse quality, conversion coating, contamination, oven profile, undercure, overbake, film build, sealer compatibility, and rework history can create distinct failure planes.
Protective and immersion systems: Investigate soluble salts, holidays, corrosion, cathodic effects, chemical resistance, water temperature, pressure, and service conditions. Failure at a small opening can spread beneath an otherwise intact film.
Technical References
- Sherwin-Williams: Peeling and Cracking Problem Solver
- ASTM D3359: Rating Adhesion by Tape Test
- ASTM D4541: Pull-Off Strength of Coatings
- ASTM D6677: Evaluating Adhesion by Knife
© 2026 Azimuth Spray Systems, LLC. AirSprayTech.com — The Finishing Authority®. All rights reserved.