Finish Defect Diagnostic Center
When Paint Pulls Away: Diagnosing Fisheyes
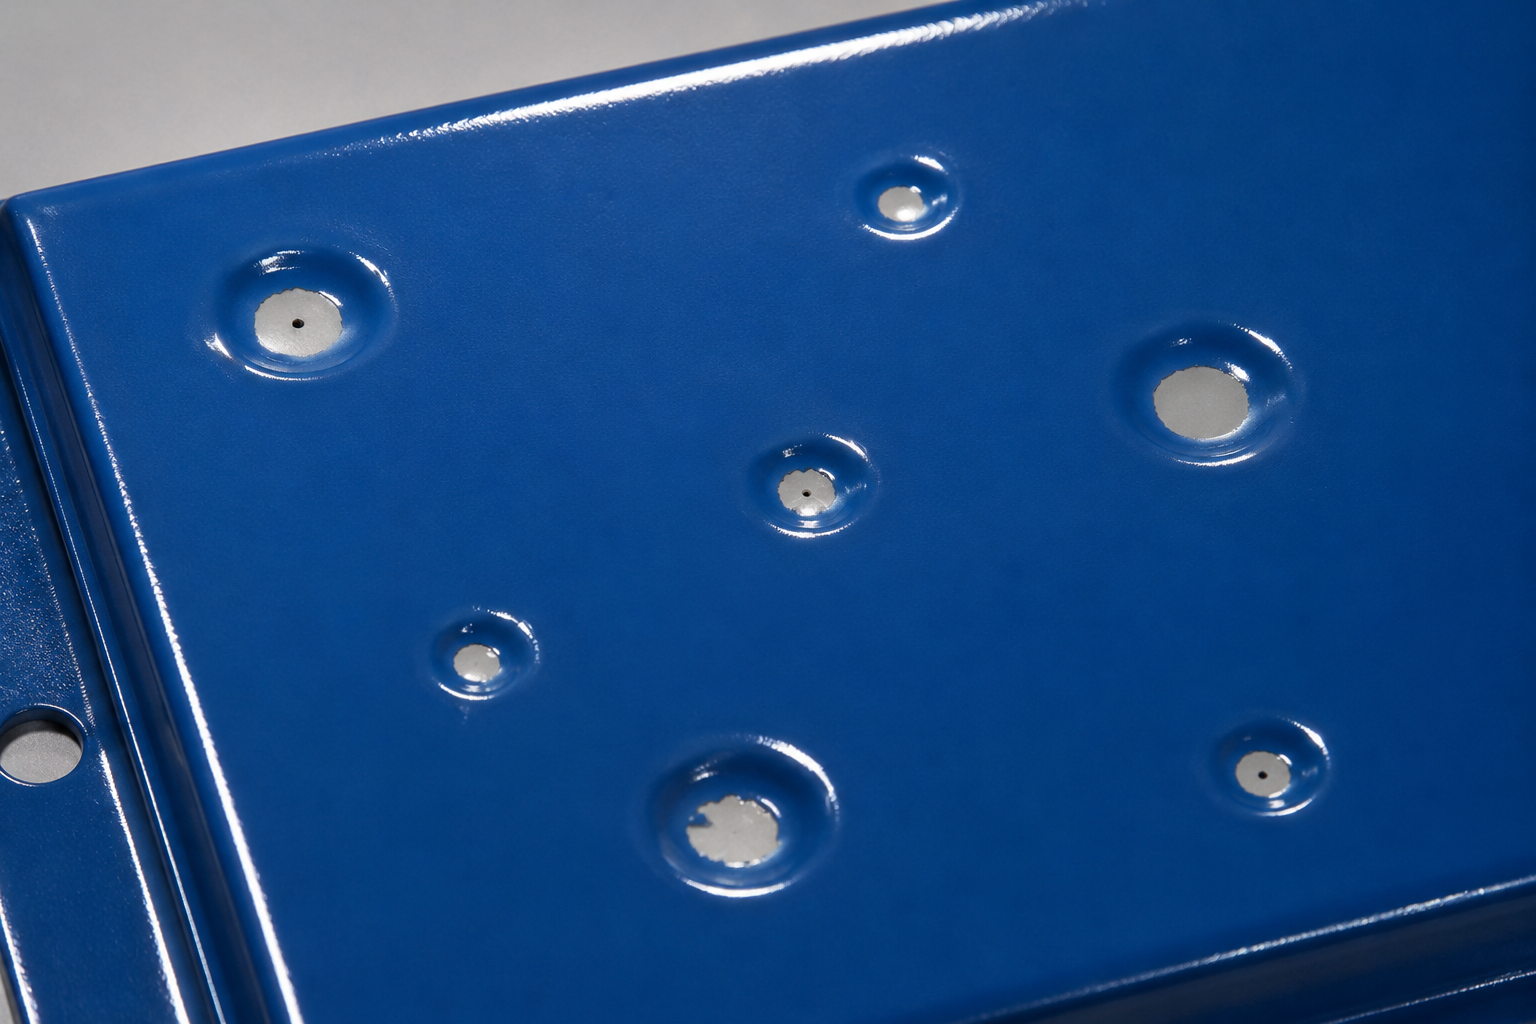
Fisheyes are small, round, crater-like depressions that form when a wet coating pulls away from a localized area instead of wetting it uniformly. The center may expose an undercoat or substrate, and a tiny contaminant is sometimes visible at the center. In many shops the same condition is called cissing. Fisheyes commonly appear during application or shortly afterward, while the film is still flowing.
What a Fisheye Looks Like
- A circular or nearly circular depression with a clean, rounded boundary.
- Coating pulled away from the center, sometimes exposing primer or substrate.
- A tiny contaminant particle occasionally visible in the middle.
- One isolated crater, scattered defects, or clusters of different sizes.
- Appearance during or soon after application, rather than after long service.
- An otherwise smooth film between affected spots.
The defect develops because the liquid coating cannot maintain a continuous film over an area with different surface energy or contamination. The coating flows toward the surrounding higher-energy surface and away from the low-energy spot. Silicone is a notorious source because a very small amount can spread widely, but oil, grease, wax, release agents, soap residue, incompatible cleaners, and other materials can produce similar wetting failures.
Common Contamination Sources
On the Part
- Oil, grease, wax, polish, silicone, fingerprints, or hand lotion.
- Mold release, stamping oil, cutting fluid, hydraulic fluid, or lubricant.
- Detergent, surfactant, cleaner, rinse-aid, or pretreatment residue.
- Adhesive, tape residue, marker, polishing compound, or repair product.
From the Air System
- Compressor oil, condensed water, pipe contamination, or failed filtration.
- Lubricated air tools connected to the finishing-air system.
- Dirty hoses, regulators, pressure pots, pumps, guns, or fittings.
- Contamination introduced during maintenance or component replacement.
From the Work Area
- Silicone sprays, tire dressings, furniture polishes, and aerosol lubricants.
- Release agents, sealants, caulks, machining operations, or nearby repairs.
- Dirty booth walls, grating, hangers, racks, filters, or recirculated air.
- Cleaning products used on floors, equipment, vehicles, or nearby surfaces.
From the Coating Process
- Unapproved thinner, additive, defoamer, fisheye eliminator, or mixing container.
- Cross-contamination from another coating, powder, solvent, or reclaimed material.
- Incompatible primer, sealer, repair, or incompletely cured underlying film.
- Dirty strainers, stirrers, transfer equipment, cups, or reusable wipes.
Do Not Confuse Fisheyes with These Defects
| Condition | Typical clue | Diagnostic direction |
|---|---|---|
| Fisheyes or cissing | Wet coating pulls away in round depressions; a center speck may be present. | Surface cleanliness, wetting, silicone, oil, wax, air quality, process products, and nearby operations. |
| General cratering | Broader crater-like appearance that may have several causes, including flow disturbance, entrained material, or contamination. | When the defect formed, crater shape and depth, material condition, substrate, application, and cure. |
| Pinholes | Very small openings or channels that may extend into or through the film, often without the broad circular wetting rim. | Porosity, trapped air or gas, outgassing, application thickness, substrate, and film formation. |
| Solvent popping | Small ruptures or volcano-like openings form as trapped volatile material escapes from a setting film. | Film build, flash time, solvent selection, temperature, airflow, and bake schedule. |
| Dirt nibs or inclusions | Raised bumps or particles projecting from the film rather than coating pulled away from a center. | Part cleaning, clothing, booth housekeeping, filtration, material straining, and airflow. |
| Blisters | Raised domes caused by pressure or loss of adhesion beneath a formed film. | Moisture, solvent, gas, osmotic pressure, adhesion, temperature, and service exposure. |
A Practical Diagnostic Sequence
- Stop and preserve the evidence. Photograph the defect before wiping, sanding, or recoating. Record whether it appeared in the wet film, during flash, during cure, or after service.
- Map the distribution. Determine whether defects follow fingerprints, repair areas, part racks, a specific gun, one booth zone, a fluid circuit, one material batch, or particular part geometry.
- Inspect the center. Use magnification and raking light. Note any central particle, exposed layer, stain, ring, or residue. Do not touch representative defects unnecessarily.
- Trace the part history. Review fabrication, machining, molding, pretreatment, washing, rinsing, handling, masking, sanding, wiping, storage, and repair steps.
- Check material control. Confirm product, batch, mix ratio, reducer, pot life, temperature, filtration, containers, stirring tools, and all additives against the current technical data sheet.
- Check the compressed-air path. Inspect drains, separators, coalescing filters, desiccant or dryer, regulators, hoses, and point-of-use filtration. Test air quality using the specified procedure.
- Inspect the equipment. Clean and examine the gun, pump, pressure pot, cup, fluid lines, seals, lubricants, and maintenance products. Determine whether only one application circuit produces the defect.
- Run controlled panels. Change one variable at a time—prepared panel, material, gun, air supply, booth, or operator—to isolate the source without contaminating additional equipment.
Useful Tests—and Their Limits
There is no single universal field test that identifies the substance responsible for a fisheye. Visual appearance alone cannot prove silicone, oil, or any specific contaminant. Useful investigation may include magnification, clean control panels, water-break observations where permitted by the surface-preparation procedure, compressed-air quality checks, extraction and laboratory analysis, and surface-energy or contact-angle measurements.
ASTM D7334-08(2022) addresses advancing contact-angle measurement for assessing surface wettability of coatings, substrates, and pigments. ASTM D8597-24 addresses surface wettability using portable goniometers. These practices may support a controlled investigation, but neither is a direct fisheye identification test or a substitute for the coating manufacturer’s surface-preparation requirements.
Corrective Action
The correct repair depends on the coating system, cure stage, severity, substrate, and service. First stop the contaminant source. Otherwise, the defect may return immediately or migrate to other parts, guns, booths, or production lines.
- Wet film: Follow the coating manufacturer’s procedure. Some systems require removal of the wet coating, cleaning, drying, and complete reapplication.
- Cured film: Sanding only the crater rim may leave the contaminant behind. Remove affected coating to a verified clean, sound layer as directed; clean and reapply the complete system within its recoat requirements.
- Protective coatings and linings: If the depression creates a holiday or exposes substrate, use the specified discontinuity inspection and repair procedure after cure.
- Production finishes: Confirm color, appearance, adhesion, film thickness, and cure on a representative test panel before releasing repaired parts.
Never add fisheye eliminator, flow additive, silicone, or extra solvent simply because craters are visible. Such additives change surface tension and may move the defect, affect intercoat adhesion, alter appearance, or contaminate equipment and future work. Use an additive only when the exact product’s current technical data sheet or coating manufacturer expressly permits it for that layer and application.
Prevention
- Separate silicone sprays, polishes, release agents, lubricants, and incompatible aerosols from finishing and preparation areas.
- Clean before sanding when required so abrasion does not spread contamination into the surface.
- Use the coating manufacturer’s approved cleaner and two-cloth or specified wiping procedure; do not allow contaminated cleaner to evaporate on the part.
- Use clean, compatible gloves, wipes, mixing containers, strainers, hoses, seals, and maintenance products.
- Maintain pretreatment chemistry, rinse-water quality, washer stages, part drainage, and drying.
- Keep finishing compressed air separate from lubricated tool air and maintain dryers, drains, and filters.
- Control booth housekeeping, filters, airflow, racks, hangers, floors, and nearby maintenance activities.
- Quarantine suspect parts, materials, and equipment until the source is identified.
- Approve repairs, additives, and process changes with controlled test panels before resuming production.
Powder, Electrostatic, E-Coat, and Industrial Considerations
Powder coating: Crater-like defects may come from oil, silicone, incompatible powder, cross-contamination, pretreatment residue, dirty reclaim, compressed air, or substrate outgassing. Separate fresh and reclaimed powder variables during diagnosis. Follow the powder supplier’s reclaim limits and do not assume a liquid fisheye additive is suitable for powder.
Electrostatic liquid application: Charging does not correct poor surface wetting. Contamination can be carried through fluid systems, while poor grounding or excessive film build may create different appearance problems. Investigate deposition and wetting as separate questions.
E-coat and multistage pretreatment: Review bath contamination, carryover, rinse quality, drainage, oven deposits, body sealer, lubricants, and upstream process changes. A defect repeated in a fixed location may point to trapped solution or contamination rather than spray application.
Floors, roofs, concrete, and porous substrates: Fisheye-like openings may instead involve outgassing, moisture, porosity, or substrate contamination. Use moisture, surface-preparation, and porosity assessments appropriate to the system before assigning the defect name.
Documentation
Record the part, substrate, location, coating layer, time of appearance, pattern, material and batch, mix and additives, equipment circuit, air supply, cleaning products, pretreatment conditions, booth conditions, photographs, samples, control-panel results, suspected source, corrective action, and verification results. A cause supported by repeatable evidence is far more valuable than a familiar guess.
Technical References
- PPG Automotive Refinish: Cissing—Causes, Prevention, and Rectification
- Sherwin-Williams: Fisheyes—Surface Contamination
- Axalta: Paint Defects Manual
- ASTM D7334-08(2022): Surface Wettability by Advancing Contact-Angle Measurement
- ASTM D8597-24: Surface Wettability Using Portable Goniometers
Technical notice: This article provides general educational guidance. Always follow the current coating technical data sheet, safety data sheet, project specification, equipment instructions, and applicable environmental and workplace requirements. Qualified inspection or laboratory analysis may be necessary when contamination is widespread or failure consequences are significant.
© 2026 Azimuth Spray Systems, LLC. AirSprayTech.com — The Finishing Authority®. All rights reserved.