AirSprayTech.com Academy
Paint Wrinkling: Causes, Diagnosis, Correction & Prevention
Finish Defect Diagnostic Center
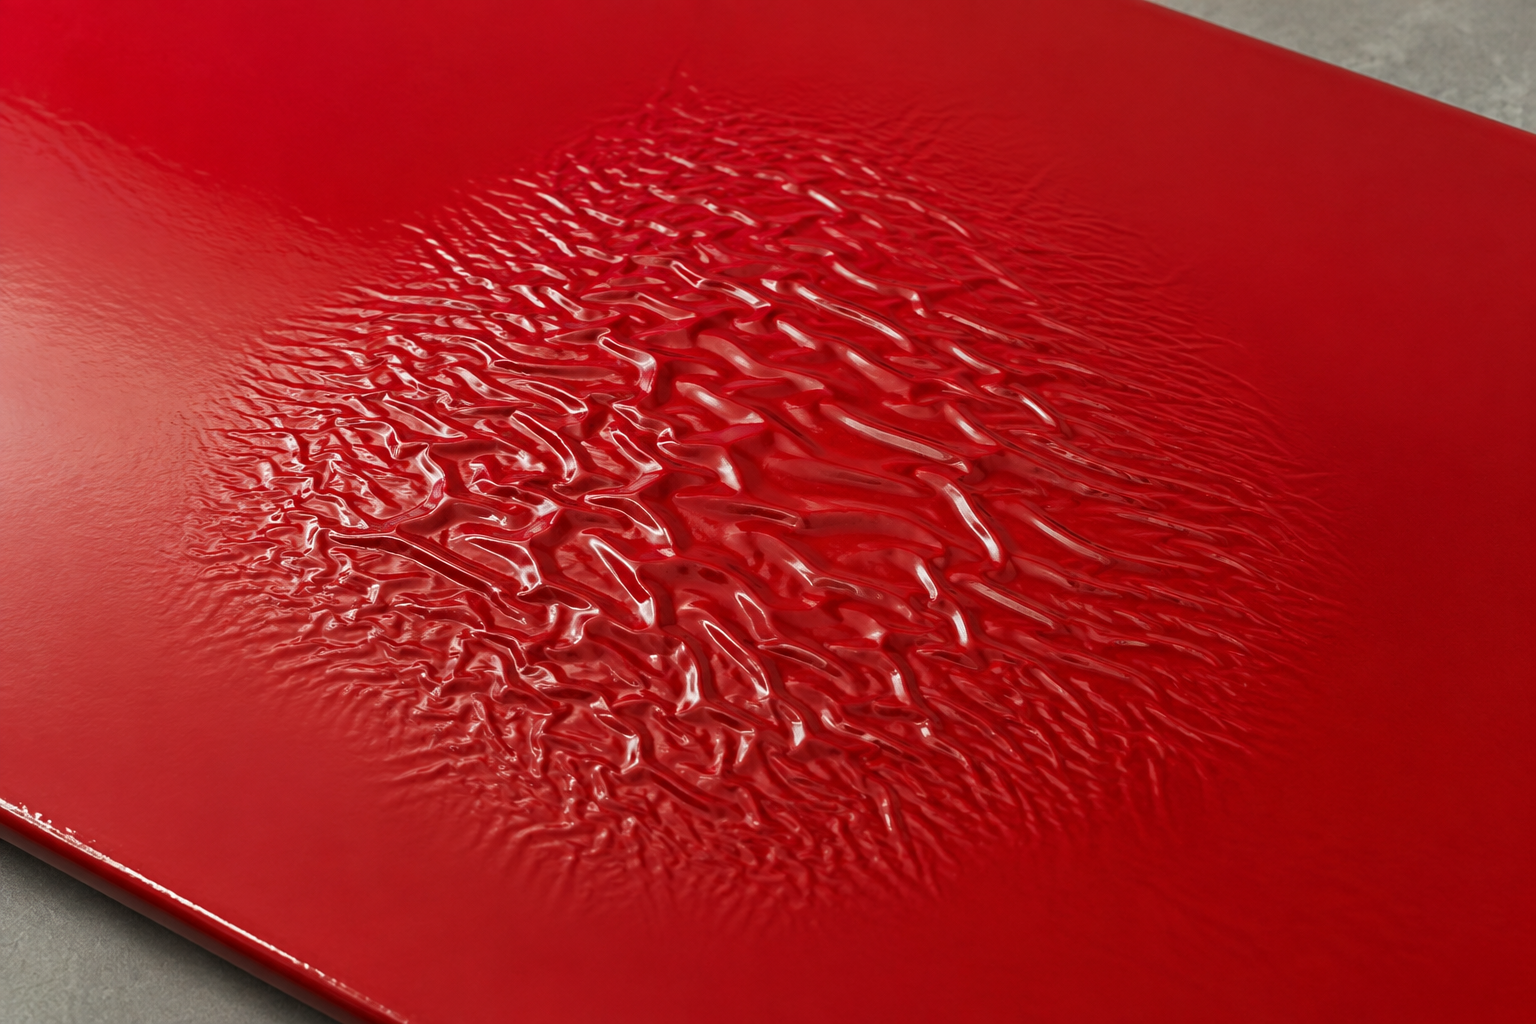
Wrinkling is a coating defect in which the surface forms puckers, folds, shriveled ridges, or irregular waves during application or cure. It often develops when the top of a coating skins over while material underneath remains soft, swollen, solvent-rich, or mobile. As the lower portion dries, cures, expands, or is attacked by new solvent, the surface can no longer remain flat.
What Wrinkling Looks Like
- Irregular puckers, ripples, folds, or shriveled areas.
- A skin-like surface that may feel soft underneath when fully cooled.
- Localized failure around heavy overlaps, repairs, edges, sand-throughs, or thick-film areas.
- Wrinkles that appear immediately after recoating or later during force drying or baking.
- Gloss and color variation caused by the distorted surface.
The terms wrinkling, lifting, raising, shriveling, and puckering are sometimes used interchangeably. In practice, the layer affected and the time of appearance matter more than the label. Wrinkling within a freshly applied film and solvent lifting of an old finish can look similar but require different process corrections.
How Wrinkling Forms
Excessive Film Build
- Heavy wet coats create a surface skin while deeper material remains mobile.
- Too many coats or insufficient flash trap solvent.
- Thick areas heat and cure differently from surrounding film.
Solvent and Reducer Problems
- Reducer evaporates too quickly and closes the surface early.
- Aggressive solvent attacks a sensitive old coating.
- Unapproved thinner changes flow, skinning, and cure behavior.
Recoat and Compatibility
- A new coat is applied outside the permitted recoat window.
- Uncured enamel, lacquer, primer, filler, or repair material is recoated.
- Sanding exposes a solvent-sensitive layer beneath a more resistant finish.
Cure and Temperature
- Heat is applied too soon or the temperature rises too quickly.
- Mix ratio, catalyst, induction time, or cure schedule is incorrect.
- Cold material or substrate slows the lower film while the surface changes rapidly.
Read the Pattern
| Observed Pattern | Investigate First |
|---|---|
| Wrinkles only in heavy or overlapped areas | Wet-film thickness, pass count, flash time, and reducer selection. |
| Defect follows sand-throughs or featheredges | Solvent-sensitive old finish exposed beneath a resistant layer. |
| Entire repair wrinkles immediately | Coating compatibility, old-finish sensitivity, aggressive solvent, and recoat window. |
| Wrinkling appears after oven entry | Pre-bake flash, temperature ramp, actual part temperature, and excessive build. |
| One batch or mixing station is affected | Mix ratio, catalyst, reducer, agitation, contamination, and material identity. |
| Underlying coat is still soft | Incomplete cure, trapped solvent, incorrect catalyzation, or excessive total film build. |
Do Not Confuse It with Another Defect
| Condition | Typical Distinction |
|---|---|
| Wrinkling | Puckered folds caused by differential movement, skinning, cure, swelling, or solvent attack. |
| Runs and sags | Wet coating moves downward under gravity, leaving beads, trails, or curtains rather than random puckers. |
| Orange peel | A repeating pebbled texture caused by inadequate flow and leveling without major folds. |
| Lifting | An underlying film swells, raises, or loses integrity when attacked by new solvent; wrinkling may be one visible symptom. |
| Cracking or checking | The film splits into lines or networks; wrinkles are initially folded or puckered without necessarily breaking open. |
| Blistering | Domed, hollow, or fluid-filled areas caused by pressure or adhesion loss rather than a generally folded surface skin. |
| Mud cracking | Deep polygonal cracks commonly associated with excessive build and shrinkage, not merely surface puckering. |
A Practical Investigation
- Preserve the evidence. Photograph normal and low-angle views before sanding. Mark representative affected and sound areas.
- Establish timing. Record whether the defect began during application, flash, recoating, oven entry, bake, cooldown, or later service.
- Map the pattern. Compare heavy and light areas, overlaps, sand-throughs, repair edges, part orientation, operators, guns, batches, and oven zones.
- Identify the affected layer. Use magnification or a cross-section to determine whether only the topcoat wrinkled or an older layer swelled and distorted.
- Check hardness cautiously. Compare the surface and underlying film only with methods approved for the coating. A soft lower layer is important evidence.
- Measure film build. Review wet-film readings and measure cured DFT where the substrate and specification permit. Include total system thickness.
- Review material records. Confirm products, batches, mix ratio, induction, pot life, reducer, viscosity, material temperature, and shelf life.
- Reconstruct the recoat sequence. Record time and temperature between every layer and compare them with minimum and maximum recoat windows.
- Profile cure. Record ambient flash and actual part temperature through force dry or bake—not oven air alone.
- Use controlled panels. Reproduce the complete system, changing one suspected variable at a time. Do not test aggressive solvent on a production part without written authorization.
Testing and Standards
No single universal field test proves the cause of wrinkling. Useful evidence includes cross-sections, film-thickness measurements, cure and hardness checks specified for the product, solvent-resistance testing when applicable, process logs, oven profiling, and controlled compatibility panels.
ASTM D823 describes producing uniform coating films on test panels and can support controlled comparisons. It is not a direct wrinkling test. When specified for chemically curing coatings, ASTM D5402 can help assess solvent resistance, but solvent rubs do not identify every cause or prove complete cure. Follow the product specification and manufacturer.
Correcting Wrinkling
- Stop the process and identify whether the failure is confined to the newest coat or includes underlying layers.
- Allow the system to cool and cure before final evaluation unless the manufacturer gives a specific wet-removal procedure.
- Remove wrinkled, softened, lifted, incompatible, or poorly cured coating to a stable layer. Sanding only the ridge tops can leave defective film underneath.
- Feather sound edges without exposing additional solvent-sensitive material. If sensitive layers are exposed, use the approved isolation procedure.
- Apply the manufacturer-recommended primer or sealer, allowing the specified film build, flash, and full cure.
- Reapply compatible topcoats within the approved recoat window and verify the repair after cure.
Prevention
- Confirm compatibility of the complete coating system, including old finishes and repair materials.
- Use only recommended reducers, hardeners, additives, and mix ratios.
- Apply the specified wet-film thickness through controlled, properly flashed coats.
- Observe minimum and maximum recoat windows at the actual substrate and shop temperature.
- Allow primers, fillers, enamels, and other undercoats to cure adequately before recoating.
- Avoid sanding through a resistant finish into a solvent-sensitive layer; isolate exposed areas as directed.
- Provide the required ambient flash before force drying and control the part-temperature ramp.
- Record coating, surface, and air temperatures, because cold film can retain solvent longer.
- Verify film build, mix accuracy, and cure on test panels when the existing finish is unknown.
- Train operators not to correct hiding, gloss, or texture by applying one excessively heavy coat.
Application Notes
Automotive refinish: Old uncatalyzed lacquer or enamel, exposed basecoat, sand-throughs, and repairs outside their recoat window are common concerns. A small approved compatibility test can prevent a large failure.
Industrial and protective coatings: Excessive total film build, incorrect cure, aggressive topcoat solvent, and early heat can leave a tough skin over soft material. Evaluate performance and adhesion, not appearance alone.
Floor, roof, and lining systems: Thick applications, cool substrates, poor intercoat cure, and incompatible repairs can wrinkle over broad areas. Moisture and contamination must also be ruled out.
Powder coating: Powder can develop wrinkled or textured surfaces from excessive film, formulation effects, contamination, incompatible powders, substrate outgassing, or cure conditions. Because the mechanism differs from solvent attack in liquid paint, investigate film build, powder identity, reclaim, part temperature, and oven profile.
What to Document
Record photographs, defect timing and location, affected layer, existing-finish history, preparation and sand-throughs, complete coating system, batch numbers, mixing and reduction, wet- and dry-film thickness, flash and recoat times, air/material/surface temperatures, oven profile, hardness or solvent-resistance results, cross-section findings, corrective action, and verification results. Separate observed facts from suspected causes.
Technical References
- PPG Refinish: Lifting and Wrinkling
- Sherwin-Williams Automotive Finishes: Troubleshooting Refinish Problems
- Axalta: Paint Defects Manual
- ASTM D823: Producing Uniform Films on Test Panels
- ASTM D5402: Assessing Solvent Resistance by Solvent Rubs
Technical notice: This article provides general educational guidance. Follow the coating manufacturer's current product data sheet, safety data sheet, approved repair procedure, project specification, and applicable safety and environmental requirements.
Return to the Finish Defect Diagnostic Center
© 2026 Azimuth Spray Systems, LLC. AirSprayTech.com — The Finishing Authority®. All rights reserved.