Finish Defect Diagnostic Center
Coating Cratering: Causes, Diagnosis, Correction & Prevention
A Finish Full of Trouble: Diagnosing Coating Craters
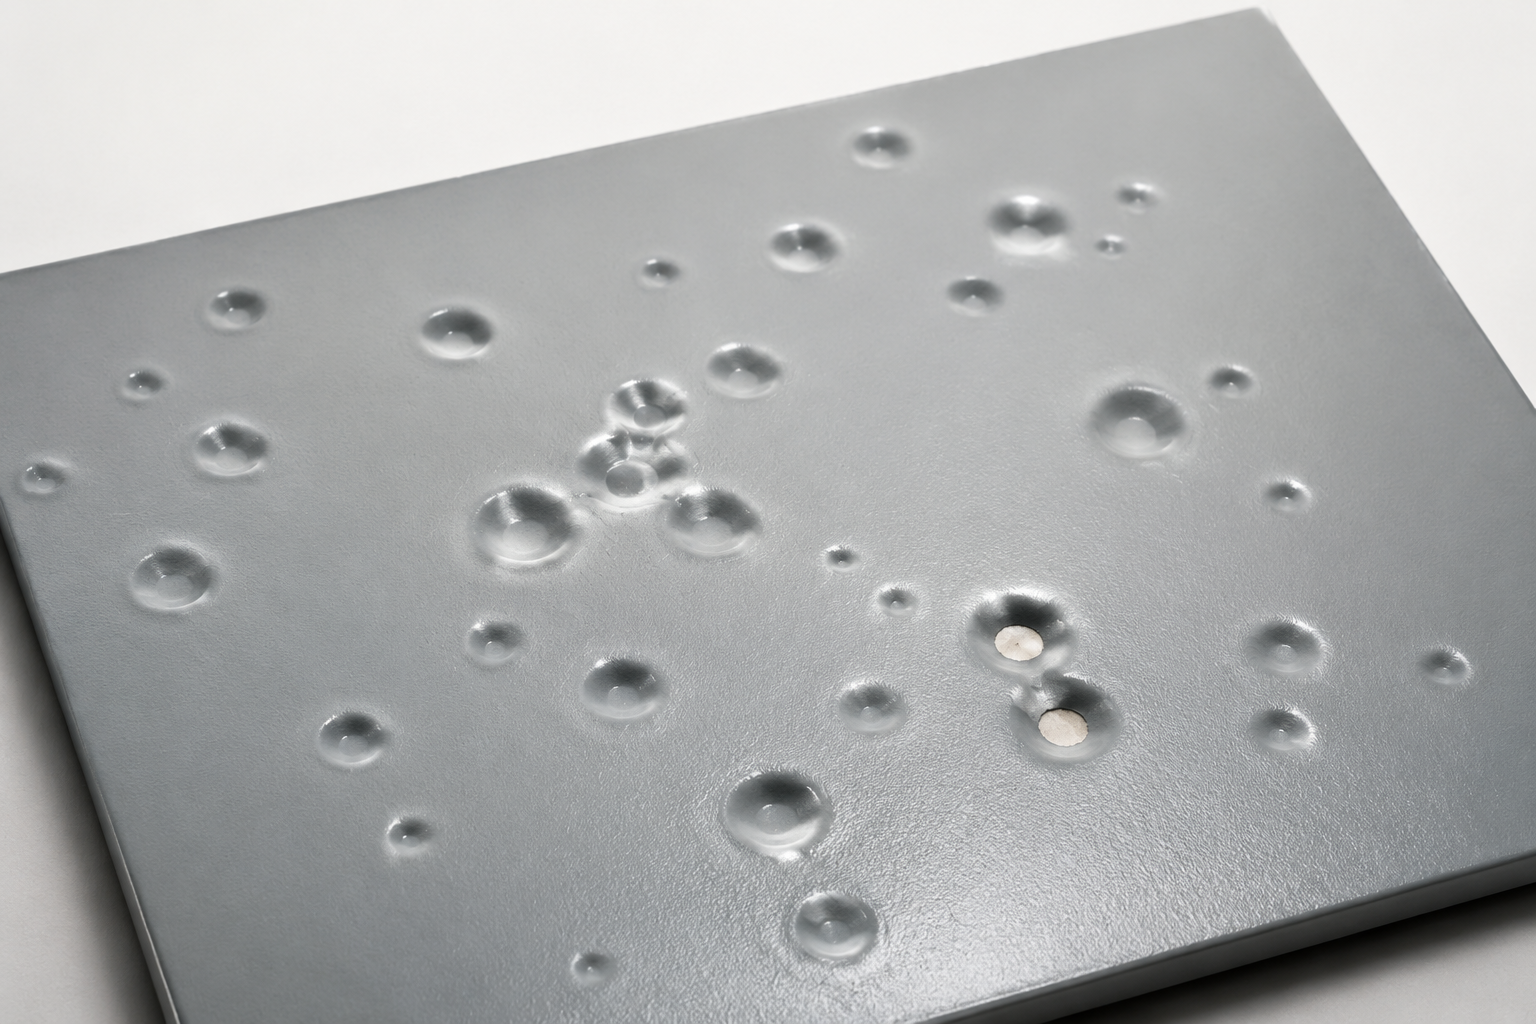
Cratering is the formation of bowl-shaped depressions in a coating film. The depressions may be shallow or deep, isolated or densely clustered, and some may extend through the finish to an underlying coat or substrate. Although fisheyes belong to the broader family of crater-like wetting defects, not every crater is a fisheye—and not every crater is caused by silicone.
What Cratering Looks Like
- Round, oval, or slightly irregular bowl-shaped depressions.
- Smooth or raised rims surrounding a lower center.
- Defects ranging from tiny clustered dimples to larger individual craters.
- Some depressions contained within the topcoat; others exposing primer or substrate.
- A defect pattern that may follow one part, one gun, one material circuit, a porous area, a repair, or an oven zone.
- Appearance in the wet film, during flash, during cure, or after bake—depending on the mechanism.
“Cratering” describes the shape of the defect, not its root cause. A low-surface-energy contaminant can force liquid coating away from a spot. Gas or vapor can disturb a film during cure. Powder incompatibility can create local flow differences. Porous castings, galvanized surfaces, concrete, wood, fillers, and welds can release gas. Pretreatment residue, moisture, corrosion, excessive film build, or electrostatic back-ionization can produce crater-like appearances as well.
Four Major Cause Families
Wetting and Contamination
- Silicone, oil, grease, wax, polish, hand lotion, or release agent.
- Cleaner, detergent, surfactant, rinse-aid, or pretreatment residue.
- Contaminated compressed air, hoses, guns, pumps, pots, or containers.
- Incompatible additive, repair product, undercoat, or maintenance material.
Gas, Vapor, and Porosity
- Outgassing from cast metal, galvanized surfaces, concrete, wood, fillers, or porous repairs.
- Trapped air, moisture, cleaning solvent, or process chemical.
- Solvent release from excessive film build or inadequate flash.
- Rapid heating, high part temperature, or an unsuitable cure profile.
Material and Compatibility
- Cross-contamination between liquid coatings or different powder chemistries.
- Dirty reclaim, mixed powder, degraded material, or exceeded shelf life.
- Incorrect mix ratio, reducer, additive, induction time, or pot life.
- Underlying coating, filler, putty, or sealer not approved for the system.
Application and Cure
- Film thickness above or below the product’s recommended range.
- Poor atomization, excessive wetness, or uneven powder deposition.
- Back-ionization, excessive voltage/current, poor grounding, or short gun distance.
- Incomplete substrate drying, inadequate flash, or incorrect oven schedule.
Cratering Versus Similar Defects
| Condition | Typical Clue | Primary Investigation |
|---|---|---|
| Cratering | Bowl-shaped depressions of varied size and depth; “crater” is a visual description with several possible causes. | Formation timing, crater profile, coating layer, substrate, contamination, material, application, and cure. |
| Fisheyes or cissing | Wet film pulls away from isolated low-energy spots; often round with a clean rim and sometimes a center contaminant. | Silicone, oil, wax, cleaner residue, compressed air, process products, and wetting. |
| Pinholes | Small narrow pores or channels, often without the wider bowl and flowing rim of a crater. | Substrate porosity, entrained air, outgassing, film build, and material condition. |
| Solvent popping | Small ruptures or volcano-like openings appear when volatile material escapes after the film begins setting. | Reducer, film thickness, flash, airflow, part temperature, and bake schedule. |
| Blisters | Raised domes rather than depressions; pressure or adhesion loss exists beneath the film. | Moisture, solvent, gas, osmotic activity, adhesion, cure, and service exposure. |
| Dirt and inclusions | Raised particles or bumps embedded in the film. | Housekeeping, filtration, clothing, material straining, conveyor, oven, and airflow. |
A Practical Diagnostic Sequence
- Preserve representative defects. Photograph them under direct and raking light before sanding or cleaning. Record magnification and scale when used.
- Establish when they formed. Observe a controlled part or panel through application, flash, gel, flow, cure, cooling, and handling.
- Map the pattern. Note relationships to porous areas, welds, seams, repairs, fingerprints, rinse traps, high-film zones, Faraday areas, specific racks, guns, fluid circuits, reclaim, or oven positions.
- Examine the crater profile. Record diameter, depth, rim shape, center condition, exposed layer, and whether the coating appears to have flowed away or ruptured outward.
- Review the substrate history. Trace fabrication, casting, galvanizing, blasting, filling, pretreatment, rinsing, drying, handling, masking, and storage.
- Verify material controls. Confirm the product, batch, storage, shelf life, mix ratio, reducer, additives, induction, pot life, filtration, and reclaim ratio.
- Inspect air and equipment. Check compressed-air quality, filters, dryers, hoses, guns, pumps, pressure pots, hoppers, booths, recovery systems, ovens, and maintenance products.
- Record application and cure. Measure film thickness, part temperature, gun settings, grounding, flash time, oven air temperature, actual metal temperature, and time at temperature.
- Run controlled trials. Change one variable at a time using verified-clean panels and separate equipment or fresh material where practical.
Evidence That Helps Identify the Mechanism
| Observation | What It May Suggest |
|---|---|
| Crater appears immediately in wet liquid coating | Surface-tension difference, contamination, incompatible undercoat, material contamination, or a fisheye-type mechanism. |
| Film looks acceptable until late flash or bake | Solvent, moisture, gas release, excessive film build, rapid surface closure, or cure-profile problem. |
| Defects repeat on castings, porous repairs, welds, or galvanized parts | Substrate outgassing, trapped solution, porosity, corrosion products, or inadequate drying. |
| Only reclaimed or mixed powder produces craters | Cross-contamination, incompatible powder, fines imbalance, degraded material, or dirty recovery equipment. |
| Defects concentrate in high-charge or heavy-film areas | Back-ionization, poor grounding, gun distance, excessive voltage/current, or film-build effects. |
| Only one gun, hose, pot, or pump produces defects | Localized equipment contamination, seal or lubricant problem, dirty fluid path, or air-quality issue. |
Testing and Standards
No single universal test identifies the cause of every coating crater. Useful tools may include optical microscopy, cross-sectional examination, film-thickness measurement, compressed-air quality testing, moisture assessment, oven profiling, controlled panels, laboratory identification of residues, and surface-wettability measurements.
ASTM D7334-08(2022) and ASTM D8597-24 address contact-angle approaches to surface wettability. They can support a properly designed investigation but are not direct cratering ratings and cannot, by themselves, identify silicone or another contaminant.
Corrective Action
First stop the source. Recoating before correcting contamination, trapped moisture, outgassing, material incompatibility, or cure conditions can reproduce the defect and spread contamination through additional equipment.
- Wet liquid film: Follow the coating manufacturer’s instructions. Removal, thorough cleaning, drying, and complete reapplication may be required.
- Cured liquid or powder film: Remove the affected coating to a sound, compatible, verified-clean layer. Repair the substrate and rebuild the system within specified preparation and recoat requirements.
- Porous or outgassing substrates: Use only manufacturer-approved approaches such as preheating, sealing, specialized outgassing-tolerant material, modified cure, or substrate repair.
- Powder incompatibility: Segregate materials, clean the booth and recovery system, control reclaim, and verify the process with fresh powder and clean panels.
- Electrostatic causes: Correct grounding, gun distance, voltage/current, powder output, and film build according to equipment and coating instructions.
Do not automatically add a flow agent, fisheye eliminator, defoamer, outgassing additive, thinner, or extra coating. Additives are chemistry- and layer-specific; an unapproved addition can affect intercoat adhesion, cure, color, gloss, chemical resistance, or future production.
Prevention
- Control oil, grease, silicone, wax, release agents, hand creams, aerosols, and maintenance chemicals throughout the finishing area.
- Maintain pretreatment concentration, temperature, contact time, rinsing, drainage, and drying.
- Use clean finishing air and maintain compressor drains, dryers, separators, coalescing filters, and point-of-use filtration.
- Keep liquid and powder materials, containers, hoses, reclaim systems, booths, and cleaning tools properly segregated.
- Store coatings within published temperature, humidity, shelf-life, and packaging limits.
- Apply within specified film thickness, flash, temperature, and cure ranges.
- Verify grounding and electrostatic settings and avoid excessive deposition in high-charge areas.
- Qualify porous, cast, galvanized, filled, welded, and repaired substrates with representative test panels.
- Record process changes and retain samples so a new defect can be traced quickly.
Powder-Coating Considerations
Powder craters deserve a full-system investigation. TIGER Coatings’ troubleshooting guidance identifies possible contributors including inadequate pretreatment, grease and oil, chemical or corrosion residue, contaminated compressed air, silicone and welding sprays, hand cream, incompatible powders, outgassing, damp parts, unsuitable putty, rough blasting profile, electrostatic back-ionization, and substrate defects. The correct response depends on which mechanism the evidence supports.
When comparing fresh and reclaimed powder, keep application thickness, cure profile, grounding, gun settings, and substrate constant. If fresh powder on a verified-clean panel performs correctly while production reclaim does not, investigate cross-contamination, fines, storage, screening, recovery-system cleanliness, and the supplier’s approved reclaim ratio.
Documentation
Record the part and location; crater size, depth, density, and layer; time of formation; substrate and preparation; coating product and batch; liquid mix or powder-reclaim details; equipment circuit; air quality; film thickness; flash and cure profile; photographs; samples; controlled-panel results; suspected cause; corrective action; and verification results.
Technical References
- TIGER Coatings: Tips & Tricks for Powder Coating—Troubleshooting Guide
- Axalta Coating Systems: Prevent Cratering Technical Bulletin
- PPG Automotive Refinish: Cissing—Causes, Prevention, and Rectification
- ASTM D7334-08(2022): Surface Wettability by Advancing Contact-Angle Measurement
- ASTM D8597-24: Surface Wettability Using Portable Goniometers
Technical notice: This article provides general educational guidance. Always follow the current coating technical data sheet, safety data sheet, project specification, equipment instructions, and applicable environmental and workplace requirements. Qualified inspection or laboratory analysis may be necessary when the cause remains uncertain or failure consequences are significant.
© 2026 Azimuth Spray Systems, LLC. AirSprayTech.com — The Finishing Authority®. All rights reserved.