AirSprayTech.com Academy — Finish Defect Diagnostic Center
Picture Framing in Coatings: Causes, Diagnosis, Correction & Prevention
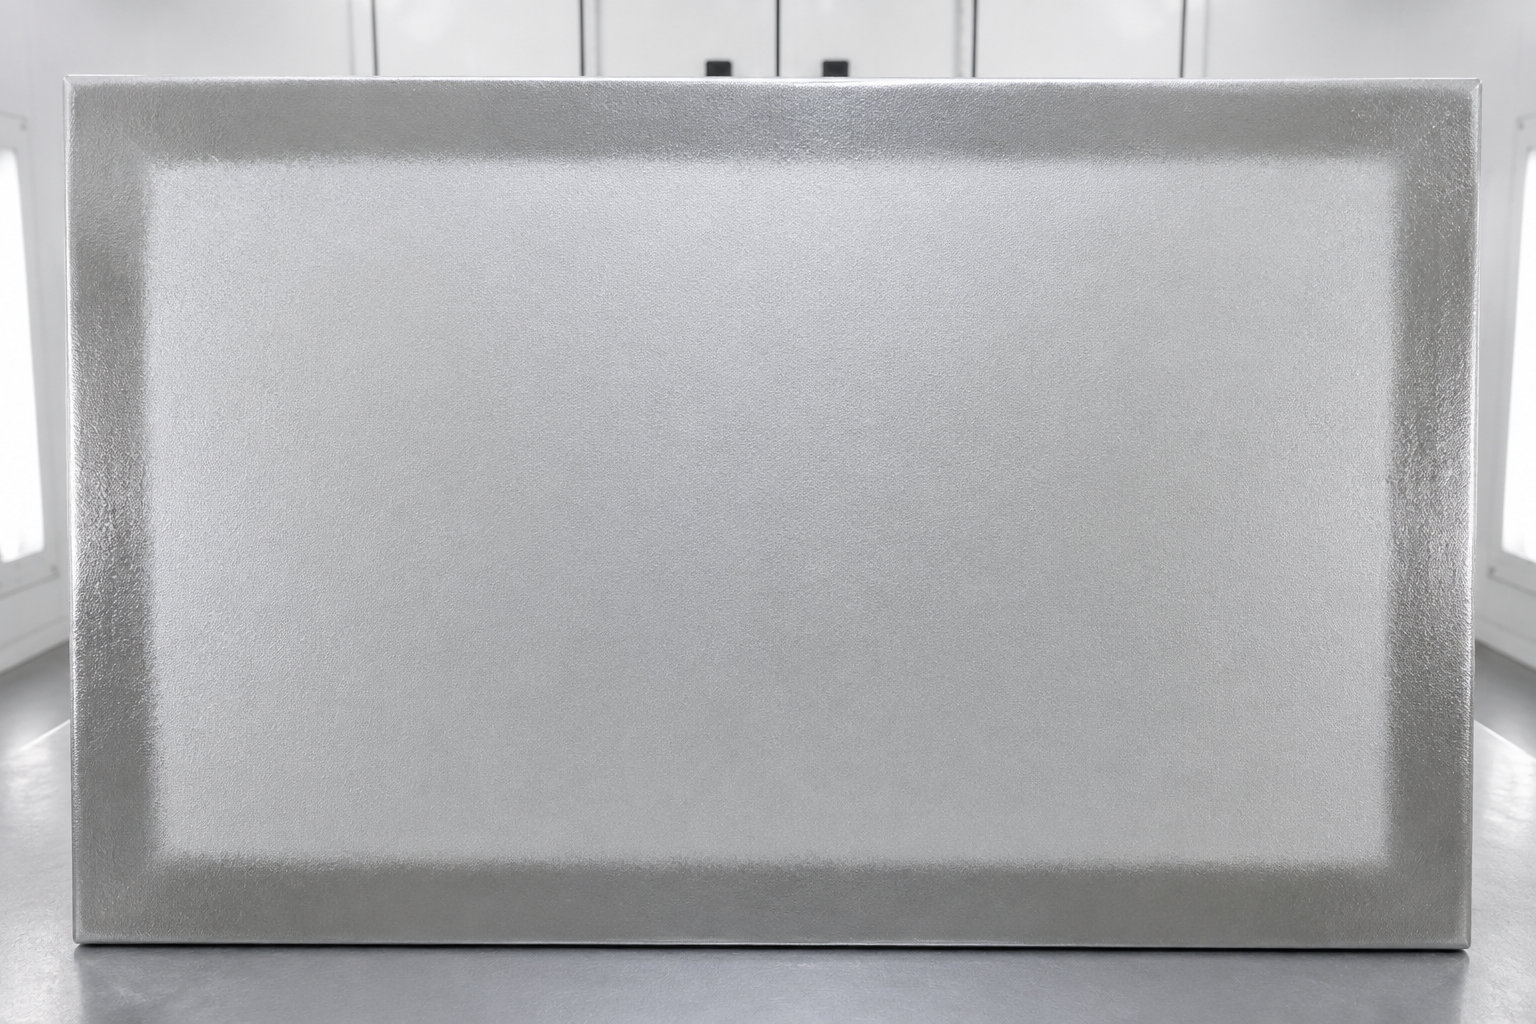
A border around a coating may look deliberate, but it usually points to a difference in application method, film thickness, drying, texture, color, or particle orientation. Learn how to identify the pattern, trace it to the process, and restore a uniform finish.
What Picture Framing Looks Like
The classic pattern is a continuous or nearly continuous band following corners, edges, trim lines, ribs, welds, or the outline of a panel. On a wall, a brushed cut-in may look darker than the rolled center. On a sprayed part, extra edge passes, gun angle, overlap, electrostatic attraction, or metallic-particle orientation can produce a perimeter with different color, gloss, texture, or film build.
Inspect the finish from straight on and from several oblique angles under uniform lighting. A band that changes dramatically with viewing angle often involves gloss, texture, or effect-pigment orientation. A band that remains consistently light or dark may involve hiding, color, substrate influence, or film thickness.
The term is not used identically everywhere. Some technical literature also uses picture framing for liquid coating that retracts from an edge during flow and drying. That condition leaves a thin or exposed edge and is closer to dewetting or crawling. This article concentrates on the more common visible perimeter-band defect; determine which meaning your supplier or specification intends.
Why Picture Framing Happens
Brush-and-Roller Application
- A heavy brush cut-in meets a thinner roller film.
- The cut-in dries before the field is rolled, so the two films do not blend.
- Brush marks and roller stipple reflect light differently.
- The roller stops too far from corners, leaving an unnecessarily wide brushed band.
- Paint is incompletely mixed or material from different containers is not boxed together.
Liquid Spray Application
- Extra passes around edges produce higher film build.
- The painter slows, hesitates, changes gun distance, or arcs the gun at the perimeter.
- A narrow or poorly balanced fan creates unequal deposition.
- Edge passes and field passes receive different overlap or flash time.
- Rebound, turbulent air, or part geometry changes atomization and transfer.
Powder and Electrostatic Application
- Electric-field concentration can increase deposition on prominent outside edges.
- Excess voltage or current, poor gun positioning, or slow edge passes may exaggerate the band.
- Poor grounding destabilizes transfer and makes coverage less predictable.
- Edges may build heavily while adjacent recesses remain light because of Faraday-cage effects.
- Uneven powder flow, reclaim blend, cure, or film thickness can change color and gloss.
Material, Surface, and Environment
- Settling, inadequate agitation, viscosity drift, or pot-life advancement changes application behavior.
- Porosity or primer variation alters absorption, holdout, gloss, and hiding.
- Temperature, airflow, humidity, or flash time differs between edge and field.
- Metallic and pearlescent flakes orient differently with film wetness and spray technique.
- Touch-up material or a later production batch does not match the original finish.
Read the Pattern Before Changing the Process
| Observed Pattern | Likely Direction | What to Check First |
|---|---|---|
| Dark brushed border around a rolled wall | Tool texture, heavier cut-in, or lost wet edge | Cut-in width, roller reach, application sequence, spread rate, and mixing |
| Glossy or smoother perimeter on a sprayed panel | Higher edge film build or wetter edge pass | Gun speed, distance, angle, overlap, triggering, and dry-film-thickness map |
| Metallic shade changes mainly with viewing angle | Flake orientation or uneven wetness | Atomization, reducer, flash, final orientation pass, gun geometry, and booth airflow |
| Heavy powder on outside edges with light adjacent recesses | Electrostatic field concentration and Faraday effect | Ground, voltage/current limit, gun distance, part orientation, powder flow, and air settings |
| Thin, exposed, or pulled-back edge | Dewetting, contamination, surface tension, or excessive flow | Cleanliness, edge condition, film wetness, solvent balance, and product compatibility |
Do Not Confuse It With These Defects
- Poor hiding: Substrate or primer shows through broadly, not only as a perimeter band.
- Mottling or clouding: Irregular light-and-dark patches occur across the field rather than tracking the outline.
- Lap marks: Stripes follow the overlap between passes or roller sections.
- Crawling or edge pull: The wet coating retracts and leaves thin, bare, or sharply defined areas.
- Color mismatch: A repaired section or entire component differs without consistently following its perimeter.
- Runs and sags: Gravity creates curtains, tears, or downward movement rather than a stable border.
How to Investigate Picture Framing
- Preserve the evidence. Photograph the entire area before sanding or recoating. Include identifiers, scale, lighting direction, product, batch, applicator, equipment, settings, environmental readings, and cure history.
- Map the border. Record its width and whether it follows the painter's passes, brush cut-in, part geometry, grounding points, rack orientation, seams, ribs, or substrate transitions.
- Compare appearance. Examine the edge and center under the same illumination and viewing geometry. Measure color and gloss when numerical comparison is needed.
- Compare film build. Take multiple dry-film-thickness readings in the perimeter, transition zone, and center. Do not rely on one reading from each area.
- Review application sequence. Determine whether the perimeter was coated first, last, twice, with another tool, or after it had begun to dry.
- Check material control. Verify batch numbers, mixing, agitation, reduction, viscosity, temperature, pot life, powder condition, reclaim ratio, and specified cure.
- Inspect equipment and setup. Evaluate spray pattern, atomization, fluid delivery, air balance, gun distance, electrostatic settings, grounding, conveyor speed, and booth airflow.
- Run controlled panels. Change one factor at a time. A successful test panel should reproduce the actual substrate, primer, application method, flash, and cure as closely as practical.
Useful Test Methods
There is no single universal standard that declares a coating to have picture framing. Instead, use the project specification and appropriate methods to quantify the difference between the perimeter and center:
- ASTM D2244 provides calculations for color tolerances and color differences from instrumentally measured color coordinates.
- ASTM D523 is the test method for specular gloss. Use the specified geometry and consistent measurement orientation.
- ASTM D7091 covers nondestructive dry-film-thickness measurement for nonmagnetic coatings on ferrous metals and nonmagnetic, nonconductive coatings on nonferrous metals.
These measurements document the symptom; they do not identify the cause by themselves. Compare results with an approved standard, control panel, contract tolerance, product data sheet, and a documented process review. Confirm that each instrument is suitable for the substrate, coating, surface profile, gloss range, and color type being evaluated.
Correcting the Defect
First correct the process condition that created the band. If the coating is still wet, follow the manufacturer's instructions; uncontrolled brushing, rolling, misting, or solvent addition can make appearance and cure worse. Once cured, minor architectural hatbanding may be corrected by uniformly recoating the complete wall or natural break while maintaining a wet edge.
For industrial, automotive, wood, and effect finishes, spot blending can leave another halo. The dependable repair may require cleaning, sanding or other approved preparation, and recoating the complete panel or part with uniform passes. Remove runs, texture, contamination, or excessive film before recoating. Verify intercoat adhesion, maximum recoat interval, film-build limits, cure schedule, and compatibility in the coating manufacturer's instructions.
Preventing Picture Framing
- Thoroughly mix or agitate material and keep settled components uniformly incorporated.
- Maintain a wet edge. On walls, cut in a manageable section and roll the field before the cut-in dries.
- Keep brush cut-ins narrow and bring the roller close to corners without striking adjacent surfaces.
- Use consistent tools, roller nap, spread rate, material batch, reduction, and application pressure.
- Hold spray guns square to the surface at a consistent distance and speed; avoid arcing and hesitation at edges.
- Plan edge and field passes so overlap and total film build remain controlled. If a stripe coat is specified for protection, allow for it in the appearance coat.
- For electrostatic and powder systems, verify clean grounding and optimize voltage, current limit, flow, air, gun distance, and part orientation on representative pieces.
- Control substrate condition, material temperature, booth airflow, flash, and cure.
- Approve the process on a representative test panel before production, especially with metallic, pearlescent, translucent, low-gloss, or high-gloss finishes.
Application-Specific Notes
Architectural coatings: Tool choice and wet-edge control are usually central. Sherwin-Williams describes picture framing as nonuniform color where brushed edges generally appear darker than the rolled field; it identifies differing film build, loss of wet edge, and incomplete mixing among the possible causes.
Automotive, aerospace, rail, and product finishing: Color may be acceptable straight on yet fail at an angle because effect-pigment orientation differs. Standardize gun path, atomization, flash, and any final orientation or control coat.
Protective and lining work: Edge stripe coats may be intentional and necessary for corrosion protection. The question becomes whether the final system meets specified total thickness, appearance, cure, and holiday requirements. Never sacrifice required edge protection merely to hide a visible band.
Powder coating: Diagnose outside-edge buildup and recessed-area starvation together. Lowering one electrostatic setting without checking ground, part geometry, gun path, powder delivery, and cure may move the problem rather than solve it.
Technical References
- Sherwin-Williams: Uneven Color (Picture Framing/Hatbanding)
- American Coatings Association: Automotive Coatings Application Defects
- ASTM D2244: Color Tolerances and Color Differences
- ASTM D523: Specular Gloss
- ASTM D7091: Nondestructive Dry-Film-Thickness Measurement
© 2026 Azimuth Spray Systems, LLC. AirSprayTech.com — The Finishing Authority®. All rights reserved.