AirSprayTech.com Academy — Finish Defect Diagnostic Center
Flaking and Scaling in Coatings: Causes, Diagnosis, Correction & Prevention
When a coating breaks into loose chips, flakes, or plate-like scales, the visible debris is only the final stage. The real investigation begins with the cracks, weak interface, weathering, corrosion, or stress that allowed those pieces to detach.
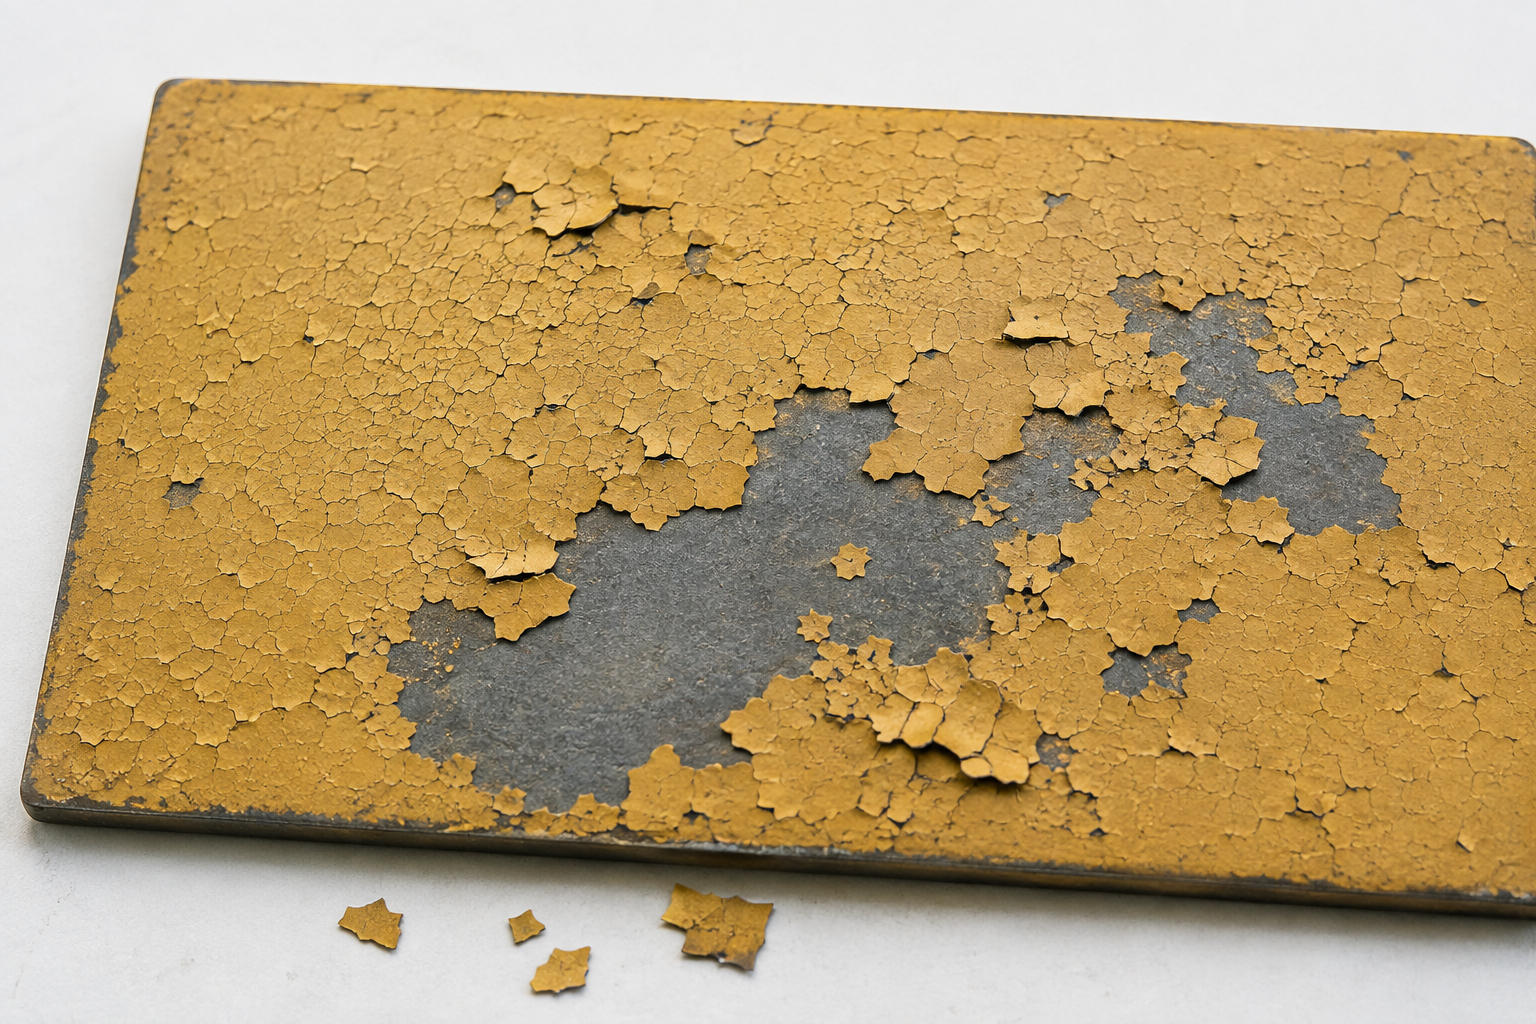
What Flaking and Scaling Look Like
Flakes may be tiny, irregular fragments scattered across a surface or loose pieces forming along cracks and edges. Scales are usually larger and more plate-like. Their edges may curl upward before pieces detach. Failure can be isolated, patterned, or widespread, and it may expose primer, an intermediate coat, a previous finish, bare substrate, or corrosion.
Coating scaling must not be confused with mill scale or rust scale. Mill scale is an oxide layer formed during hot processing of steel. Rust scale is accumulated corrosion product. Either can detach with paint attached and cause apparent coating failure, but the weak plane is then within or beneath the oxide rather than necessarily within the coating.
How the Defect Develops
Flaking commonly represents a progression: the film becomes brittle, stressed, cracked, or poorly bonded; crack edges lift; moisture and contaminants enter; adhesion declines; and traffic, weather, cleaning, vibration, or thermal movement dislodges pieces. Scaling may be the same process at a larger size or greater severity.
Weak Adhesion
- Oil, grease, silicone, wax, dust, salts, moisture, chalk, or cleaning residue remains beneath the coating.
- Surface preparation, anchor profile, pretreatment, or primer selection is inadequate.
- A glossy, aged, contaminated, or incompatible previous coat is recoated.
- The recoat window is exceeded without the required abrasion or treatment.
Cracking and Embrittlement
- Excessive total film thickness increases internal stress.
- A hard coating is applied over a soft, flexible, or moving layer.
- UV exposure, oxidation, heat, cold, chemical attack, or aging reduces flexibility.
- Incorrect mix ratio, cure, plasticizer loss, or repeated thermal cycling makes the film brittle.
Moisture and Corrosion
- Water enters through cracks, holidays, seams, edges, porous substrates, or from behind the coating.
- Underfilm corrosion expands and lifts pieces of coating.
- Soluble salts attract moisture and accelerate loss of adhesion.
- Freeze-thaw action, wet-dry cycling, immersion, or hydrostatic pressure increases damage.
Mechanical and Substrate Movement
- Impact, abrasion, flexing, vibration, pressure washing, or scraping breaks an already weakened film.
- Wood checking, concrete cracking, joints, welds, and dissimilar materials transfer movement into the coating.
- Weak plaster, concrete laitance, degraded wood, rust scale, or old coating detaches with the finish.
- Sharp edges and poor design concentrate stress and allow moisture entry.
Read the Pieces and the Exposed Surface
| Observation | Likely Direction | What to Check |
|---|---|---|
| Fine flakes develop from a network of cracks | Aging, brittleness, excessive build, incompatible layers, or repeated movement | Film thickness, layer sequence, flexibility, weathering, cure, and crack depth |
| Large scales detach with rust on their backs | Underfilm corrosion or failure of rust/mill scale | Surface preparation, oxide condition, salts, moisture entry, holidays, and corrosion pattern |
| Topcoat flakes but sound primer remains | Intercoat adhesion or topcoat embrittlement | Recoat window, contamination, sanding, compatibility, cure, and topcoat thickness |
| All coating layers detach to bare substrate | Substrate-interface failure | Cleanliness, profile, pretreatment, primer, moisture, salts, and delay after preparation |
| Concrete, wood, plaster, or old paint remains on the back | Cohesive failure of a weak substrate or underlying layer | Substrate soundness and whether the remaining surface can support a repair system |
| Damage concentrates at edges, seams, cracks, or joints | Stress concentration and moisture entry | Design, movement, edge coverage, stripe coat, sealants, drainage, and detailing |
Flaking Versus Similar Defects
- Peeling: Coating typically lifts in broader flexible strips, curls, or sheets. Flaking produces smaller discrete pieces.
- Delamination: Separation occurs at a defined layer interface; delamination may ultimately appear as either peeling or flaking.
- Cracking and checking: The film is split but pieces may still be attached. Flaking begins when those pieces release.
- Mud cracking: Deep irregular cracks usually form during drying of an excessively thick or rapidly dried film; later detachment may create flakes.
- Chalking: Loose powder forms on the surface as binder degrades. Chalking does not initially produce intact chips.
- Erosion: Film wears away gradually rather than separating as recognizable pieces.
- Rust or mill scale: Oxide fragments are substrate products, although coating may remain attached to them.
How to Inspect the Failure
- Do not disturb it immediately. Photograph the overall distribution and representative details before scraping, cleaning, or collecting samples.
- Describe size and frequency. Record whether the defect consists of fine flakes, medium chips, or large scales and estimate the affected area using the required standard.
- Map the pattern. Note connections to sunlight, moisture paths, elevations, repairs, edges, welds, joints, substrate types, production batches, or service zones.
- Examine both faces. Collect representative pieces. Compare the outward face, fracture edge, and back under magnification. Identify any primer, old coating, rust, substrate, deposits, or corrosion products attached.
- Determine the failure plane. Establish whether fracture is within a coating, between coats, at the substrate, or within a weak substrate or oxide layer.
- Measure the system. Where applicable, document individual and total dry-film thickness, crack depth, surface profile, corrosion, moisture, and soluble contamination.
- Reconstruct history. Review products, batches, preparation, environmental readings, application, flash, recoat intervals, cure, exposure, maintenance, cleaning, and previous repairs.
- Compare sound areas. Use controls and qualified laboratory examination when the failure mechanism remains uncertain.
Standards for Rating Flaking
- ASTM D772 — Standard Test Method for Evaluating Degree of Flaking (Scaling) of Exterior Paints. Use its reference method to rate the extent and size of visible flaking within the standard's scope.
- ISO 4628-5:2022 — Paints and varnishes: assessment of degree of flaking. It addresses evaluation of the quantity and size of defects.
- ASTM D3359 — Rating Adhesion by Tape Test. It may be useful for compatible, intact test areas when specified, but visibly loose coating already demonstrates failure.
- ASTM D4541 — Pull-Off Strength of Coatings Using Portable Adhesion Testers. Record the fracture plane and all required test parameters.
ASTM D772 and ISO 4628-5 describe the visible degree of flaking; they do not determine root cause. Adhesion results likewise depend on method, substrate, preparation, equipment, and the plane that fractures. Use the edition and acceptance criteria required by the project specification.
Correcting Flaking and Scaling
Do not coat over loose flakes or scales. New material will be bonded to debris rather than to a sound surface. Determine the extent of weak coating and substrate first, then remove defective material to a firmly attached boundary using an approved method and appropriate containment.
Correct moisture, corrosion, salts, contamination, weak substrate, incompatible layers, excess film build, movement, and environmental or cure problems. Prepare the exposed surface to the specified cleanliness and profile. Feather remaining sound edges only where permitted, then rebuild the required system within its application, recoat, thickness, and cure limits.
If deterioration is widespread, spot repair may leave islands of aged coating surrounded by new material. Complete removal and replacement may be more reliable. Critical structures, linings, roofs, floors, pipelines, rail equipment, aircraft, marine assets, and containment systems require an approved written repair procedure.
Preventing the Defect
- Remove contamination, chalk, corrosion, rust scale, mill scale, laitance, weak paint, and unsound substrate to the specified condition.
- Establish the correct surface profile and apply the designated primer before prepared surfaces degrade.
- Use compatible coating layers with sufficient flexibility, weathering resistance, chemical resistance, and thermal capability for service.
- Control wet and dry film thickness; excessive build can increase internal stress and cracking.
- Follow mix ratio, induction, pot life, flash, recoat, and cure requirements.
- Control moisture migration, leaks, condensation, drainage, and substrate dryness.
- Protect edges, welds, seams, fasteners, joints, and difficult geometry as required.
- Account for substrate movement and avoid placing a rigid coating over a flexible or unstable layer.
- Inspect and maintain early cracks, impact damage, and holidays before water and corrosion spread beneath the film.
- Document baseline condition and periodically rate exposed coatings so progression can be tracked.
Application-Specific Clues
Architectural surfaces: Moisture, aged brittle films, chalk, glossy old paint, incompatible layers, weak plaster, and wood movement commonly contribute. Old coatings may contain lead or other hazardous material; assess and control the hazard before disturbing them.
Protective steel coatings: Determine whether coating detached from properly prepared steel or remained attached to rust or mill scale that released. Edge breakdown, soluble salts, underfilm corrosion, and excessive accumulated maintenance coats deserve close attention.
Concrete floors, roofs, and masonry: Flakes may carry weak cement paste, laitance, old coating, or roofing material. Moisture, movement, UV, traffic, chemicals, and substrate soundness can act together.
OEM, transportation, powder, aerospace, and rail: Pretreatment, film build, cure profile, contamination, intercoat compatibility, forming, impact, vibration, thermal cycling, and rework history help distinguish process failure from service damage.
Technical References
- ASTM D772: Evaluating Degree of Flaking (Scaling) of Exterior Paints
- ISO 4628-5:2022: Assessment of Degree of Flaking
- Sherwin-Williams: How to Fix Flaking, Cracking, and Peeling Paint
- American Coatings Association: Weathering and Field Defects
© 2026 Azimuth Spray Systems, LLC. AirSprayTech.com — The Finishing Authority®. All rights reserved.