AirSprayTech.com Academy
When Paint Pulls Away: Diagnosing Coating Crawl
Finish Defect Diagnostic Center
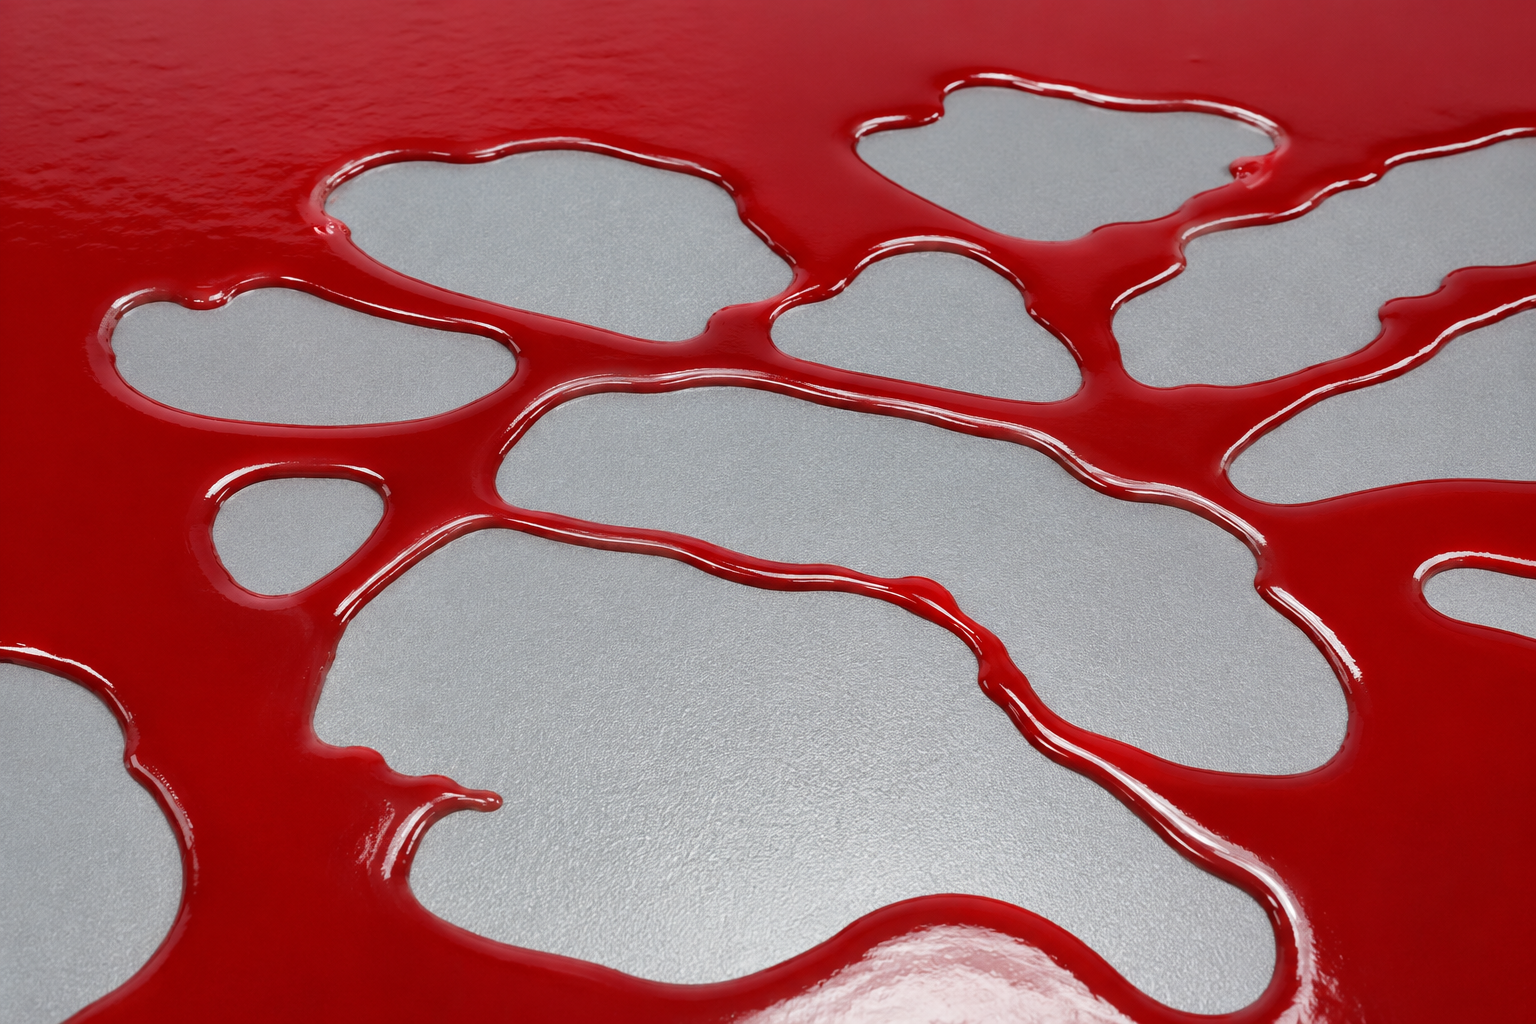
Crawling is severe wet-film retraction. A coating may initially spread across the surface and then pull away, leaving broad irregular islands, bare areas, edge retraction, or thick connected pools. The defect occurs when the liquid coating cannot maintain stable contact with the substrate or previous coat. In practical terms, the coating's cohesive forces overcome its ability to wet and adhere to the surface while it is still liquid.
What Crawling Looks Like
- Broad exposed islands surrounded by retracted coating.
- Irregular web-like patterns and interconnected pools.
- Coating pulled away from edges, seams, repaired areas, or an entire panel.
- Thick rounded borders where the liquid collected after moving.
- A defect that appears during application or soon afterward, before cure.
Crawling is also called severe dewetting, retraction, edge pull, or poor wetting. Terminology varies among automotive, industrial, architectural, printing, floor, and specialty-coating operations. The important evidence is that coverage was lost because the wet film moved away from part of the surface.
Why Wetting Matters
A liquid coating must displace air at the surface, spread, and remain spread long enough to form a continuous film. Application force from a spray gun, roller, brush, dip tank, or flow coater may temporarily force material across a difficult surface. Once that force is gone, unfavorable surface and interfacial forces can cause the film to retract. Surface contamination, low substrate surface energy, incompatible layers, or problems within the coating can disturb that balance.
Common Causes
Surface Contamination
- Silicone, oil, grease, wax, mold release, polish, hydraulic fluid, or lubricant.
- Soap, detergent, surfactant, cleaner, or rinse residue.
- Hand cream, fingerprints, tape adhesive, plasticizer, or dirty wiping materials.
Surface Condition
- Low-energy plastic or another difficult-to-wet substrate.
- Overly smooth, glossy, or improperly prepared previous coating.
- Moisture, condensation, dust, overspray, or incomplete pretreatment.
Material Compatibility
- Incompatible primer, topcoat, additive, reducer, cleaner, or repair product.
- Wrong mix ratio, over-reduction, or an unapproved additive.
- Contaminated coating, circulation system, reclaim, container, or mixing equipment.
Application Environment
- Oil or water from compressed air and spray equipment.
- Silicone-containing products, aerosols, lubricants, or maintenance activity nearby.
- Temperature, humidity, airflow, or flash conditions outside product limits.
Read the Pattern
| Observed Pattern | Investigate First |
|---|---|
| Large areas retract across the whole part | Overall surface preparation, low-energy substrate, wrong cleaner, incompatible coating, or contaminated material. |
| Defect follows fingerprints or wiping paths | Handling, gloves, hand products, wipe quality, cleaning method, and evaporation of cleaner. |
| Crawling occurs only on plastic or rubber | Surface energy, mold release, plasticizer, flame/plasma treatment, and specified adhesion promoter. |
| Only one gun, pot, pump, or line is affected | Equipment oil, dirty fluid path, hose condition, lubricant, cleaning residue, and material cross-contamination. |
| Failure occurs around seams or fasteners | Trapped oil, cleaner, pretreatment residue, sealant, lubricant, or moisture emerging from joints. |
| One shift or maintenance period is affected | New chemical, aerosol, polish, conveyor lubricant, filter work, housekeeping, or nearby silicone use. |
| Topcoat crawls but primer did not | Intercoat contamination, primer cure, sanding residue, recoat window, and primer-topcoat compatibility. |
Do Not Confuse It with Another Defect
| Condition | Typical Distinction |
|---|---|
| Crawling | Broad wet-film retraction leaves large bare islands and thick connected borders. |
| Fisheyes or cissing | Smaller, usually circular depressions surrounding localized contamination; a speck may be visible at the center. |
| Cratering | Bowl-shaped depressions formed by localized flow disturbance; they may not expose broad interconnected areas. |
| Poor hiding | Coating remains continuous but the substrate shows through because opacity or film build is insufficient. |
| Runs and sags | Coating moves downward under gravity and accumulates; crawling retracts away from areas because of wetting instability. |
| Edge pull | Retraction concentrated at sharp edges; it can be a localized form of dewetting and may accompany broader crawling. |
| Delamination | A cured film separates after formation; crawling occurs while the coating is still liquid. |
A Practical Investigation
- Preserve the first failed part. Photograph the wet defect if safe and record how quickly it formed. Do not wipe away the evidence before sampling.
- Map the pattern. Mark parts, faces, edges, racks, guns, operators, shifts, material batches, and process stages.
- Review recent changes. Ask about cleaners, wipes, lubricants, sealants, polishes, hand products, maintenance aerosols, filters, hoses, additives, reclaimed material, and housekeeping.
- Inspect compressed air and equipment. Check separators, coalescing filters, dryers, drains, piping, hoses, regulators, guns, pumps, pots, and cleaning procedures.
- Verify preparation. Confirm wash stages, concentration, rinse quality, conductivity where applicable, drying, sanding, dust removal, and handling.
- Confirm the coating system. Record product and batch numbers, mix ratio, induction, pot life, reducer, viscosity, material temperature, and compatibility of every layer.
- Check the affected layer. Determine whether retraction began on bare substrate, pretreatment, primer, old finish, or a newly contaminated intercoat.
- Run controlled panels. Use known-clean reference panels and representative production substrates. Change one suspected variable at a time.
- Escalate identification when needed. Laboratory surface analysis may be required when trace silicone, oil, surfactant, plasticizer, or another unknown contaminant is suspected.
Testing and Standards
There is no single universal jobsite test that identifies the cause of crawling. A water-break observation can reveal some surface contamination on suitable metals, but surfactants can sometimes create misleading results, and the method is not appropriate for every substrate. Clean test panels, contact-angle measurements, dyne solutions or pens used with proper training, surface spectroscopy, and laboratory contamination analysis may contribute.
ASTM D7490 addresses measurement of surface tension of solid coatings, substrates, and pigments using contact-angle measurements. It is a controlled measurement requiring proper equipment and interpretation; it does not by itself identify a contaminant or guarantee that a production coating will remain wetted.
Correcting Crawling
- Stop application and isolate affected material, equipment, and parts until the source is understood.
- Remove the failed coating completely from the affected area. Adding another wet coat rarely solves an unstable or contaminated interface.
- Clean and prepare the surface using the coating manufacturer's approved procedure. Replace contaminated wipes, solvents, filters, or process solutions.
- Remove or isolate incompatible layers and correct the equipment or environmental source.
- Reapply the complete approved coating system to a verification panel or part before restarting production.
- Where film continuity is critical, repeat specified thickness, adhesion, holiday, cure, or other acceptance inspections after repair.
Prevention
- Keep silicone polishes, sprays, lubricants, and unapproved aerosols away from coating and preparation areas.
- Use only approved cleaners, wipes, pretreatments, reducers, additives, and compatible coating layers.
- Clean before sanding when oily or waxy contamination may be present, then clean again as specified.
- Do not allow cleaner to evaporate and redeposit contamination when the procedure requires wipe-on/wipe-off cleaning.
- Control gloves, hand creams, masking, adhesives, mold releases, conveyor lubricants, and maintenance products.
- Maintain clean, dry compressed air and dedicated fluid equipment where cross-contamination is possible.
- Verify preparation and surface treatment for low-energy plastics and other difficult substrates.
- Respect recoat windows and keep prepared surfaces protected until coating.
- Use clean reference panels and a documented process window after material, chemical, or maintenance changes.
Application Notes
Automotive and industrial liquid finishing: silicone, oil, wax, dirty air, cleaner residue, and incompatible undercoats are frequent suspects. Trace contamination can travel through shared air, equipment, clothing, or shop activity.
Plastics and composites: mold release and low surface energy demand the specified cleaning and activation process. A surface may look clean yet remain difficult to wet.
Floors, roofs, and protective linings: oil, curing compound, soap, moisture, dust, previous sealers, and chemical residues can cause broad dewetting. Correct surface preparation must match the substrate and service.
Powder coating: conventional powder does not form a liquid film during spray, but retraction and crater-like defects may develop during melt. Investigate substrate contamination, silicone, oil, powder incompatibility, reclaim, pretreatment, film build, and cure conditions.
What to Document
Record photographs, time of formation, exposed-area size and pattern, substrate and affected layer, preparation steps, cleaners and process chemistry, recent maintenance, compressed-air and equipment condition, material and batch numbers, mixing and reduction, environmental conditions, test-panel results, laboratory findings, corrective action, and verification results. Separate confirmed evidence from suspected sources.
Technical References
- American Coatings Association: Film Dewetting, Crawling, and Edge Retraction
- PPG Automotive Refinish: Cissing and Surface-Tension Contamination
- Sherwin-Williams: Liquid Coatings Troubleshooting Guide
- ASTM D7490: Surface Tension Using Contact-Angle Measurements
Technical notice: This article provides general educational guidance. Follow the coating manufacturer's current product data sheet, safety data sheet, approved repair procedure, project specification, and applicable safety and environmental requirements.
Return to the Finish Defect Diagnostic Center
© 2026 Azimuth Spray Systems, LLC. AirSprayTech.com — The Finishing Authority®. All rights reserved.